Andorid之所以是分区,是因为各自有对应的功能和用途的考量,可以进行单独读写和格式化。
Android 设备包含两类分区:
一类是启动分区,对启动过程至关重要。
一类是用户分区,用于存储与启动无关的信息。
启动分区
boot 分区
一般的嵌入式Linux的设备中.bootloader,内核,根文件系统被分为三个不同分区。在Android做得比较复杂,从这个手机分区和来看,这里boot分区是把内核和[ramdisk file]file&search_source=Entity&hybrid_search_source=Entity&hybrid_search_extra={"sourceType"%3A"answer"%2C"sourceId"%3A196267472})的根文件系统打包在一起了,是编译生成boot.img来烧录的。
如果没有这个分区,手机通常无法启动到安卓系统。只有必要的时候,才去通过Recovery软件擦除(format)这个分区,一旦擦除,设备只有再重新安装一个新的boot分区,可以通过安装一个包含boot分区的ROM来实现,否则无法启动安卓系统。
标准分区
system 分区。此分区包含 Android 框架。
这里是挂载到/system目录下的分区。这里有 /system/bin 和 /system/sbin 保存很多系统命令。它是由编译出来的system.img来烧入。
相当于你电脑的C盘,用来放系统。这个分区基本包含了整个安卓操作系统,除了内核(kernel)和ramdisk。包括安卓用户界面、和所有预装的系统应用程序。擦除这个分区,会删除整个安卓系统。你可以通过进入Recovery程序或者bootloader程序中,安装一个新ROM,也就是新安卓系统。
odm 分区
此分区包含原始设计制造商 (ODM) 对系统芯片 (SoC) 供应商板级支持包 (BSP) 的自定义设置。利用此类自定义设置,ODM 可以替换或自定义 SoC 组件,并在硬件抽象层 (HAL) 上为板级组件、守护程序和 ODM 特定的功能实现内核模块。此分区是可选的;通常情况下,它用于存储自定义设置,以便设备可以针对多个硬件 SKU 使用单个供应商映像。如需了解详情,请参阅 ODM 分区。
recovery 分区。
recovery 分区即恢复分区,在正常分区被破坏后,仍可以进入这一分区进行备份和恢复.我的理解是这个分区保存一个简单的OS或底层软件,在Android的内核被破坏后可以用bootloader从这个分区引导进行操作。
这个分区可以认为是一个boot分区的替代品,可以是你的手机进入Recovery程序,进行高级恢复或安卓系统维护工作。
cache 分区。
它将挂载到 /cache 目录下。这个分区是安卓系统缓存区,保存系统最常访问的数据和应用程序。擦除这个分区,不会影响个人数据,只是删除了这个分区中已经保存的缓存内容,缓存内容会在后续手机使用过程中重新自动生成。
userdata 分区
此分区包含用户安装的应用和数据,包括自定义数据。它将挂载到 /data 目录下, 它是由编译出来的userdata.img来烧入。
这个分区也叫用户数据区,包含了用户的数据:联系人、短信、设置、用户安装的程序。擦除这个分区,本质上等同于手机恢复出厂设置,也就是手机系统第一次启动时的状态,或者是最后一次安装官方或第三方ROM后的状态。在Recovery程序中进行的“data/factory reset ”操作就是在擦除这个分区。
vendor 分区
此分区包含所有无法分发给 AOSP 的二进制文件。如果设备不包含专有信息,则可以忽略此分区。
radio 分区
此分区包含无线装置映像,只有包含无线装置且在专用分区中存储无线装置专用软件的设备才需要此分区。
查看分区大小
cat /proc/partitionsmajor minor #blocks name179 0 153672 mmcblk0179 1 104 mmcblk0p1179 2 124 mmcblk0p2179 3 140 mmcblk0p3179 4 208 mmcblk0p4179 5 892 mmcblk0p5259 4 2040 mmcblk0p12259 5 124 mmcblk0p13259 6 30700 mmcblk0p14259 7 4060 mmcblk0p15259 8 8900 mmcblk0p16259 9 8100 mmcblk0p17259 10 13186048 mmcblk0p18179 16 406 mmcblk0boot1179 8 496 mmcblk0boot0第一个mmcblk0为emmc的块设备,大小为15388672 KB。
emmc : Embedded Multi Media Card : 内嵌式存储器标准规格。
是MMC协会订立、主要针对手机或平板电脑等产品的内嵌式存储器标准规格。NAND Flash+闪存控制芯片+标准接口封装。内置存储器的基础上,又额外加了一个控制芯片,最后再以统一的方式封装,并预留一个标准接口,以便手机客户拿来直接使用。
ls -l /dev/block/platform/soc/by-namelrwxrwxrwx root root 2019-03-13 16:38 baseparam -> /dev/block/mmcblk0p5lrwxrwxrwx root root 2019-03-13 16:38 bootargs -> /dev/block/mmcblk0p2lrwxrwxrwx root root 2019-03-13 16:38 cache -> /dev/block/mmcblk0p17lrwxrwxrwx root root 2019-03-13 16:38 deviceinfo -> /dev/block/mmcblk0p4lrwxrwxrwx root root 2019-03-13 16:38 fastboot -> /dev/block/mmcblk0p1lrwxrwxrwx root root 2019-03-13 16:38 fastplay -> /dev/block/mmcblk0p9lrwxrwxrwx root root 2019-03-13 16:38 fastplaybak -> /dev/block/mmcblk0p10lrwxrwxrwx root root 2019-03-13 16:38 kernel -> /dev/block/mmcblk0p11lrwxrwxrwx root root 2019-03-13 16:38 logo -> /dev/block/mmcblk0p7lrwxrwxrwx root root 2019-03-13 16:38 logobak -> /dev/block/mmcblk0p8lrwxrwxrwx root root 2019-03-13 16:38 misc -> /dev/block/mmcblk0p12lrwxrwxrwx root root 2019-03-13 16:38 pqparam -> /dev/block/mmcblk0p6lrwxrwxrwx root root 2019-03-13 16:38 qbboot -> /dev/block/mmcblk0p13lrwxrwxrwx root root 2019-03-13 16:38 qbdata -> /dev/block/mmcblk0p14lrwxrwxrwx root root 2019-03-13 16:38 recovery -> /dev/block/mmcblk0p3lrwxrwxrwx root root 2019-03-13 16:38 system -> /dev/block/mmcblk0p16lrwxrwxrwx root root 2019-03-13 16:38 trustedcore -> /dev/block/mmcblk0p15lrwxrwxrwx root root 2019-03-13 16:38 userdata -> /dev/block/mmcblk0p18可以看到 UserData 对应的分区是 mmcblk0p18 大小为 13186048KB = 12877 M = 12.5 G
在android中,device里面的BroadConfig.mk中可以修改userdata的大小,注意这里面的单位为字节。
TARGET_USERIMAGES_USE_EXT4 := trueBOARD_SYSTEMIMAGE_PARTITION_SIZE := 838860800BOARD_USERDATAIMAGE_PARTITION_SIZE := 135013152BOARD_CACHEIMAGE_PARTITION_SIZE := 838860800BOARD_CACHEIMAGE_FILE_SYSTEM_TYPE := ext4BOARD_FLASH_BLOCK_SIZE := 4096BOARD_HAVE_BLUETOOTH := trueStorageManager
在Android系统中,常用的存储介质是Nand Flash。系统的二进制镜像、Android的文件系统等通常都保存在Nand Flash 中。
Nand-flash存储器是flash存储器的一种,Nand-flash存储器具有容量较大,改写速度快等优点,适用于大量数据的存储,因而在业界得到了越来越广泛的应用,如嵌入式产品中包括数码相机、MP3随身听等。
StorageManager用来管理外部存储上的数据安全,
android.os.storage.StorageManager.getSystemService(Contxt.STORAGE_SERVICE)们 可以通过这个服务获取Android设备上的所有存储设备。 系统提供了 StorageManager 类,它有一个方法叫getVolumeList(),这个方法的返回值是一个StorageVolume数组,StorageVolume类中封装了挂载路径,挂载状态,以及是否可以移除等信息。
DeviceStorageMonitorService
DeviceStorageMonitorService和DeviceStorageManagerService是一个东西,只是在5.0以后,名字改为了DeviceStorageMonitorService。
简介
Device storage monitor module is composed of device monitor service (Google default)The purposes of device storage monitor service are monitoring device storage status and handling low storage conditions.
服务的添加
// Create the system service manager.mSystemServiceManager = newSystemServiceManager(mSystemContext);...mSystemServiceManager.startService(DeviceStorageMonitorService.class);通过SystemServiceManager的startService方法启动了DSMS,看一下这个startService方法做了什么:
public SystemService startService(String className) {final Class<SystemService> serviceClass;try { serviceClass = (Class<SystemService>)Class.forName(className); }...return startService(serviceClass);}public <T extendsSystemService> T startService(Class<T> serviceClass) { ...final T service;try { Constructor<T> constructor = serviceClass.getConstructor(Context.class); service = constructor.newInstance ...// 注册到ServiceManager中 mServices.add(service);try { service.onStart();//启动服务 } ...}其实就是用过反射获取实例,然后将Service注册添加到ServiceManager中, 最后调用了DSMS的onStart方法,那接下来就看看DSMS的构造方法 以及 onStart方法。
publicDeviceStorageMonitorService(Context context) {super(context); // 初始化HandlerThread后台线程,做check() mHandlerThread = newHandlerThread(TAG, android.os.Process.THREAD_PRIORITY_BACKGROUND); mHandlerThread.start(); mHandler = newHandler(mHandlerThread.getLooper()) {@OverridepublicvoidhandleMessage(Message msg) {switch (msg.what) {case MSG_CHECK: check();return; } } };}@OverridepublicvoidonStart() {finalContextcontext= getContext();//获取通知服务,发送通知 mNotifManager = context.getSystemService(NotificationManager.class);//cacheFile通知 mCacheFileDeletedObserver = newCacheFileDeletedObserver(); mCacheFileDeletedObserver.startWatching();// Ensure that the notification channel is set upPackageManagerpackageManager= context.getPackageManager();//addService到BinderService,也添加到LocalService publishBinderService(SERVICE, mRemoteService); publishLocalService(DeviceStorageMonitorInternal.class, mLocalService);//开始check()// Kick off pass to examine storage state mHandler.removeMessages(MSG_CHECK); mHandler.obtainMessage(MSG_CHECK).sendToTarget(); }DeviceStorageMonitorInternal提供的接口
//内部服务提供check():检测接口 //isMemoryLow:是否LowStorage //getMemoryLowThreshold:data的低存储值privatefinalDeviceStorageMonitorInternalmLocalService=newDeviceStorageMonitorInternal() {@Override//发送Msg触发Handler,check()publicvoidcheckMemory() {// Kick off pass to examine storage state mHandler.removeMessages(MSG_CHECK); mHandler.obtainMessage(MSG_CHECK).sendToTarget(); }//data分区可使用空间<500M@OverridepublicbooleanisMemoryLow() {return Environment.getDataDirectory().getUsableSpace() < getMemoryLowThreshold(); }//500M,具体项目在看@OverridepubliclonggetMemoryLowThreshold() {return getContext().getSystemService(StorageManager.class) .getStorageLowBytes(Environment.getDataDirectory()); } };check() /data分区
@WorkerThreadprivatevoidcheck() {finalStorageManagerstorage= getContext().getSystemService(StorageManager.class);finalintseq= mSeq.get();//本地打印只有/data目录// Check every mounted private volume to see if they're low on spacefor (VolumeInfo vol : storage.getWritablePrivateVolumes()) {finalFilefile= vol.getPath();finallongfullBytes= storage.getStorageFullBytes(file);finallonglowBytes= storage.getStorageLowBytes(file);//500M// Automatically trim cached data when nearing the low threshold;// when it's within 150% of the threshold, we try trimming usage// back to 200% of the threshold.if (file.getUsableSpace() < (lowBytes * 3) / 2) {finalPackageManagerServicepms= (PackageManagerService) ServiceManager .getService("package");//lowBytes的1.5倍容量时触发freeStoragetry { pms.freeStorage(vol.getFsUuid(), lowBytes * 2, 0); } catch (IOException e) { Slog.w(TAG, e); } }// Send relevant broadcasts and show notifications based on any// recently noticed state transitions.finalUUIDuuid= StorageManager.convert(vol.getFsUuid());finalStatestate= findOrCreateState(uuid);finallongtotalBytes= file.getTotalSpace();//data总大小finallongusableBytes= file.getUsableSpace();//可使用大小intoldLevel= state.level;int newLevel;//判断是LEVEL_LOW,LEVEL_FULL还是LEVEL_NORMALif (mForceLevel != State.LEVEL_UNKNOWN) {// When in testing mode, use unknown old level to force sending// of any relevant broadcasts. oldLevel = State.LEVEL_UNKNOWN; newLevel = mForceLevel; } elseif (usableBytes <= fullBytes) { newLevel = State.LEVEL_FULL; } elseif (usableBytes <= lowBytes) { newLevel = State.LEVEL_LOW; } elseif (StorageManager.UUID_DEFAULT.equals(uuid) && !isBootImageOnDisk() && usableBytes < BOOT_IMAGE_STORAGE_REQUIREMENT) { newLevel = State.LEVEL_LOW; } else { newLevel = State.LEVEL_NORMAL; }// Log whenever we notice drastic storage changesif ((Math.abs(state.lastUsableBytes - usableBytes) > DEFAULT_LOG_DELTA_BYTES) || oldLevel != newLevel) {//log EventLogTags.writeStorageState(uuid.toString(), oldLevel, newLevel, usableBytes, totalBytes); state.lastUsableBytes = usableBytes; }//发送通知 updateNotifications(vol, oldLevel, newLevel);//发送广播 updateBroadcasts(vol, oldLevel, newLevel, seq); state.level = newLevel; }//没有check消息,继续30s检测// Loop around to check again in future; we don't remove messages since// there might be an immediate request pending.if (!mHandler.hasMessages(MSG_CHECK)) { mHandler.sendMessageDelayed(mHandler.obtainMessage(MSG_CHECK), DEFAULT_CHECK_INTERVAL); } }发送广播
privatevoidupdateBroadcasts(VolumeInfo vol, int oldLevel, int newLevel, int seq) {if (!Objects.equals(StorageManager.UUID_PRIVATE_INTERNAL, vol.getFsUuid())) {// We don't currently send broadcasts for secondary volumesreturn; }//lowStorage广播action ACTION_DEVICE_STORAGE_LOWfinalIntentlowIntent=newIntent(Intent.ACTION_DEVICE_STORAGE_LOW) .addFlags(Intent.FLAG_RECEIVER_REGISTERED_ONLY_BEFORE_BOOT | Intent.FLAG_RECEIVER_INCLUDE_BACKGROUND | Intent.FLAG_RECEIVER_VISIBLE_TO_INSTANT_APPS) .putExtra(EXTRA_SEQUENCE, seq);//正常Storage广播action ACTION_DEVICE_STORAGE_OKfinalIntentnotLowIntent=newIntent(Intent.ACTION_DEVICE_STORAGE_OK) .addFlags(Intent.FLAG_RECEIVER_REGISTERED_ONLY_BEFORE_BOOT | Intent.FLAG_RECEIVER_INCLUDE_BACKGROUND | Intent.FLAG_RECEIVER_VISIBLE_TO_INSTANT_APPS) .putExtra(EXTRA_SEQUENCE, seq);if (State.isEntering(State.LEVEL_LOW, oldLevel, newLevel)) {// 内存正在变得越来越小,只发送一次广播ACTION_DEVICE_STORAGE_LOW,粘性广播,进程注册肯定会收到广播 getContext().sendStickyBroadcastAsUser(lowIntent, UserHandle.ALL); } elseif (State.isLeaving(State.LEVEL_LOW, oldLevel, newLevel)) {//内存正在变得越来越大,恢复正常移除lowIntent粘性广播,发送normal的普通广播 getContext().removeStickyBroadcastAsUser(lowIntent, UserHandle.ALL); getContext().sendBroadcastAsUser(notLowIntent, UserHandle.ALL); }finalIntentfullIntent=newIntent(Intent.ACTION_DEVICE_STORAGE_FULL) .addFlags(Intent.FLAG_RECEIVER_REGISTERED_ONLY_BEFORE_BOOT) .putExtra(EXTRA_SEQUENCE, seq);finalIntentnotFullIntent=newIntent(Intent.ACTION_DEVICE_STORAGE_NOT_FULL) .addFlags(Intent.FLAG_RECEIVER_REGISTERED_ONLY_BEFORE_BOOT) .putExtra(EXTRA_SEQUENCE, seq);//发送FULL Storage广播ACTION_DEVICE_STORAGE_FULLif (State.isEntering(State.LEVEL_FULL, oldLevel, newLevel)) { getContext().sendStickyBroadcastAsUser(fullIntent, UserHandle.ALL); } elseif (State.isLeaving(State.LEVEL_FULL, oldLevel, newLevel)) { getContext().removeStickyBroadcastAsUser(fullIntent, UserHandle.ALL); getContext().sendBroadcastAsUser(notFullIntent, UserHandle.ALL); } }APP 监听 lowStorage广播
publicvoidregisterLowStorageBroadcast() {IntentFilterfilter=newIntentFilter(); filter.addAction(Intent.ACTION_DEVICE_STORAGE_LOW); filter.addAction(Intent.ACTION_DEVICE_STORAGE_OK); mContext.registerReceiver(mReceiver, filter); }/** Receives events that might indicate a need to clean up files. */privatefinalBroadcastReceivermReceiver=newBroadcastReceiver() {@OverridepublicvoidonReceive(Context context, Intent intent) {finalStringaction= intent.getAction();if (Intent.ACTION_DEVICE_STORAGE_LOW.equals(action)) { Log.i(TAG, "handleStorageLow storage Low"); } elseif (Intent.ACTION_DEVICE_STORAGE_OK.equals(action)) { Log.i(TAG, "handleStorageLow storage Ok"); } } };解决实际问题
目前Android 11 系统有存储满了的提示和界面, 现在提供兜底方案,防止Android Userdata分区被写满,导致Android无法启动。
1、监控磁盘使用状况,剩余分区容量低于警戒值,则下次开机时格式化分区
2、监控磁盘使用状况,剩余分区容量低于危险值,则立即格式化分区
3、警戒值和危险值大小评估
经过上述内容可以了解到, Android 11 是存在自己的内存检查机制的,当内存解决低阈值时自动修剪缓存数据;
当它在阈值的150%以内时,我们尝试调整清理缓存返回阈值到的200%,同时发送广播。这里有两个疑问:
Android 的原生阈值是多少呢?
Android 原声的 内存检查机制能满足上述问题吗?
Android 的原生阈值是多少呢?
privatestaticfinalintDEFAULT_THRESHOLD_PERCENTAGE=5;privatestaticfinallongDEFAULT_THRESHOLD_MAX_BYTES= DataUnit.MEBIBYTES.toBytes(500);publiclonggetStorageLowBytes(File path) {finallonglowPercent= Settings.Global.getInt(mResolver, Settings.Global.SYS_STORAGE_THRESHOLD_PERCENTAGE, DEFAULT_THRESHOLD_PERCENTAGE);finallonglowBytes= (path.getTotalSpace() * lowPercent) / 100;finallongmaxLowBytes= Settings.Global.getLong(mResolver, Settings.Global.SYS_STORAGE_THRESHOLD_MAX_BYTES, DEFAULT_THRESHOLD_MAX_BYTES);return Math.min(lowBytes, maxLowBytes); }默认总内存的 5% 和 500M 选择最小的(可配置)
项目上 UserData 对应的分区是 mmcblk0p18 大小为 13186048KB = 12877 M = 12.5 G
12877 * 5% = 643.84 。 所以选500M 为阈值。
解答疑问:
阈值 = 500M
Android 原声的内存检查机制能满足上述问题吗?
释放内存
try { pms.freeStorage(vol.getFsUuid(), lowBytes * 2, 0);} catch (IOException e) {// 捕获异常未做处理 Slog.w(TAG, e);}PackageManagerService.java
/** * Blocking call to clear various types of cached data across the system * until the requested bytes are available. */publicvoidfreeStorage(String volumeUuid, long bytes, int storageFlags)throws IOException {finalStorageManagerstorage= mInjector.getStorageManager();finalFilefile= storage.findPathForUuid(volumeUuid);if (file.getUsableSpace() >= bytes) return;if (ENABLE_FREE_CACHE_V2) {finalbooleaninternalVolume= Objects.equals(StorageManager.UUID_PRIVATE_INTERNAL,volumeUuid);finalbooleanaggressive= (storageFlags & StorageManager.FLAG_ALLOCATE_AGGRESSIVE) != 0;finallongreservedBytes= storage.getStorageCacheBytes(file, storageFlags);// 1. Pre-flight to determine if we have any chance to succeed// 确定我们是否有机会成功// 2. Consider preloaded data (after 1w honeymoon, unless aggressive)if (internalVolume && (aggressive || SystemProperties .getBoolean("persist.sys.preloads.file_cache_expired", false))) {// 删除预加载的文件 deletePreloadsFileCache();if (file.getUsableSpace() >= bytes) return; }// 3. Consider parsed APK data (aggressive only)// 已解析的APK数据if (internalVolume && aggressive) { FileUtils.deleteContents(mCacheDir);if (file.getUsableSpace() >= bytes) return; }// 4. Consider cached app data (above quotas)// 缓存的应用数据try { mInstaller.freeCache(volumeUuid, bytes, reservedBytes, Installer.FLAG_FREE_CACHE_V2); } catch (InstallerException ignored) { }if (file.getUsableSpace() >= bytes) return;// 5. Consider shared libraries with refcount=0 and age>min cache period// 共享库if (internalVolume && pruneUnusedStaticSharedLibraries(bytes, android.provider.Settings.Global.getLong(mContext.getContentResolver(), Global.UNUSED_STATIC_SHARED_LIB_MIN_CACHE_PERIOD, DEFAULT_UNUSED_STATIC_SHARED_LIB_MIN_CACHE_PERIOD))) {return; }// 6. Consider dexopt output (aggressive only)// TODO: Implement// 7. Consider installed instant apps unused longer than min cache period// 考虑已安装的即时应用未使用时间超过最小缓存时间if (internalVolume && mInstantAppRegistry.pruneInstalledInstantApps(bytes, android.provider.Settings.Global.getLong(mContext.getContentResolver(), Global.INSTALLED_INSTANT_APP_MIN_CACHE_PERIOD, InstantAppRegistry.DEFAULT_INSTALLED_INSTANT_APP_MIN_CACHE_PERIOD))) {return; }// 8. Consider cached app data (below quotas)// 缓存的应用数据try { mInstaller.freeCache(volumeUuid, bytes, reservedBytes, Installer.FLAG_FREE_CACHE_V2 | Installer.FLAG_FREE_CACHE_V2_DEFY_QUOTA); } catch (InstallerException ignored) { }if (file.getUsableSpace() >= bytes) return;// 9. Consider DropBox entries// TODO: Implement// 10. Consider instant meta-data (uninstalled apps) older that min cache period// 未安装的应用程序if (internalVolume && mInstantAppRegistry.pruneUninstalledInstantApps(bytes, android.provider.Settings.Global.getLong(mContext.getContentResolver(), Global.UNINSTALLED_INSTANT_APP_MIN_CACHE_PERIOD, InstantAppRegistry.DEFAULT_UNINSTALLED_INSTANT_APP_MIN_CACHE_PERIOD))) {return; } } else {try { mInstaller.freeCache(volumeUuid, bytes, 0, 0); } catch (InstallerException ignored) { }if (file.getUsableSpace() >= bytes) return; }// 如果清除了所有缓存, 还不满足最, 抛出异常thrownewIOException("Failed to free " + bytes + " on storage device at " + file);}删除预加载的文件
@OverridepublicvoiddeletePreloadsFileCache() { mContext.enforceCallingOrSelfPermission(android.Manifest.permission.CLEAR_APP_CACHE,"deletePreloadsFileCache");Filedir= Environment.getDataPreloadsFileCacheDirectory(); Slog.i(TAG, "Deleting preloaded file cache " + dir); FileUtils.deleteContents(dir);}FileUtils.javapublicstaticbooleandeleteContents(File dir) { File[] files = dir.listFiles();booleansuccess=true;if (files != null) {for (File file : files) {if (file.isDirectory()) {// 递归 success &= deleteContents(file); }if (!file.delete()) { Log.w(TAG, "Failed to delete " + file); success = false; } } }return success;}删除缓存的应用数据 缓存
系统缓存」由所有已安装应用的 /data/data/packagename/cache 文件夹和 /sdcard/Android/data/packagename/cache 文件夹组成。
Installer.javapublicvoidfreeCache(String uuid, long targetFreeBytes, long cacheReservedBytes, int flags)throws InstallerException {if (!checkBeforeRemote()) return;try { mInstalld.freeCache(uuid, targetFreeBytes, cacheReservedBytes, flags); } catch (Exception e) {throw InstallerException.from(e); }}privatebooleancheckBeforeRemote() {if (mWarnIfHeld != null && Thread.holdsLock(mWarnIfHeld)) { Slog.wtf(TAG, "Calling thread " + Thread.currentThread().getName() + " is holding 0x" + Integer.toHexString(System.identityHashCode(mWarnIfHeld)), newThrowable()); }if (mIsolated) { Slog.i(TAG, "Ignoring request because this installer is isolated");returnfalse; } else {returntrue; }}mInstalld.freeCache(uuid, targetFreeBytes, cacheReservedBytes, flags); 这个实际是调用
frameworks/native/cmds/installd/binder/android/os/IInstalld.aidl 中定义的方法。最后调用的是 InstalldNativeService.cpp
binder::Status InstalldNativeService::freeCache(conststd::unique_ptr<std::string>& uuid,int64_t targetFreeBytes, int64_t cacheReservedBytes, int32_t flags) { ENFORCE_UID(AID_SYSTEM);// 检查UUID CHECK_ARGUMENT_UUID(uuid);std::lock_guard<std::recursive_mutex> lock(mLock);auto uuidString = uuid ? *uuid : "";constchar* uuid_ = uuid ? uuid->c_str() : nullptr;auto data_path = create_data_path(uuid_);auto noop = (flags & FLAG_FREE_CACHE_NOOP);// 确定的可释放的空间 = 还需要释放的空间int64_tfree = data_disk_free(data_path);if (free < 0) {return error("Failed to determine free space for " + data_path); }int64_t cleared = 0;// 目标释放的目标空间 - 确定的可释放的空间 = 还需要释放的空间int64_t needed = targetFreeBytes - free; LOG(DEBUG) << "Device " << data_path << " has " << free << " free; requested " << targetFreeBytes << "; needed " << needed;// 确定的可释放的空间 > 目标释放的目标空间 return ok if (free >= targetFreeBytes) {return ok(); }if (flags & FLAG_FREE_CACHE_V2) {// This new cache strategy fairly removes files from UIDs by deleting// files from the UIDs which are most over their allocated quota// 这种新的缓存策略通过从UID中删除超出其分配配额最多的文件,从UID中公平地删除文件// 1. Create trackers for every known UID ATRACE_BEGIN("create");std::unordered_map<uid_t, std::shared_ptr<CacheTracker>> trackers;for (auto user : get_known_users(uuid_)) { FTS *fts; FTSENT *p;auto ce_path = create_data_user_ce_path(uuid_, user);auto de_path = create_data_user_de_path(uuid_, user);auto media_path = findDataMediaPath(uuid, user) + "/Android/data/";char *argv[] = { (char*) ce_path.c_str(), (char*) de_path.c_str(), (char*) media_path.c_str(), nullptr };if (!(fts = fts_open(argv, FTS_PHYSICAL | FTS_NOCHDIR | FTS_XDEV, nullptr))) {return error("Failed to fts_open"); }while ((p = fts_read(fts)) != nullptr) {if (p->fts_info == FTS_D && p->fts_level == 1) {uid_t uid = p->fts_statp->st_uid;if (multiuser_get_app_id(uid) == AID_MEDIA_RW) { uid = (multiuser_get_app_id(p->fts_statp->st_gid) - AID_EXT_GID_START) + AID_APP_START; }auto search = trackers.find(uid);if (search != trackers.end()) { search->second->addDataPath(p->fts_path); } else {auto tracker = std::shared_ptr<CacheTracker>(new CacheTracker( multiuser_get_user_id(uid), multiuser_get_app_id(uid), uuidString)); tracker->addDataPath(p->fts_path); {std::lock_guard<std::recursive_mutex> lock(mQuotasLock); tracker->cacheQuota = mCacheQuotas[uid]; }if (tracker->cacheQuota == 0) {#if MEASURE_DEBUG LOG(WARNING) << "UID " << uid << " has no cache quota; assuming 64MB";#endif tracker-> cacheQuota = 67108864; } trackers[uid] = tracker; } fts_set(fts, p, FTS_SKIP); } } fts_close(fts); } ATRACE_END();// 2. Populate tracker stats and insert into priority queue ATRACE_BEGIN("populate");int64_t cacheTotal = 0;auto cmp = [](std::shared_ptr<CacheTracker> left, std::shared_ptr<CacheTracker> right) {return (left->getCacheRatio() < right->getCacheRatio()); };std::priority_queue<std::shared_ptr<CacheTracker>,std::vector<std::shared_ptr<CacheTracker>>, decltype(cmp)> queue(cmp);for (constauto& it : trackers) { it.second->loadStats();queue.push(it.second); cacheTotal += it.second->cacheUsed; } ATRACE_END();// 3. Bounce across the queue, freeing items from whichever tracker is// the most over their assigned quota// 在队列中跳跃,从超出其分配配额最多的跟踪器中释放项目 ATRACE_BEGIN("bounce");std::shared_ptr<CacheTracker> active;while (active || !queue.empty()) {// Only look at apps under quota when explicitly requested// 仅在明确请求时查看配额下的应用if (active && (active->getCacheRatio() < 10000) && !(flags & FLAG_FREE_CACHE_V2_DEFY_QUOTA)) { LOG(DEBUG) << "Active ratio " << active->getCacheRatio() << " isn't over quota, and defy not requested";break; }// Only keep clearing when we haven't pushed into reserved areaif (cacheReservedBytes > 0 && cleared >= (cacheTotal - cacheReservedBytes)) { LOG(DEBUG) << "Refusing to clear cached data in reserved space";break; }// Find the best tracker to work with; this might involve swapping// if the active tracker is no longer the most over quota// 找到最佳的跟踪器;这可能涉及交换 如果活动跟踪器不再超出配额bool nextBetter = active && !queue.empty() && active->getCacheRatio() < queue.top()->getCacheRatio();if (!active || nextBetter) {if (active) {// Current tracker still has items, so we'll consider it// again later once it bubbles up to surfacequeue.push(active); } active = queue.top(); queue.pop(); active->ensureItems();continue; }// If no items remain, go find another tracker// 如果没有剩余项目,请查找另一个跟踪器if (active->items.empty()) { active = nullptr;continue; } else {auto item = active->items.back(); active->items.pop_back(); LOG(DEBUG) << "Purging " << item->toString() << " from " << active->toString();if (!noop) { item->purge(); } active->cacheUsed -= item->size; needed -= item->size; cleared += item->size; }// Verify that we're actually done before bailing, since sneaky// apps might be using hardlinks// 验证我们在保释之前是否已经完成,因为偷偷摸摸的应用程序可能正在使用硬链接if (needed <= 0) {free = data_disk_free(data_path); needed = targetFreeBytes - free;if (needed <= 0) {break; } else { LOG(WARNING) << "Expected to be done but still need " << needed; } } } ATRACE_END(); } else {return error("Legacy cache logic no longer supported"); }free = data_disk_free(data_path);if (free >= targetFreeBytes) {return ok(); } else {return error(StringPrintf("Failed to free up %" PRId64 " on %s; final free space %" PRId64, targetFreeBytes, data_path.c_str(), free)); }}什么是Cache Tracker
单个UID的缓存跟踪器。
每个跟踪器有两种模式:
第一种模式 加载轻量级的“统计数据”,
第二种模式 加载详细的“项目”
然后可以清除这些项目以释放空间
617#ifndef ANDROID_INSTALLD_CACHE_TRACKER_H18#define ANDROID_INSTALLD_CACHE_TRACKER_H1920#include<memory>21#include<string>22#include<queue>2324#include<sys/types.h>25#include<sys/stat.h>2627#include<android-base/macros.h>28#include<cutils/multiuser.h>2930#include"CacheItem.h"3132 namespace android {33 namespace installd {3435/**36 * Cache tracker for a single UID. Each tracker is used in two modes: first37 * for loading lightweight "stats", and then by loading detailed "items"38 * which can then be purged to free up space.39 */40classCacheTracker {41 public:42 CacheTracker(userid_t userId, appid_t appId, conststd::string& uuid);43 ~CacheTracker();4445std::stringtoString();4647voidaddDataPath(conststd::string& dataPath);4849voidloadStats();50voidloadItems();5152voidensureItems();5354intgetCacheRatio();5556int64_t cacheUsed;57int64_t cacheQuota;5859std::vector<std::shared_ptr<CacheItem>> items;6061 private:62userid_t mUserId;63appid_t mAppId;64bool mItemsLoaded;65conststd::string& mUuid;6667std::vector<std::string> mDataPaths;6869boolloadQuotaStats();70voidloadItemsFrom(conststd::string& path);7172 DISALLOW_COPY_AND_ASSIGN(CacheTracker);73 };7475 } // namespace installd76 } // namespace android7778#endif// ANDROID_INSTALLD_CACHE_TRACKER_H留下疑问:Cache Tracker的内存释放策略是什么样的,目前还未找到答案。
解答疑问:
通过上述源码,了解到Android 会从以上空间帮我们释放内存:
删除预加载的文件
已解析的APK数据
缓存的应用数据
共享库
已安装的即时应用未使用时间超过最小缓存时间
缓存的应用数据
未安装的应用程序
但是如果清除了上述所有的地方 可用的内存空间 还是很小, 不满足 2 倍的阈值, 抛出
thrownewIOException("Failed to free " + bytes + " on storage device at " + file);try { pms.freeStorage(vol.getFsUuid(), lowBytes * 2, 0);} catch (IOException e) {// 捕获异常未做处理 Slog.w(TAG, e);}我们看到 Android 在捕获到异常后未做任何处理。那内存极限紧张的情况下,Android是怎么处理的呢?
内存极限紧张的情况下,Android是怎么处理的呢?
使用模拟器实验验证:

开机前 Data分区容量
Total | Used | Available | 阈值 |
774 M | 378 M | 364 M | 774 * 5% = 38 M |
目前还是大于阈值, 开始写入 380M 文件
dd if=/dev/block/dm-0 of=13gbFile bs=1024 count=68640
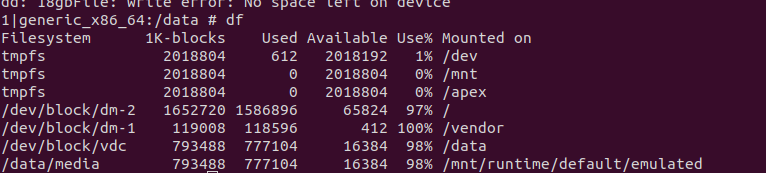
Total | Used | Available | 阈值 |
774 M | 758 M | 16M | 774 * 5% = 38 M |
现在已经小于阈值了, 重启后:
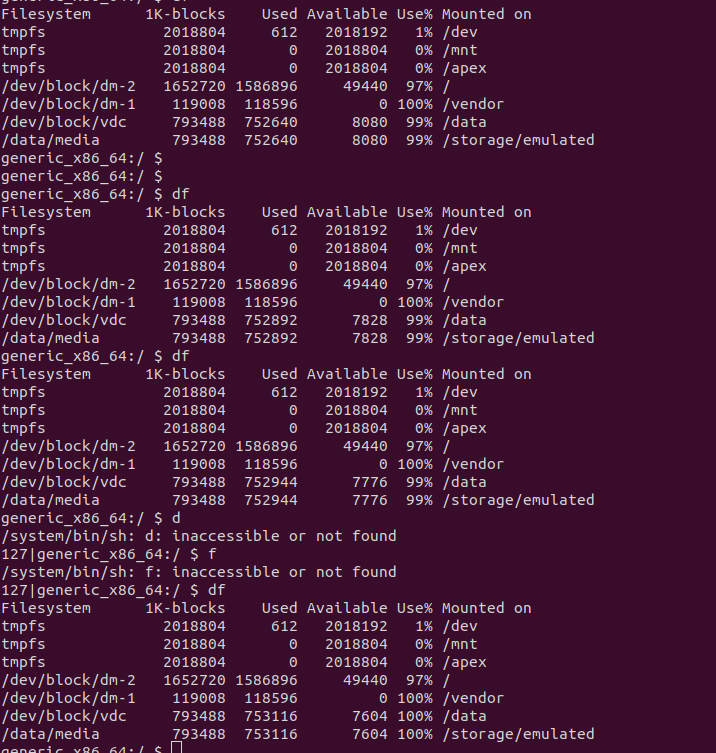
Data分区还是满的,系统还是可以起来。查看Log
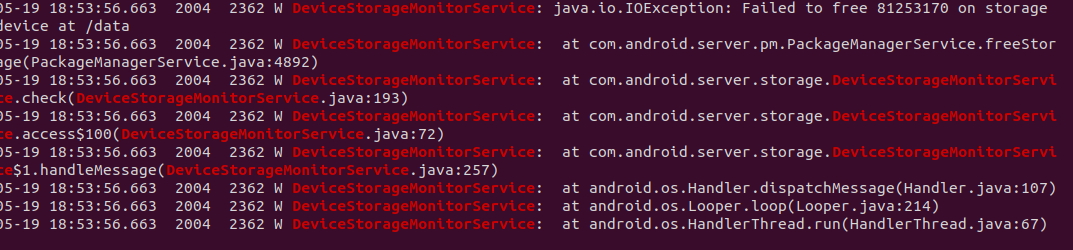
81253170 = 76M (阈值)= 38 * 2
我们可以看到当前已经没有办法清除到 2 倍的阈值, 并打印了Android 的原生log。 但是还是不影响系统启动。但是为了防止内存极端紧张的情况下系统,还是增加兜底方案。
在系统原有机制中,定制空间不足时,小于 lowBytes / 2 写一个属性persist.vendor.data.lowspace ,下次重启执行wipe data; 小于lowBytes / 3 M 直接清理 wipe dated。
try { pms.freeStorage(vol.getFsUuid(), lowBytes * 2, 0);} catch (IOException e) { Slog.w(TAG, e);try {if (file.getUsableSpace() < lowBytes / 2) { // only 500Mif (vol.id != null) Slog.w(TAG, "id = " + vol.id); SystemProperties.set("persist.vendor.data.lowspace", "true"); }if (file.getUsableSpace() < lowBytes / 3) { // only 166M, wipedata directly SystemProperties.set("persist.vendor.data.lowspace", "false"); Runtime.getRuntime().exec("reboot wipedata"); } } catch (Exception e2) { Slog.w(TAG, e2); }}}开机 - 双清
static Result<Success> do_load_persist_props(const BuiltinArguments& args) { load_persist_props();if (::property_get_bool("persist.vendor.data.lowspace", 0)) { property_set("persist.vendor.data.lowspace", "false"); // reset to false property_set(ANDROID_RB_PROPERTY, "reboot,wipedata"); }return Success();}双清后:
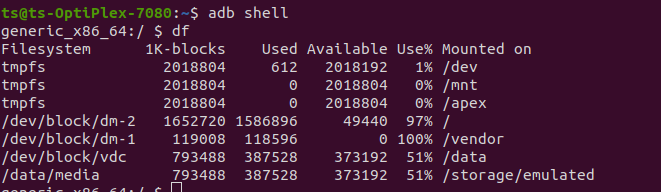
内存回复到出厂设置。