Spring面试专题
1.介绍下Spring的初始化过程
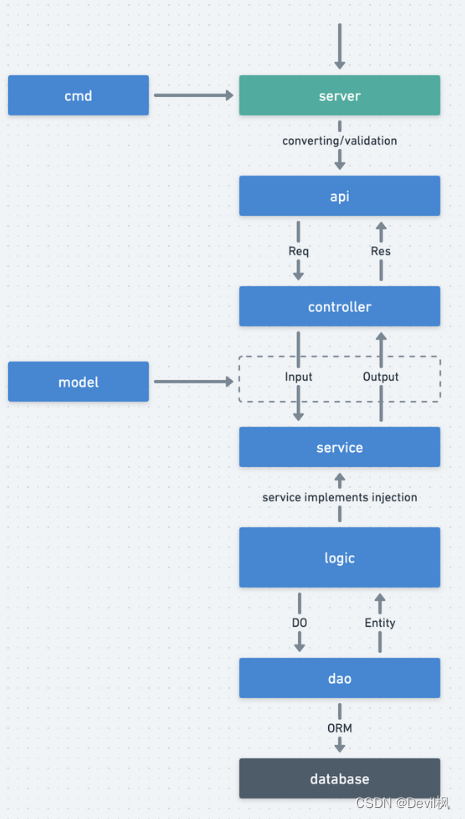
Spring的初始化过程中会走refresh方法,这是个模板模式的实现,包含有如下的14个方法
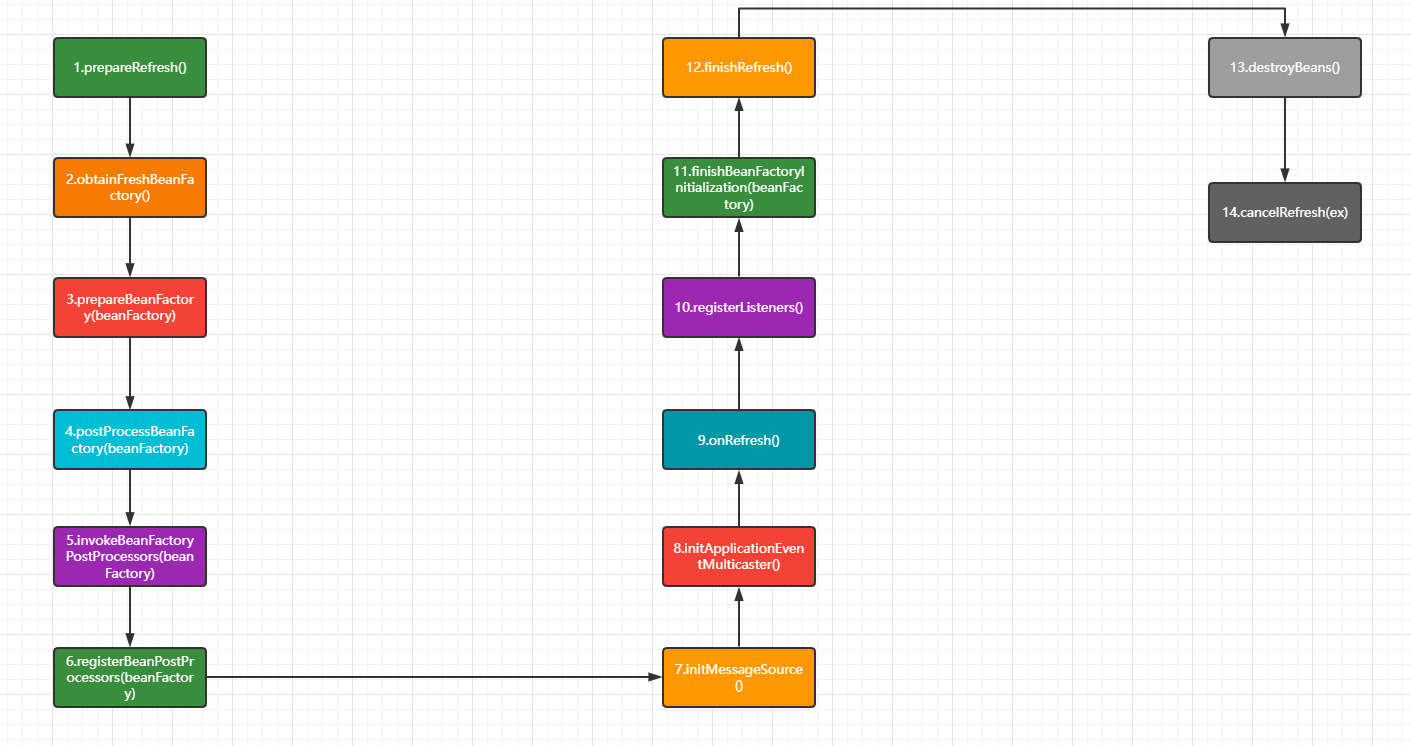
每个方法的相关作用
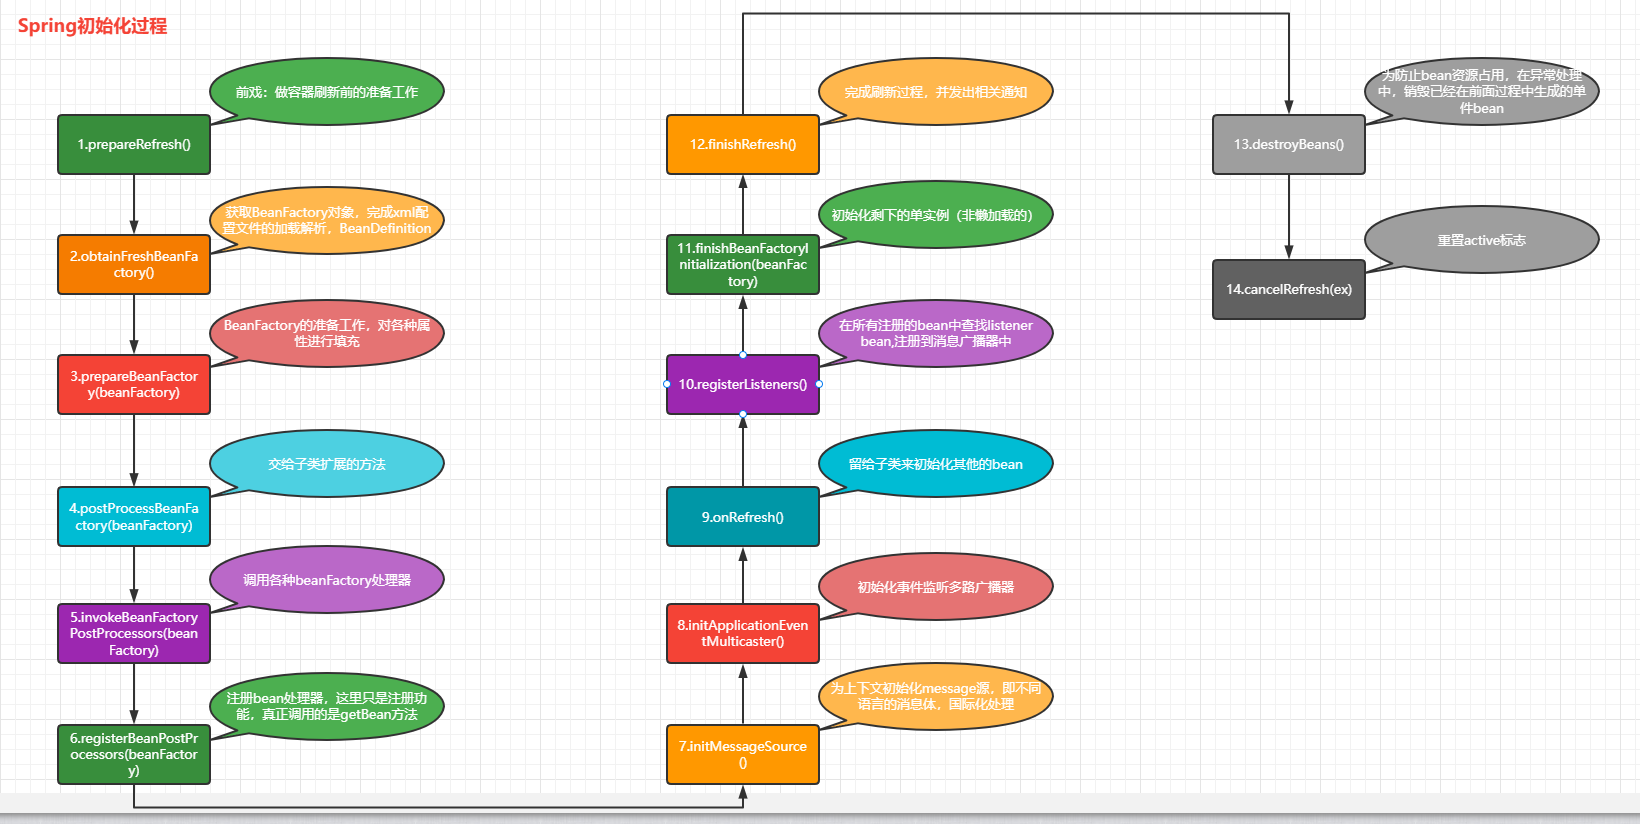
把每个方法的作用按照这个图介绍下就可以了
2.配置文件的加载解析
Spring初始化的时候在obtainFreshBeanFactory方法中完成了配置文件的加载解析,并把解析的bean标签信息封装到了BeanDefinition对象中,所有的解析的BeanDefinition对象都存储在了DefaultListableBeanFactory对象的beanDefinitionMap的Map集合中。
3.介绍下Spring中常用的注解
@Controller,@Service,@Repository 这些日常开发中常用的注解没啥挑战,@Import注解会让面试官眼前一亮。
@Import注解本身的由来是在Spring3.0的时候由xml文件的方式向注解编程的发展,替换以前在配置文件中的/<import>标签 ,也就是可以导入其他的配置类,然后@Import注解还扩展了对应的功能
静态注入:可以直接把对应的类型注入到容器中:@Import(User.class)
动态注入:可以实现ImportSelector接口和ImportBeanDefinitionRegistrar接口,然后通过重写对应的方法来实现动态的注入
当然在ImportSelector接口的实现还可以触发延迟加载的逻辑。DeferredImportSelector,这块在SpringBoot的自动装配中就应用到了
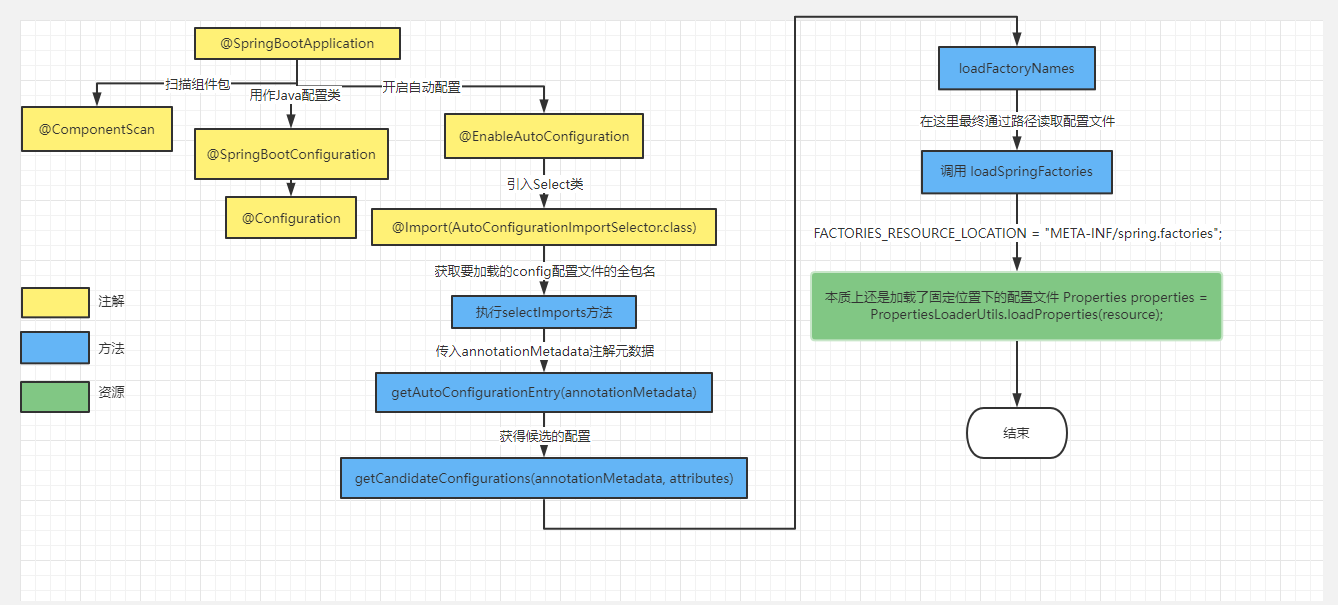
4.SpringBoot 的自动装配原理
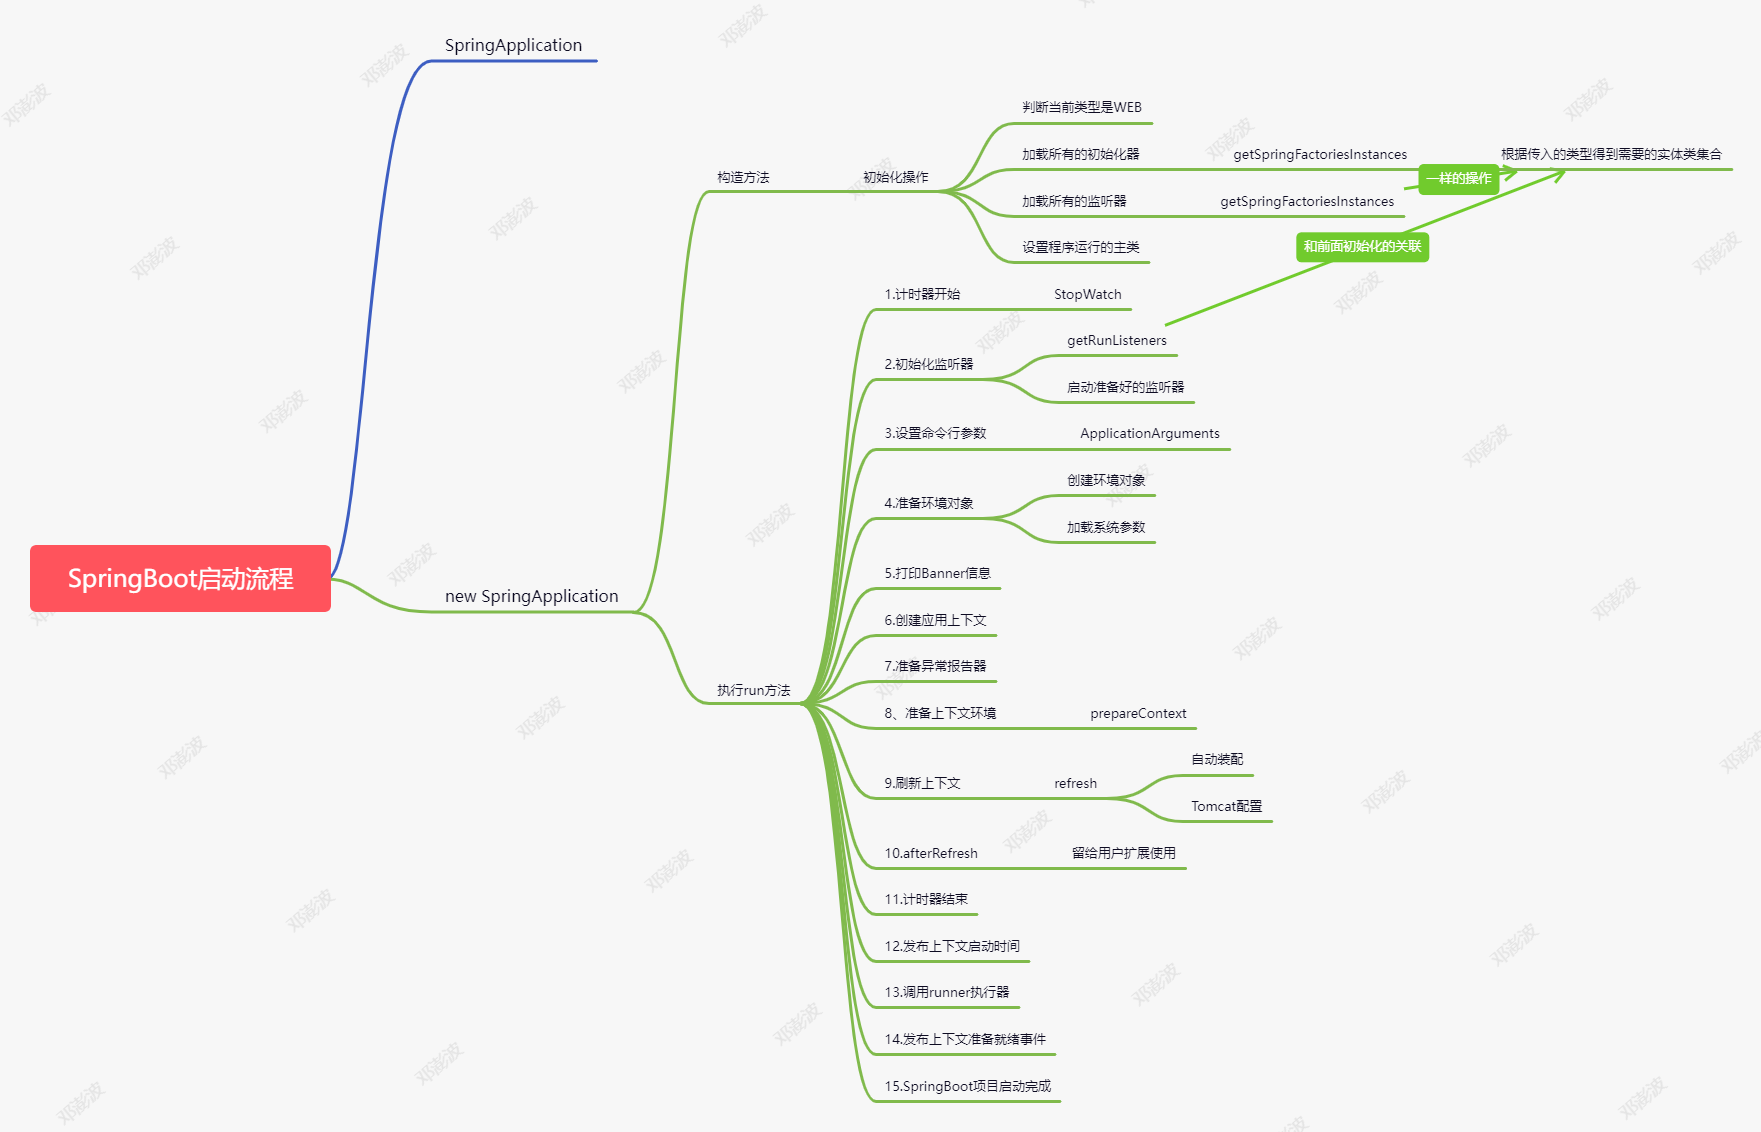
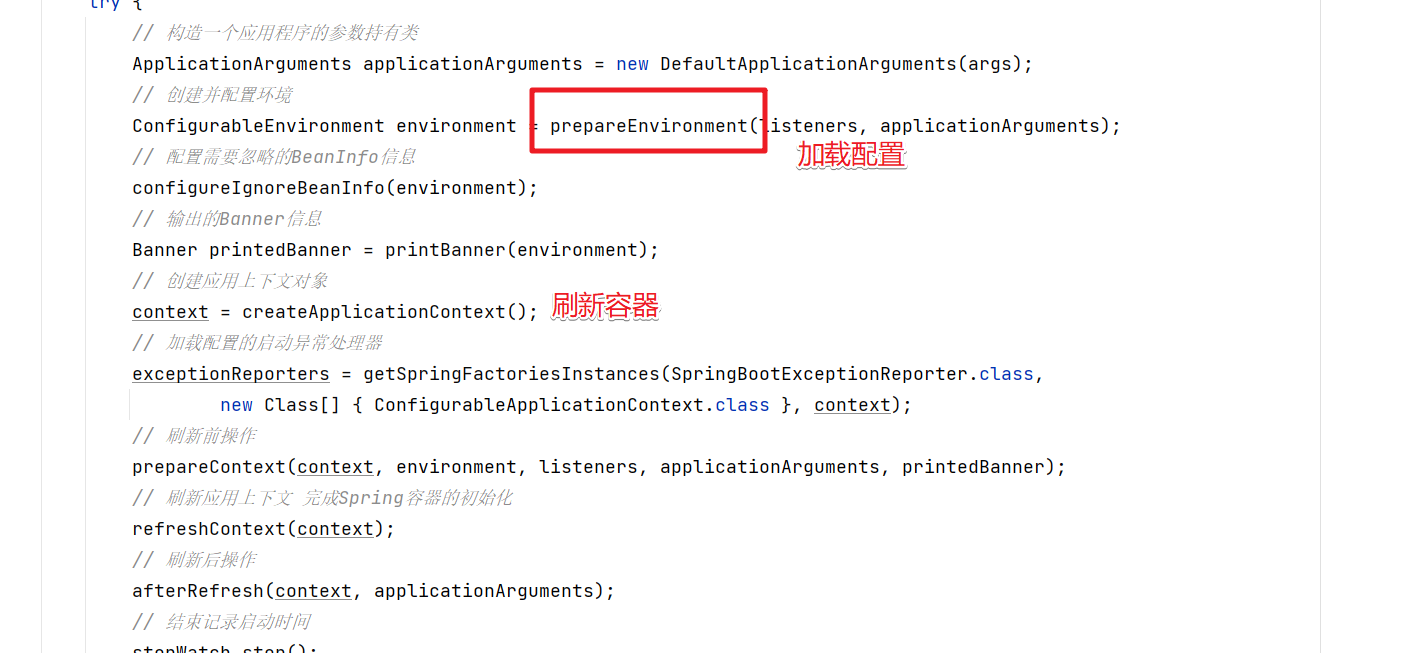
5.介绍下SpringBoot的启动流程
6.SpringBoot中有了属性文件为什么还要加一个bootstrap.yml文件?
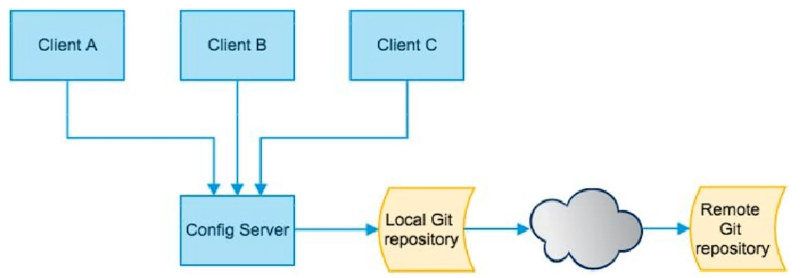
在单体的SpringBoot项目中其实我们是用不到bootstrap.yml文件的,bootsrap.yml文件的使用需要SpringCloud的支持,因为在微服务环境下我们都是有配置中心的,来统一的管理系统的相关配置属性,那么怎么去加载配置中心的内容呢?一个SpringBoot项目启动的时候默认只会加载对应的application.yml中的相关信息,这时bootstrap.yml的作用就体现出来了,会在SpringBoot正常启动前创建一个父容器来通过bootstrap.yml中的配置来加载配置中心的内容。
7.如果要对属性文件中的账号密码加密如何实现?
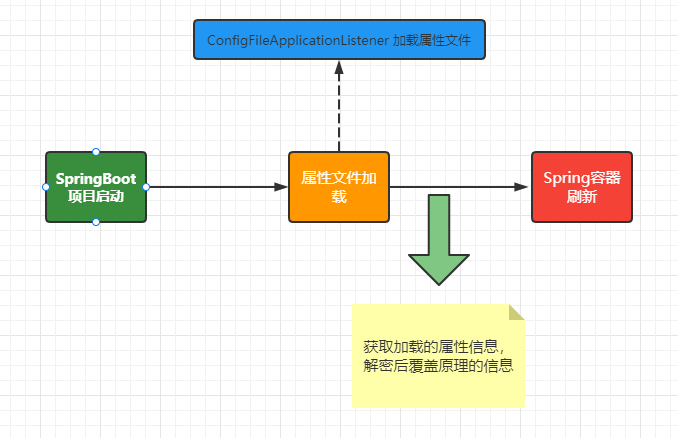
其实这是一个比较篇实战的一个问题,我们在application.yml中保存的MySQL数据库的账号密码或者其他服务的账号密码,都可以保存加密后的内容,那么我们在处理的时候要怎么解密呢?这个其实比较简单只需要对SpringBoot的执行流程清楚就可以了,第一个我们可以通过自定义监听器可以在加载解析了配置文件之后对加密的文件中做解密处理同时覆盖之前加密的内容,或者通过对应的后置处理器来处理,具体的实现如下:
然后我们通过案例代码来演示下,加深大家的理解
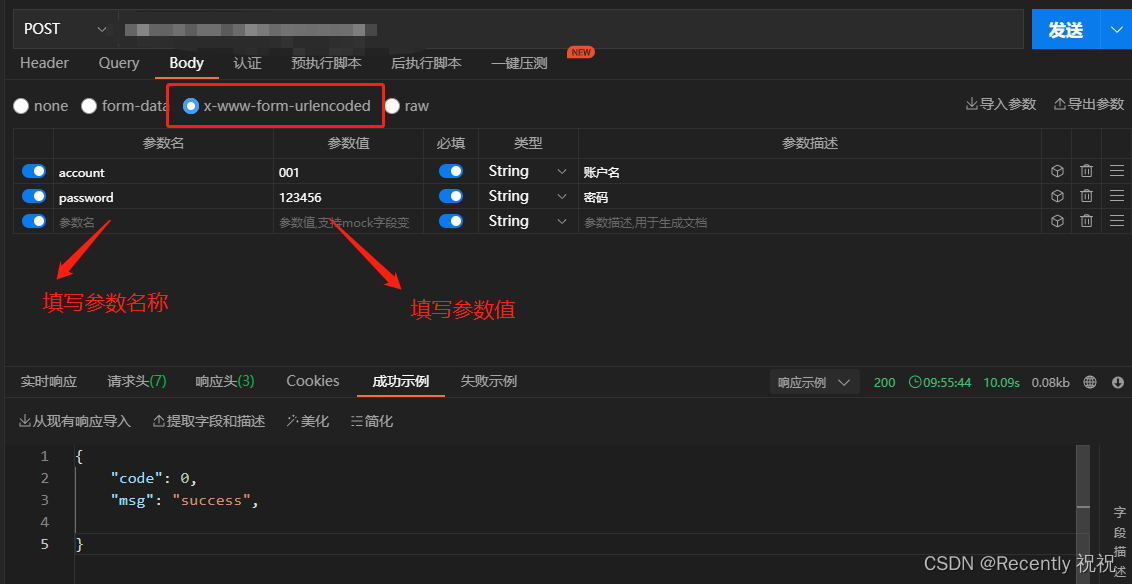
首先我们在属性文件中配置加密后的信息
spring.datasource.driverClassName=com.mysql.cj.jdbc.Driver
spring.datasource.url=jdbc:mysql://localhost:3306/mb?serverTimezone=UTC&useUnicode=true&characterEncoding=utf-8&useSSL=true
spring.datasource.username=root
# 对通过3DES对密码加密
spring.datasource.password=t5Jd2CzFWEw=spring.datasource.type=com.alibaba.druid.pool.DruidDataSourcemybatis.mapper-locations=classpath:mapper/*.xml
在SpringBoot项目启动的时候在在刷新Spring容器之前执行的,所以我们要做的就是在加载完环境配置信息后,获取到配置的 spring.datasource.password=t5Jd2CzFWEw= 这个信息,然后解密并修改覆盖就可以了。
 然后在属性文件的逻辑其实是通过发布事件触发对应的监听器来实现的
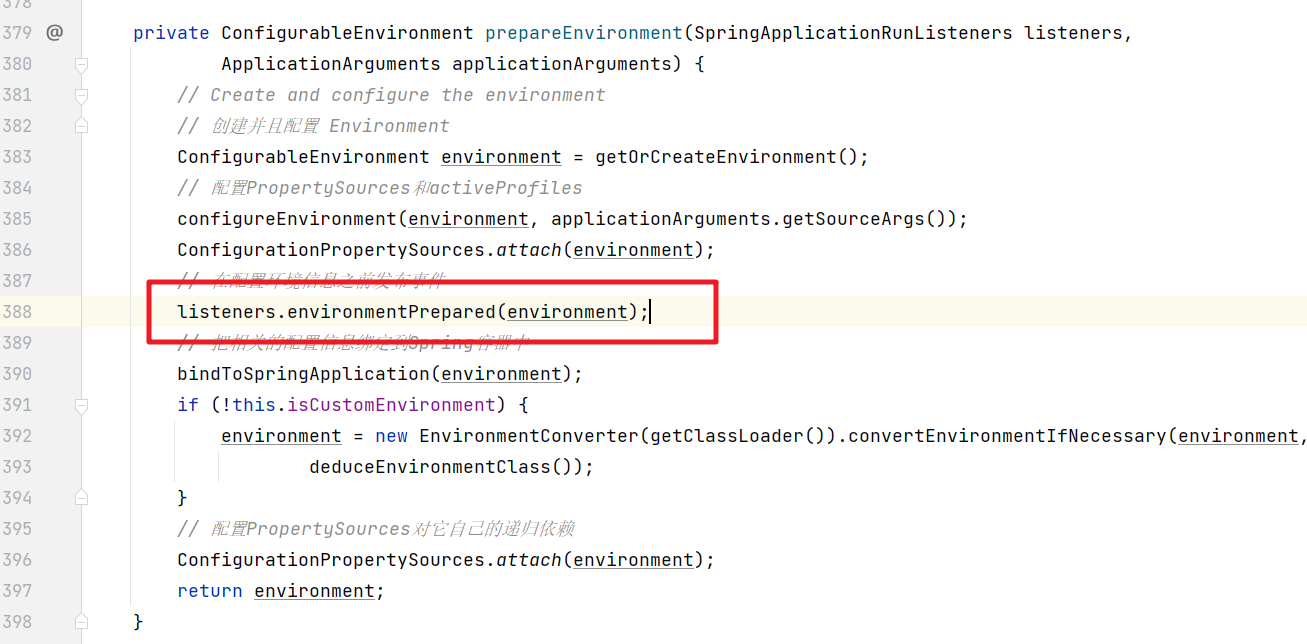
所以第一个解决方案就是你自定义一个监听器,这个监听器在加载属性文件(ConfigFileApplicationListener)的监听器之后处理,这种方式稍微麻烦点,
还有一种方式就是通过加载属性文件的一个后置处理器来处理,这就以个为例来实现
3DES的工具类
/*** 3DES加密算法,主要用于加密用户id,身份证号等敏感信息,防止破解*/
public class DESedeUtil {//秘钥public static final String  KEY = "~@#$y1a2n.&@+n@$%*(1)";//秘钥长度private static final int secretKeyLength = 24;//加密算法private static final String  ALGORITHM = "DESede";//编码private static final String CHARSET = "UTF-8";/*** 转换成十六进制字符串* @param key* @return*/public static byte[] getHex(String key){byte[] secretKeyByte = new byte[24];try {byte[] hexByte;hexByte = new String(DigestUtils.md5Hex(key)).getBytes(CHARSET);//秘钥长度固定为24位System.arraycopy(hexByte,0,secretKeyByte,0,secretKeyLength);} catch (UnsupportedEncodingException e) {e.printStackTrace();}return secretKeyByte;}/*** 生成密钥,返回加密串* @param key 密钥* @param encodeStr 将加密的字符串* @return*/public static String  encode3DES(String key,String encodeStr){try {Cipher cipher = Cipher.getInstance(ALGORITHM);cipher.init(Cipher.ENCRYPT_MODE, new SecretKeySpec(getHex(key), ALGORITHM));return Base64.encodeBase64String(cipher.doFinal(encodeStr.getBytes(CHARSET)));}catch(Exception e){e.printStackTrace();}return null;}/*** 生成密钥,解密,并返回字符串* @param key 密钥* @param decodeStr 需要解密的字符串* @return*/public static String decode3DES(String key, String decodeStr){try {Cipher cipher = Cipher.getInstance(ALGORITHM);cipher.init(Cipher.DECRYPT_MODE, new SecretKeySpec(getHex(key),ALGORITHM));return new String(cipher.doFinal(new Base64().decode(decodeStr)),CHARSET);} catch(Exception e){e.printStackTrace();}return null;}public static void main(String[] args) {String userId = "123456";String encode = DESedeUtil.encode3DES(KEY, userId);String decode = DESedeUtil.decode3DES(KEY, encode);System.out.println("用户id>>>"+userId);System.out.println("用户id加密>>>"+encode);System.out.println("用户id解密>>>"+decode);}}
声明后置处理器
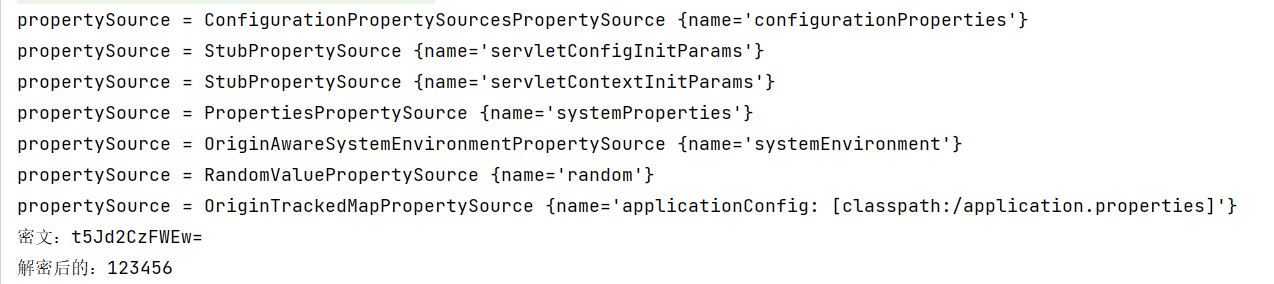
public class SafetyEncryptProcessor implements EnvironmentPostProcessor {@Overridepublic void postProcessEnvironment(ConfigurableEnvironment environment, SpringApplication application) {for (PropertySource<?> propertySource : environment.getPropertySources()) {System.out.println("propertySource = " + propertySource);if(propertySource instanceof OriginTrackedMapPropertySource){OriginTrackedMapPropertySource source = (OriginTrackedMapPropertySource) propertySource;for (String propertyName : source.getPropertyNames()) {//System.out.println(propertyName + "=" + source.getProperty(propertyName));if("spring.datasource.password".equals(propertyName)){Map<String,Object> map = new HashMap<>();// 做解密处理String property = (String) source.getProperty(propertyName);String s = DESedeUtil.decode3DES(DESedeUtil.KEY, property);System.out.println("密文:" + property);System.out.println("解密后的:" + s);map.put(propertyName,s);// 注意要添加到前面,覆盖environment.getPropertySources().addFirst(new MapPropertySource(propertyName,map));}}}}}
}
然后在META-INF/spring.factories文件中注册
org.springframework.boot.env.EnvironmentPostProcessor=com.bobo.util.SafetyEncryptProcessor
然后启动项目就可以了
搞定