汽车架构:车载HAL是汽车与车辆网络服务之间的接口定义(同时保护传入的数据):
车载HAL与Android Automotive架构:
- Car App:包括OEM和第三方开发的App
- Car API:内有包含CarSensorManager在内的API。位于/platform/packages/services/Car/car-lib
- CarService:系统中与车相关的服务,位于/platform/packages/services/Car/
- Vehicle HAL:汽车的硬件抽象层描述。位于hardware/interfaces/automotive/vehicle/2.0/default/(接口属性:hardware/interfaces/automotive/vehicle/2.0/default/impl/vhal_v2_0/)
Framework CarService
Android O/P为Automotive场景提供了一系列的服务,这些服务统被称为CarService。它们与HAL层的VehicleHAL通信,进而通过车载总线(例如CAN总线)与车身进行通讯,同时它们还为应用层的APP提供接口,从而让APP能够实现对车身的控制与状态的显示
- Car***Manager:packages/services/Car/car-lib/src/android/car/hardware
- Car***Service:packages/services/Car/service/src/com/android/car/
CarService启动流程
和汽车相关的服务的启动主要依靠一个系统服务CarServiceHelperService开机时在SystemServer中启动:
CarServiceHelperService启动
private static final String CAR_SERVICE_HELPER_SERVICE_CLASS ="com.android.internal.car.CarServiceHelperService";private void startOtherServices(@NonNull TimingsTraceAndSlog t) {......if (mPackageManager.hasSystemFeature(PackageManager.FEATURE_AUTOMOTIVE)) {t.traceBegin("StartCarServiceHelperService");mSystemServiceManager.startService(CAR_SERVICE_HELPER_SERVICE_CLASS);t.traceEnd();}......}
CarServiceHelperService被定义在frameworks/opt/car/下,它和其他系统服务一样,属于SystemService的子类,通过SystemServiceManager.startService启动:
SystemServiceManager.startService
public SystemService startService(String className) {final Class<SystemService> serviceClass = loadClassFromLoader(className,this.getClass().getClassLoader());return startService(serviceClass);}private static Class<SystemService> loadClassFromLoader(String className,ClassLoader classLoader) {try {return (Class<SystemService>) Class.forName(className, true, classLoader);} catch (ClassNotFoundException ex) {...}}
loadClassFromLoader通过类加载器直接获取CarServiceHelperService的class对象,拿到class对象进而再调用startService重载方法:
public <T extends SystemService> T startService(Class<T> serviceClass) {try {final String name = serviceClass.getName();
// Create the service.if (!SystemService.class.isAssignableFrom(serviceClass)) {throw new RuntimeException("Failed to create " + name+ ": service must extend " + SystemService.class.getName());}final T service;try {Constructor<T> constructor = serviceClass.getConstructor(Context.class);service = constructor.newInstance(mContext);} catch (InstantiationException ex) {...} catch (IllegalAccessException ex) {...} catch (NoSuchMethodException ex) {...} catch (InvocationTargetException ex) {...}startService(service);return service;} finally {Trace.traceEnd(Trace.TRACE_TAG_SYSTEM_SERVER);}}
接着通过反射构造CarServiceHelperService的实例对象,然后再调用startService重载方法:
public void startService(@NonNull final SystemService service) {// Register it.mServices.add(service);// Start it.long time = SystemClock.elapsedRealtime();try {service.onStart();} catch (RuntimeException ex) {throw new RuntimeException("Failed to start service " + service.getClass().getName()+ ": onStart threw an exception", ex);}warnIfTooLong(SystemClock.elapsedRealtime() - time, service, "onStart");}
这里先将CarServiceHelperService保存到mServices这个list中,然后调用CarServiceHelperService的onStart方法正式启动此服务。
CarServiceHelperService.onStart
@Overridepublic void onStart() {EventLog.writeEvent(EventLogTags.CAR_HELPER_START, mHalEnabled ? 1 : 0);
IntentFilter filter = new IntentFilter(Intent.ACTION_REBOOT);filter.addAction(Intent.ACTION_SHUTDOWN);mContext.registerReceiverForAllUsers(mShutdownEventReceiver, filter, null, null);mCarWatchdogDaemonHelper.addOnConnectionChangeListener(mConnectionListener);mCarWatchdogDaemonHelper.connect();Intent intent = new Intent();intent.setPackage("com.android.car");intent.setAction(ICarConstants.CAR_SERVICE_INTERFACE);if (!mContext.bindServiceAsUser(intent, mCarServiceConnection, Context.BIND_AUTO_CREATE,UserHandle.SYSTEM)) {Slog.wtf(TAG, "cannot start car service");}loadNativeLibrary();}
这里首先注册了开关机广播,CarWatchdogDaemonHelper用于监控此服务,接着会绑定一个包名为"com.android.car",Action为"android.car.ICar"的服务,这就是系统中和汽车相关的核心服务CarService,相关源代码在packages/services/Car/service目录下,然后我们先去看看CarService,等下再回头来看绑定此服务之后的mCarServiceConnection回调部分。
如下是CarService的AndroidManifest部分截图,可以看到CarService的sharedUserId是系统级别的,这是一个系统级服务,类似SystemUI,它编译出来同样是一个APK文件。 来具体看CarService,它的onStartCommand没什么东西,主要来看onBind:
CarService.onBind
@Overridepublic IBinder onBind(Intent intent) {return mICarImpl;}
ICarImpl是一个Binder服务端,其顶级接口为ICar,在onCreate中初始化:
CarService.onCreate
@Overridepublic void onCreate() {//通知用户有关 CAN 总线故障 mCanBusErrorNotifier = new CanBusErrorNotifier(this /* context */);//获取Vehicle hal的client端mVehicle = getVehicle();if (mVehicle == null) {throw new IllegalStateException("Vehicle HAL service is not available.");}try {mVehicleInterfaceName = mVehicle.interfaceDescriptor();} catch (RemoteException e) {...}//实例化ICarImplmICarImpl = new ICarImpl(this,mVehicle,SystemInterface.Builder.defaultSystemInterface(this).build(),mCanBusErrorNotifier,mVehicleInterfaceName);//初始化mICarImpl.init();//Vehicle hal对端死亡回调linkToDeath(mVehicle, mVehicleDeathRecipient);//将mICarImpl注册到ServiceManagerServiceManager.addService("car_service", mICarImpl);//修改boot.car_service_created属性为1SystemProperties.set("boot.car_service_created", "1");super.onCreate();}
此方法中主要会对ICarImpl实例化,之后init进行初始化,最后将其注册到ServiceManager。
ICarImpl构造方法
ICarImpl(Context serviceContext, IVehicle vehicle, SystemInterface systemInterface,CanBusErrorNotifier errorNotifier, String vehicleInterfaceName,@Nullable CarUserService carUserService,@Nullable CarWatchdogService carWatchdogService) {......mPerUserCarServiceHelper = new PerUserCarServiceHelper(serviceContext, mCarUserService);mCarBluetoothService = new CarBluetoothService(serviceContext, mPerUserCarServiceHelper);mCarInputService = new CarInputService(serviceContext, mHal.getInputHal(), mCarUserService);mCarProjectionService = new CarProjectionService(serviceContext, null /* handler */, mCarInputService, mCarBluetoothService);mGarageModeService = new GarageModeService(mContext);mAppFocusService = new AppFocusService(serviceContext, mSystemActivityMonitoringService);mCarAudioService = new CarAudioService(serviceContext);mCarNightService = new CarNightService(serviceContext, mCarPropertyService);mFixedActivityService = new FixedActivityService(serviceContext);mInstrumentClusterService = new InstrumentClusterService(serviceContext,mAppFocusService, mCarInputService);mSystemStateControllerService = new SystemStateControllerService(serviceContext, mCarAudioService, this);mCarStatsService = new CarStatsService(serviceContext);mCarStatsService.init();if (mFeatureController.isFeatureEnabled(Car.VEHICLE_MAP_SERVICE)) {mVmsBrokerService = new VmsBrokerService(mContext, mCarStatsService);} else {mVmsBrokerService = null;}if (mFeatureController.isFeatureEnabled(Car.DIAGNOSTIC_SERVICE)) {mCarDiagnosticService = new CarDiagnosticService(serviceContext,mHal.getDiagnosticHal());} else {mCarDiagnosticService = null;}if (mFeatureController.isFeatureEnabled(Car.STORAGE_MONITORING_SERVICE)) {mCarStorageMonitoringService = new CarStorageMonitoringService(serviceContext,systemInterface);} else {mCarStorageMonitoringService = null;}mCarConfigurationService =new CarConfigurationService(serviceContext, new JsonReaderImpl());mCarLocationService = new CarLocationService(serviceContext);mCarTrustedDeviceService = new CarTrustedDeviceService(serviceContext);mCarMediaService = new CarMediaService(serviceContext, mCarUserService);mCarBugreportManagerService = new CarBugreportManagerService(serviceContext);......CarLocalServices.addService(CarPowerManagementService.class, mCarPowerManagementService);CarLocalServices.addService(CarPropertyService.class, mCarPropertyService);CarLocalServices.addService(CarUserService.class, mCarUserService);CarLocalServices.addService(CarTrustedDeviceService.class, mCarTrustedDeviceService);CarLocalServices.addService(CarUserNoticeService.class, mCarUserNoticeService);CarLocalServices.addService(SystemInterface.class, mSystemInterface);CarLocalServices.addService(CarDrivingStateService.class, mCarDrivingStateService);CarLocalServices.addService(PerUserCarServiceHelper.class, mPerUserCarServiceHelper);CarLocalServices.addService(FixedActivityService.class, mFixedActivityService);CarLocalServices.addService(VmsBrokerService.class, mVmsBrokerService);.....List<CarServiceBase> allServices = new ArrayList<>();allServices.add(mFeatureController);allServices.add(mCarUserService);allServices.add(mSystemActivityMonitoringService);allServices.add(mCarPowerManagementService);allServices.add(mCarPropertyService);allServices.add(mCarDrivingStateService);...mAllServices = allServices.toArray(new CarServiceBase[allServices.size()]);
}
这里省略了和Vehicle hal有关的初始化和分析,后续文章再看。
ICarImpl构造方法中创建了一系列CarService模块下的服务,这些服务有部分被添加到了CarLocalServices内部,其提供了getService静态方法用于直接获取这些服务,所有服务都被保存在ICarImpl内部的CarServiceBase类型数组mAllServices中(所有服务都是CarServiceBase的子类)。
ICarImpl构造方法完了之后会接着调用其init方法:
ICarImpl.init
@MainThreadvoid init() {mBootTiming = new TimingsTraceLog(VHAL_TIMING_TAG, Trace.TRACE_TAG_HAL);traceBegin("VehicleHal.init");//hal初始化//...省略traceEnd();traceBegin("CarService.initAllServices");for (CarServiceBase service : mAllServices) {service.init();}traceEnd();}
此方法很简单,遍历mAllServices,分别执行所有服务的init,各自初始化,有兴趣的可以自己去研究各个服务。
到此ICarImpl初始化完毕,最后会作为binder返回给绑定此服务的mCarServiceConnection:
private final ServiceConnection mCarServiceConnection = new ServiceConnection() {@Overridepublic void onServiceConnected(ComponentName componentName, IBinder iBinder) {if (DBG) {Slog.d(TAG, "onServiceConnected:" + iBinder);}handleCarServiceConnection(iBinder);}
@Overridepublic void onServiceDisconnected(ComponentName componentName) {handleCarServiceCrash();}};
CarServiceHelperService.handleCarServiceConnection
void handleCarServiceConnection(IBinder iBinder) {...synchronized (mLock) {if (mCarService == iBinder) {return; // already connected.}mCarService = iBinder;...sendSetCarServiceHelperBinderCall();......}}
这个方法我们主要关注上面部分,返回的ICarImpl被保存在了CarServiceHelperService的mCarService,后续可通过mCarService跨进程通信。
CarServiceHelperService.sendSetCarServiceHelperBinderCallprivate void sendSetCarServiceHelperBinderCall() {Parcel data = Parcel.obtain();data.writeInterfaceToken(ICarConstants.CAR_SERVICE_INTERFACE);data.writeStrongBinder(mHelper.asBinder());// void setCarServiceHelper(in IBinder helper)sendBinderCallToCarService(data, ICarConstants.ICAR_CALL_SET_CAR_SERVICE_HELPER);}
这里将会进行跨进程通信,首先构造传输数据,ICarConstants是定义在ExternalConstants的静态内部类:
static final class ICarConstants {....static final String CAR_SERVICE_INTERFACE = "android.car.ICar";static final int ICAR_CALL_SET_CAR_SERVICE_HELPER = 0;....}
CAR_SERVICE_INTERFACE用来标识远程服务接口,其具体传输数据是一个Binder对象,我们来看看mHelper是什么?
private final ICarServiceHelperImpl mHelper = new ICarServiceHelperImpl();
mHelper是定义在CarServiceHelperService的内部类,是一个Binder对象:
private class ICarServiceHelperImpl extends ICarServiceHelper.Stub {...........
}
CarServiceHelperService.sendBinderCallToCarService 再回到前面看sendBinderCallToCarService方法:
private void sendBinderCallToCarService(Parcel data, int callNumber) {// Cannot depend on ICar which is defined in CarService, so handle binder call directly// instead.IBinder carService;synchronized (mLock) {carService = mCarService;}if (carService == null) {Slog.w(TAG, "Not calling txn " + callNumber + " because service is not bound yet",new Exception());return;}int code = IBinder.FIRST_CALL_TRANSACTION + callNumber;try {carService.transact(code, data, null, Binder.FLAG_ONEWAY);} catch (RemoteException e) {handleCarServiceCrash();} catch (RuntimeException e) {throw e;} finally {data.recycle();}}
这个方法很明显就是跨进程传输的具体实现了,对端是mCarService即ICarImpl,调用binder的transact进行跨进程通信,其code代表需要调用的对端方法,data为携带的传输数据,ICAR_CALL_SET_CAR_SERVICE_HELPER等于0,这里调用的是对端的0号方法。
于是我们来看看ICar.aidl中定义的0号方法:
interface ICar {.....oneway void setCarServiceHelper(in IBinder helper) = 0;......}
ICarImpl.setCarServiceHelper
接着来看setCarServiceHelper具体实现:
@Overridepublic void setCarServiceHelper(IBinder helper) {//权限检查assertCallingFromSystemProcess();ICarServiceHelper carServiceHelper = ICarServiceHelper.Stub.asInterface(helper);synchronized (mLock) {mICarServiceHelper = carServiceHelper;}mSystemInterface.setCarServiceHelper(carServiceHelper);mCarOccupantZoneService.setCarServiceHelper(carServiceHelper);}
这里将ICarServiceHelper的代理端保存在ICarImpl内部mICarServiceHelper,同时也传给了SystemInterface和CarOccupantZoneService,我们暂时不需要知道这三个类拿到ICarServiceHelper的代理端的具体用处,只需要知道他们有能力跨进程访问CarServiceHelperService就行了。
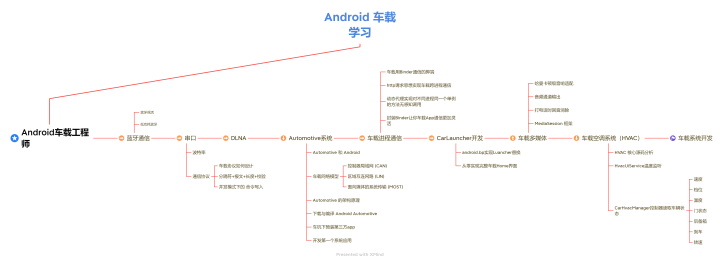
全文解析了车机开发中CarFramework框架的CarService启动流程;车机开发的知识点非常的多;总结如上图资料文档参考《车载技术手册》,里面内容包含以上进阶技术。
CarService启动流程总结
- 首先CarService是一个系统级别的服务APK,类似SystemUI,其在开机时由SystemServer通过CarServiceHelperService启动。
- CarServiceHelperService通过绑定服务的方式启动CarService,启动之后创建了一个Binder对象ICarImpl,并通过onBind返回给system_server进程。
- ICarImpl构造方法中创建了一系列和汽车相关的核心服务,并依次启动这些服务即调用各自init方法。
- ICarImpl返回给CarServiceHelperService之后,CarServiceHelperService也将其内部的一个Binder对象(ICarServiceHelperImpl)传递到了CarService进程,自此CarService和system_server两个进程建立了双向Binder通信。