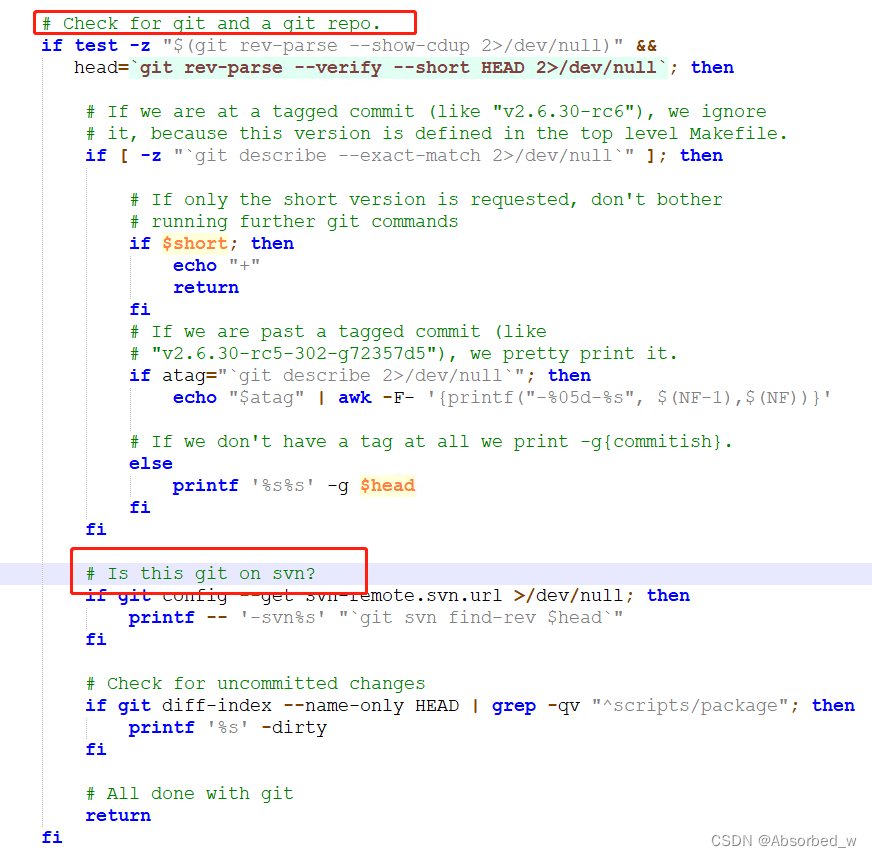
自己编译运行过程中遇到的一些问题
下载Assimp已编译的lib(因为我们公司的电脑有很多权限和限制,也不能自己安装一些没有报备的软件,所以愁方便我就没有用cMake自己编译了)找到一位免费分享的博主的。
https://blog.csdn.net/lady_killer9/article/details/89429092
系统找不到zlib.dll文件的解决方法
https://blog.csdn.net/LHXvs2015/article/details/120674525
https://www.cnblogs.com/yangjinbang/p/8330786.html
下载Assimp可识别的模型地址
https://learnopengl-cn.github.io/03%20Model%20Loading/03%20Model/
现实生活中,我们都是美术同学通过一些现代的绘图工具,为我们导出模型来绘制,建模工具会自己生成所有的顶点坐标、顶点法线和纹理坐标,我们开发者就不需要去关注这些细节了。
Mesh
Mesh俗称网格,一个网格代表可绘制的实体。我们自定义一个网格类
至少要包含一组顶点数据,这组顶点数据应该包含顶点坐标,顶点法线,已经顶点的uv坐标。
一组绘制顺序索引,用于EBO绑定。
一组贴图数据,用于纹理映射。
#pragma once
// Std. Includes
#include <string>
#include <fstream>
#include <sstream>
#include <iostream>
#include <vector>
using namespace std;
// GL Includes
#include <GL/glew.h> // Contains all the necessery OpenGL includes
#include <glm/glm.hpp>
#include <glm/gtc/matrix_transform.hpp>struct Vertex {// Positionglm::vec3 Position;// Normalglm::vec3 Normal;// TexCoordsglm::vec2 TexCoords;
};struct Texture {GLuint id;string type;aiString path;
};class Mesh {
public:  vector<Vertex> vertices;vector<GLuint> indices;vector<Texture> textures;//构造函数Mesh(vector<Vertex> vertices, vector<GLuint> indices, vector<Texture> textures){this->vertices = vertices;this->indices = indices;this->textures = textures;// Now that we have all the required data, set the vertex buffers and its attribute pointers.this->setupMesh();}void Draw(Shader shader){       GLuint diffuseNr = 1;GLuint specularNr = 1; //绑定贴图与采样器for (GLuint i = 0; i < this->textures.size(); i++){glActiveTexture(GL_TEXTURE0 + i);        stringstream ss;string number;string name = this->textures[i].type;if (name == "texture_diffuse")ss << diffuseNr++; else if (name == "texture_specular")ss << specularNr++; number = ss.str(); //保证每个uniform采样器对应着正确的纹理单元glUniform1i(glGetUniformLocation(shader.Program, (name + number).c_str()), i);           glBindTexture(GL_TEXTURE_2D, this->textures[i].id);}glUniform1f(glGetUniformLocation(shader.Program, "material.shininess"), 16.0f);glBindVertexArray(this->VAO);glDrawElements(GL_TRIANGLES, this->indices.size(), GL_UNSIGNED_INT, 0);glBindVertexArray(0);for (GLuint i = 0; i < this->textures.size(); i++){glActiveTexture(GL_TEXTURE0 + i);glBindTexture(GL_TEXTURE_2D, 0);}}
private:  GLuint VAO, VBO, EBO;//初始化各种缓冲和链接数据void setupMesh(){//初始化VAO,VBO,EBO 缓冲对象glGenVertexArrays(1, &this->VAO);glGenBuffers(1, &this->VBO);glGenBuffers(1, &this->EBO);glBindVertexArray(this->VAO);//将顶点数据初始化至缓冲中glBindBuffer(GL_ARRAY_BUFFER, this->VBO);glBufferData(GL_ARRAY_BUFFER, this->vertices.size() * sizeof(Vertex), &this->vertices[0], GL_STATIC_DRAW);//将绘制顺序索引初始到缓冲中glBindBuffer(GL_ELEMENT_ARRAY_BUFFER, this->EBO);glBufferData(GL_ELEMENT_ARRAY_BUFFER, this->indices.size() * sizeof(GLuint), &this->indices[0], GL_STATIC_DRAW);    glEnableVertexAttribArray(0);//将数据链接到顶点属性,告诉openGL如何解析这些数据glVertexAttribPointer(0, 3, GL_FLOAT, GL_FALSE, sizeof(Vertex), (GLvoid*)0);glEnableVertexAttribArray(1);glVertexAttribPointer(1, 3, GL_FLOAT, GL_FALSE, sizeof(Vertex), (GLvoid*)offsetof(Vertex, Normal));glEnableVertexAttribArray(2);glVertexAttribPointer(2, 2, GL_FLOAT, GL_FALSE, sizeof(Vertex), (GLvoid*)offsetof(Vertex, TexCoords));glBindVertexArray(0);}
};
模型类
现实生活中一个我们看到的模型都是由很多部位组成的,也可以说成是由很多mesh组合而成的,比如一张桌子,是由一个桌板加四个桌脚拼成的为了方便抽象,我们又封装了一层模型的类。
这个类主要就是去解析美术给我们的一个从Blender,Maya等工具导出的模型,将其拆分为一个Mesh数组,然后再调用Mesh类的绘制。
#pragma once
// Std. Includes
#include <string>
#include <fstream>
#include <sstream>
#include <iostream>
#include <map>
#include <vector>
using namespace std;
// GL Includes
#include <GL/glew.h> // Contains all the necessery OpenGL includes
#include <glm/glm.hpp>
#include <glm/gtc/matrix_transform.hpp>
#include <SOIL.h>
#include <assimp/Importer.hpp>
#include <assimp/scene.h>
#include <assimp/postprocess.h>#include "Mesh.h"GLint TextureFromFile(const char* path, string directory);class Model
{
public:/*  Functions   */// Constructor, expects a filepath to a 3D model.Model(string path){this->loadModel(path);}// Draws the model, and thus all its meshesvoid Draw(Shader shader){for (GLuint i = 0; i < this->meshes.size(); i++)this->meshes[i].Draw(shader);}private:/*  Model Data  */vector<Mesh> meshes;string directory;vector<Texture> textures_loaded;	// Stores all the textures loaded so far, optimization to make sure textures aren't loaded more than once.int mycount = 0;void loadModel(string path){Assimp::Importer importer;const aiScene* scene = importer.ReadFile(path, aiProcess_Triangulate | aiProcess_FlipUVs);     if (!scene || scene->mFlags == AI_SCENE_FLAGS_INCOMPLETE || !scene->mRootNode) // if is Not Zero{cout << "ERROR::ASSIMP:: " << importer.GetErrorString() << endl;return;}       this->directory = path.substr(0, path.find_last_of('/'));this->processNode(scene->mRootNode, scene);//printf("mesh个数: %d", mycount);}void processNode(aiNode* node, const aiScene* scene){for (GLuint i = 0; i < node->mNumMeshes; i++){           aiMesh* mesh = scene->mMeshes[node->mMeshes[i]];          this->meshes.push_back(this->processMesh(mesh, scene));}       for (GLuint i = 0; i < node->mNumChildren; i++){this->processNode(node->mChildren[i], scene);}}Mesh processMesh(aiMesh* mesh, const aiScene* scene){mycount++;vector<Vertex> vertices;vector<GLuint> indices;vector<Texture> textures;for (GLuint i = 0; i < mesh->mNumVertices; i++){Vertex vertex;glm::vec3 vector; vector.x = mesh->mVertices[i].x;vector.y = mesh->mVertices[i].y;vector.z = mesh->mVertices[i].z;vertex.Position = vector;vector.x = mesh->mNormals[i].x;vector.y = mesh->mNormals[i].y;vector.z = mesh->mNormals[i].z;vertex.Normal = vector;if (mesh->mTextureCoords[0]) {glm::vec2 vec;               vec.x = mesh->mTextureCoords[0][i].x;vec.y = mesh->mTextureCoords[0][i].y;vertex.TexCoords = vec;}elsevertex.TexCoords = glm::vec2(0.0f, 0.0f);vertices.push_back(vertex);}for (GLuint i = 0; i < mesh->mNumFaces; i++){aiFace face = mesh->mFaces[i];for (GLuint j = 0; j < face.mNumIndices; j++)indices.push_back(face.mIndices[j]);}if (mesh->mMaterialIndex >= 0){aiMaterial* material = scene->mMaterials[mesh->mMaterialIndex];            vector<Texture> diffuseMaps = this->loadMaterialTextures(material, aiTextureType_DIFFUSE, "texture_diffuse");textures.insert(textures.end(), diffuseMaps.begin(), diffuseMaps.end());vector<Texture> specularMaps = this->loadMaterialTextures(material, aiTextureType_SPECULAR, "texture_specular");textures.insert(textures.end(), specularMaps.begin(), specularMaps.end());}      return Mesh(vertices, indices, textures);}vector<Texture> loadMaterialTextures(aiMaterial* mat, aiTextureType type, string typeName){vector<Texture> textures;for (GLuint i = 0; i < mat->GetTextureCount(type); i++){aiString str;mat->GetTexture(type, i, &str);           GLboolean skip = false;for (GLuint j = 0; j < textures_loaded.size(); j++){if (std::strcmp(textures_loaded[j].path.C_Str(), str.C_Str()) == 0){textures.push_back(textures_loaded[j]);skip = true; break;}}if (!skip){  Texture texture;texture.id = TextureFromFile(str.C_Str(), this->directory);texture.type = typeName;texture.path = str;textures.push_back(texture);this->textures_loaded.push_back(texture); }}return textures;}
};GLint TextureFromFile(const char* path, string directory)
{  string filename = string(path);filename = directory + '/' + filename;GLuint textureID;glGenTextures(1, &textureID);int width, height;unsigned char* image = SOIL_load_image(filename.c_str(), &width, &height, 0, SOIL_LOAD_RGB);glBindTexture(GL_TEXTURE_2D, textureID);glTexImage2D(GL_TEXTURE_2D, 0, GL_RGB, width, height, 0, GL_RGB, GL_UNSIGNED_BYTE, image);glGenerateMipmap(GL_TEXTURE_2D);glTexParameteri(GL_TEXTURE_2D, GL_TEXTURE_WRAP_S, GL_REPEAT);glTexParameteri(GL_TEXTURE_2D, GL_TEXTURE_WRAP_T, GL_REPEAT);glTexParameteri(GL_TEXTURE_2D, GL_TEXTURE_MIN_FILTER, GL_LINEAR_MIPMAP_LINEAR);glTexParameteri(GL_TEXTURE_2D, GL_TEXTURE_MAG_FILTER, GL_LINEAR);glBindTexture(GL_TEXTURE_2D, 0);SOIL_free_image_data(image);return textureID;
}
最后就是渲染代码
```cpp
// Std. Includes
#include <string>// GLEW
#define GLEW_STATIC
#include <GL/glew.h>// GLFW
#include <GLFW/glfw3.h>// GL includes
#include "Shader.h"
#include "Camera.h"
#include "Model.h"// GLM Mathemtics
#include <glm/glm.hpp>
#include <glm/gtc/matrix_transform.hpp>
#include <glm/gtc/type_ptr.hpp>// Other Libs
#include <SOIL.h>// Properties
GLuint screenWidth = 800, screenHeight = 600;// Function prototypes
void key_callback(GLFWwindow* window, int key, int scancode, int action, int mode);
void scroll_callback(GLFWwindow* window, double xoffset, double yoffset);
void mouse_callback(GLFWwindow* window, double xpos, double ypos);
void Do_Movement();const GLuint WIDTH = 800, HEIGHT = 600;
// Camera
glm::vec3 cameraPos = glm::vec3(0.0f, 0.0f, 3.0f);
glm::vec3 cameraFront = glm::vec3(0.0f, 0.0f, -1.0f);
glm::vec3 cameraUp = glm::vec3(0.0f, 1.0f, 0.0f);
GLfloat yaw = -90.0f;	// Yaw is initialized to -90.0 degrees since a yaw of 0.0 results in a direction vector pointing to the right (due to how Eular angles work) so we initially rotate a bit to the left.
GLfloat pitch = 0.0f;
GLfloat lastX = WIDTH / 2.0;
GLfloat lastY = HEIGHT / 2.0;
bool keys[1024];
bool firstMouse = true;GLfloat deltaTime = 0.0f;
GLfloat lastFrame = 0.0f;// The MAIN function, from here we start our application and run our Game loop
int main()
{// Init GLFWglfwInit();glfwWindowHint(GLFW_CONTEXT_VERSION_MAJOR, 3);glfwWindowHint(GLFW_CONTEXT_VERSION_MINOR, 3);glfwWindowHint(GLFW_OPENGL_PROFILE, GLFW_OPENGL_CORE_PROFILE);glfwWindowHint(GLFW_RESIZABLE, GL_FALSE);GLFWwindow* window = glfwCreateWindow(screenWidth, screenHeight, "LearnOpenGL", nullptr, nullptr); // WindowedglfwMakeContextCurrent(window);// Set the required callback functionsglfwSetKeyCallback(window, key_callback);glfwSetCursorPosCallback(window, mouse_callback);glfwSetScrollCallback(window, scroll_callback);// OptionsglfwSetInputMode(window, GLFW_CURSOR, GLFW_CURSOR_DISABLED);// Initialize GLEW to setup the OpenGL Function pointersglewExperimental = GL_TRUE;glewInit();// Define the viewport dimensionsglViewport(0, 0, screenWidth, screenHeight);// Setup some OpenGL optionsglEnable(GL_DEPTH_TEST);// Setup and compile our shadersShader shader("VertexShaderSource2_2_1.txt", "FragmentShaderSource2_2_1.txt");// Load modelsModel ourModel("nanosuit/nanosuit.obj");// Draw in wireframe//glPolygonMode(GL_FRONT_AND_BACK, GL_LINE);// Game loopwhile (!glfwWindowShouldClose(window)){// Set frame timeGLfloat currentFrame = glfwGetTime();deltaTime = currentFrame - lastFrame;lastFrame = currentFrame;// Check and call eventsglfwPollEvents();Do_Movement();// Clear the colorbufferglClearColor(0.05f, 0.05f, 0.05f, 1.0f);glClear(GL_COLOR_BUFFER_BIT | GL_DEPTH_BUFFER_BIT);shader.Use();   // <-- Don't forget this one!// Transformation matricesglm::mat4 view(1);glm::mat4 projection(1);view = glm::lookAt(cameraPos, cameraPos + cameraFront, cameraUp);projection = glm::perspective(45.0f, (GLfloat)WIDTH / (GLfloat)HEIGHT, 0.1f, 100.0f);// Get the uniform locationsglUniformMatrix4fv(glGetUniformLocation(shader.Program, "projection"), 1, GL_FALSE, glm::value_ptr(projection));glUniformMatrix4fv(glGetUniformLocation(shader.Program, "view"), 1, GL_FALSE, glm::value_ptr(view));// Draw the loaded modelglm::mat4 model(1);model = glm::translate(model, glm::vec3(0.0f, -1.75f, 0.0f)); // Translate it down a bit so it's at the center of the scenemodel = glm::scale(model, glm::vec3(0.2f, 0.2f, 0.2f));	// It's a bit too big for our scene, so scale it downglUniformMatrix4fv(glGetUniformLocation(shader.Program, "model"), 1, GL_FALSE, glm::value_ptr(model));ourModel.Draw(shader);// Swap the buffersglfwSwapBuffers(window);}glfwTerminate();return 0;
}#pragma region "User input"// Moves/alters the camera positions based on user input
void Do_Movement()
{// Camera controlsGLfloat cameraSpeed = 5.0f * deltaTime;if (keys[GLFW_KEY_W])cameraPos += cameraSpeed * cameraFront;if (keys[GLFW_KEY_S])cameraPos -= cameraSpeed * cameraFront;if (keys[GLFW_KEY_A])cameraPos -= glm::normalize(glm::cross(cameraFront, cameraUp)) * cameraSpeed;if (keys[GLFW_KEY_D])cameraPos += glm::normalize(glm::cross(cameraFront, cameraUp)) * cameraSpeed;
}// Is called whenever a key is pressed/released via GLFW
void key_callback(GLFWwindow* window, int key, int scancode, int action, int mode)
{if (key == GLFW_KEY_ESCAPE && action == GLFW_PRESS)glfwSetWindowShouldClose(window, GL_TRUE);if (action == GLFW_PRESS)keys[key] = true;else if (action == GLFW_RELEASE)keys[key] = false;
}void mouse_callback(GLFWwindow* window, double xpos, double ypos)
{/*if (firstMouse)
{lastX = xpos;lastY = ypos;firstMouse = false;
}GLfloat xoffset = xpos - lastX;
GLfloat yoffset = lastY - ypos; // Reversed since y-coordinates go from bottom to left
lastX = xpos;
lastY = ypos;GLfloat sensitivity = 0.05;	// Change this value to your liking
xoffset *= sensitivity;
yoffset *= sensitivity;yaw += xoffset;
pitch += yoffset;// Make sure that when pitch is out of bounds, screen doesn't get flipped
if (pitch > 89.0f)pitch = 89.0f;
if (pitch < -89.0f)pitch = -89.0f;glm::vec3 front;
front.x = cos(glm::radians(yaw)) * cos(glm::radians(pitch));
front.y = sin(glm::radians(pitch));
front.z = sin(glm::radians(yaw)) * cos(glm::radians(pitch));
cameraFront = glm::normalize(front);*/
}void scroll_callback(GLFWwindow* window, double xoffset, double yoffset)
{}#pragma endregion
顶点着色器代码
#version 330 core
layout (location = 0) in vec3 position;
layout (location = 1) in vec3 normal;
layout (location = 2) in vec2 texCoords;out vec2 TexCoords;uniform mat4 model;
uniform mat4 view;
uniform mat4 projection;void main()
{gl_Position = projection * view * model * vec4(position, 1.0f);TexCoords = texCoords;
}
片段着色器代码
#version 330 corein vec2 TexCoords;out vec4 color;uniform sampler2D texture_diffuse1;void main()
{    color = vec4(texture(texture_diffuse1, TexCoords));
}
参考链接:https://learnopengl-cn.readthedocs.io/zh/latest/03%20Model%20Loading/03%20Model/