Vue基础14
- TodoList-组件自定义事件
- 先改Header和Footer子组件,List先不考虑
- App.vue
- MyHeader.vue
- MyFooter.vue
- 全局事件总线
- 实现思路
- 正规写法
- main.js
- App.vue
- Student.vue
- School.vue
- 总结:全局事件总线(GlobalEventBus)
- TodoList案例:全局事件总线
- App.vue
- MyItem.vue
- MyList.vue
TodoList-组件自定义事件
先改Header和Footer子组件,List先不考虑
App.vue
<MyHeader  @addTodo="addTodo"/>
<MyFooter :todos="todos" @clearAllTodo="clearAllTodo" @checkAllTodo="checkAllTodo"/>
Header.vue
add(){if(!this.title.trim()) return alert('输入的值不能为空!');const todoObj={id:nanoid(),title:this.title,done:false};this.$emit("addTodo",todoObj)this.title=''}
Footer.vue
props:['todos'],
isAll:{get(){return this.haveDone===this.total&&this.total>0},set(value){// this.todos.forEach(todo=>todo.done=value)// this.checkAllTodo(value)this.$emit("checkAllTodo",value)}}
methods:{checkAll(e){// this.checkAllTodo(e.target.checked)this.$emit("checkAllTodo",e.target.checked)},clearAll(){if(confirm('确定删除已完成任务吗?')){// this.clearAllTodo()this.$emit("clearAllTodo")}}}
App.vue
<template><div class="bg"><div class="todoList"><h2 class="title">待办事项</h2><MyHeader  @addTodo="addTodo"/><div class="listItem" v-show="todos.length"><MyList :todos="todos" :deleteTodo="deleteTodo" :checkTodo="checkTodo"/><MyFooter :todos="todos" @clearAllTodo="clearAllTodo" @checkAllTodo="checkAllTodo"/></div></div></div>
</template><script>
import MyHeader from "@/components/MyHeader";
import MyList from '@/components/MyList';
import MyFooter from '@/components/MyFooter'
export default {name: "App",components:{MyHeader, MyList, MyFooter},data(){return{todos:JSON.parse(localStorage.getItem('todos'))||[]}},methods:{//添加一个todoaddTodo(todoObj){this.todos.unshift(todoObj)},//删除一个tododeleteTodo(id){this.todos=this.todos.filter(todo=>todo.id!==id)},//勾选or取消勾选一个todocheckTodo(id){this.todos.forEach((todo)=>{if(todo.id===id){todo.done=!todo.done}})},//清除已完成任务clearAllTodo() {this.todos=this.todos.filter(todo=>!todo.done)},//全选or取消全选checkAllTodo(done){this.todos.forEach(todo=>todo.done=done)}},watch:{todos:{//开启深度监视deep:true,handler(value){localStorage.setItem('todos',JSON.stringify(value))}}}
}
</script><style lang="less">
*{padding: 0;margin: 0;
}
.bg{background-color: #333;height: 937px;padding-top: 100px;box-sizing: border-box;.todoList{background-color: #fff;width: 50%;height: 90%;margin: 0 auto;//box-shadow: 5px 5px 10px 3px rgba(147, 221, 255, 0.5),-5px -5px 10px 3px rgba(147, 221, 255, 0.5);  蓝色阴影box-shadow: 5px 5px 10px 3px rgba(0, 0, 0, 0.5),-5px -5px 10px 3px rgba(0, 0, 0, 0.5);padding-top: 20px;box-sizing: border-box;.title{text-align: center;font-size: 30px;font-weight: 300;color: #00a4ff;}.listItem{width: 90%;//height: 200px;margin: auto;/*background-color: pink;*/list-style: none;border-radius: 0 0 5px 5px;box-shadow: 1px 1px 5px 1px rgba(0,0,0,0.1),-1px -1px 5px 1px rgba(0,0,0,0.1);padding: 20px 0;box-sizing: border-box;}}
}
</style>
MyHeader.vue
<template><div><input type="text" class="content" @keyup.enter="add" placeholder="请输入你的任务名称,按回车键确认" v-model="title"></div>
</template><script>
import {nanoid} from 'nanoid';
export default {name: "MyHeader",data(){return{title:''}},methods:{add(){if(!this.title.trim()) return alert('输入的值不能为空!');const todoObj={id:nanoid(),title:this.title,done:false};this.$emit("addTodo",todoObj)this.title=''}}
}
</script><style scoped lang="less">
div{width: 90%;height: 8%;background-color: #ffffff;box-shadow: 1px 1px 5px 1px rgba(0,0,0,0.1),-1px -1px 5px 1px rgba(0,0,0,0.1);margin: 10px auto 2px auto;display: flex;.content{width: 95%;height: 80%;font-size: 25px;outline: none;display: block;margin: auto;justify-content: center;align-self: center;border: none;}
}
</style>
MyFooter.vue
<template><div>
<!-- <input type="checkbox" name="matter" id="" :checked="isAll" @change="checkAll">--><input type="checkbox" name="matter" id="" v-model="isAll"> 已完成 <span>{{haveDone}}</span> / 全部 <span>{{total}}</span><button @click="clearAll">清除已完成任务</button></div>
</template><script>
export default {name: "MyFooter",props:['todos'],computed:{total(){return this.todos.length},haveDone(){return this.todos.reduce((pre,current)=>{return pre+(current.done?1:0)},0)},// isAll(){// return this.haveDone===this.total&&this.total>0// },isAll:{get(){return this.haveDone===this.total&&this.total>0},set(value){// this.todos.forEach(todo=>todo.done=value)// this.checkAllTodo(value)this.$emit("checkAllTodo",value)}}},methods:{checkAll(e){// this.checkAllTodo(e.target.checked)this.$emit("checkAllTodo",e.target.checked)},clearAll(){if(confirm('确定删除已完成任务吗?')){// this.clearAllTodo()this.$emit("clearAllTodo")}}}}
</script><style scoped lang="less">
div{width: 95%;margin: auto;margin-top: 10px;//border: 1px solid rgba(87, 87, 87, 0.3);button{background-color: #d9534f;float: right;padding: 3px 10px;color: white;border: 1px solid #d43f3a;border-radius: 5px;cursor: pointer;&:hover{background-color: #c9302c;border: 1px solid #ac2925;}}
}
</style>Chrome浏览器安装Vue legacy插件才能显示自定义事件

全局事件总线
使用一个中间者x组件作为桥梁,实现任意组件之间能够通信
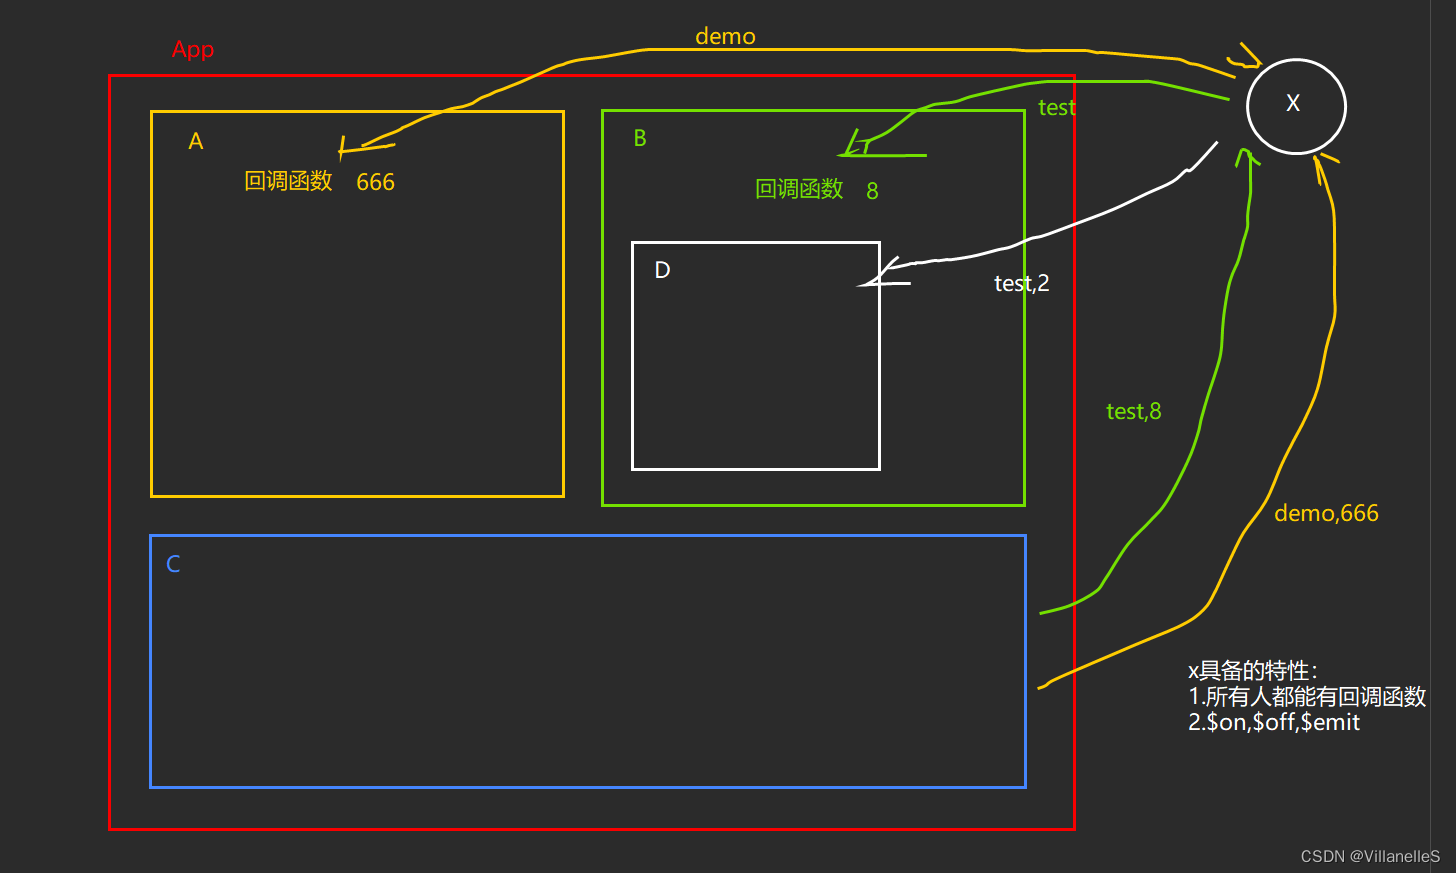
实现思路
- 第一步:所有人都能有回调函数
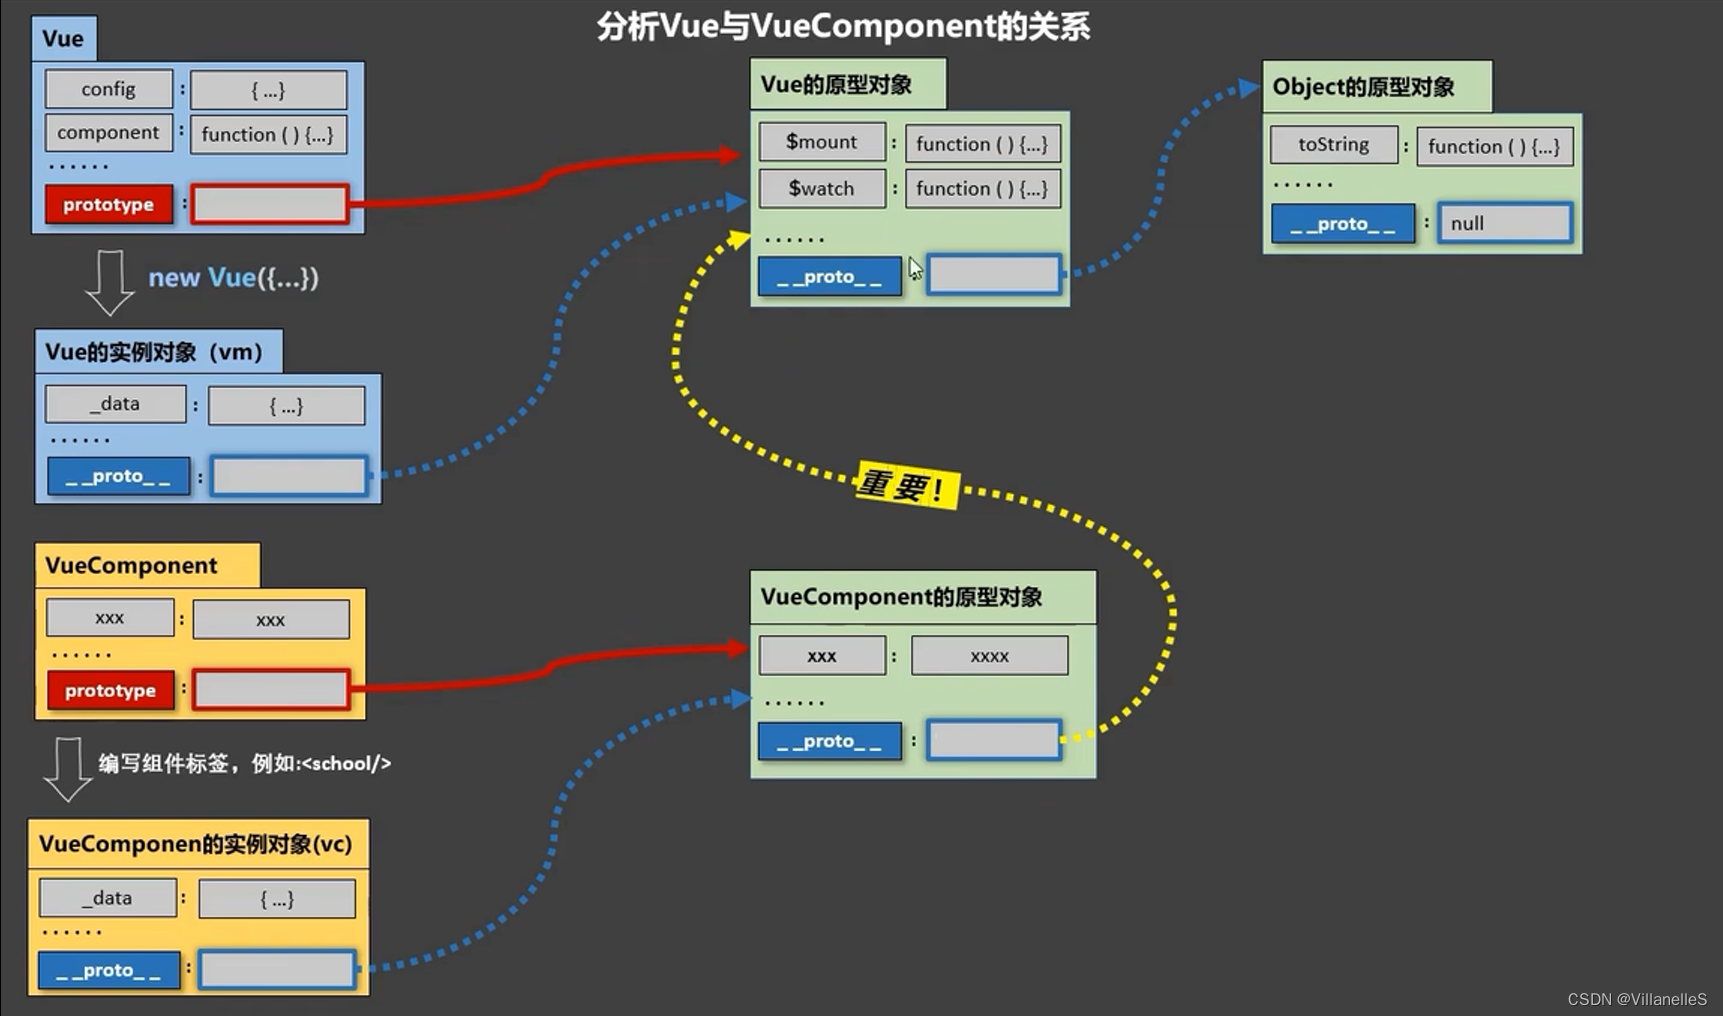
知识点回顾:
参考:Vue基础8的非单文件组件的一个重要的内置关系:VueComponent的原型对象是继承Vue的原型对象的
应用在项目中:
在main.js里:
//1.生成一个VueComponent构造函数
const Demo=Vue.extend({})
//2.new一个VC对象
const d=new Demo()
//3.在原型中放置这个x为刚创建的VC
Vue.prototype.x=d
main.js
import Vue from 'vue';import App from './App'Vue.config.productionTip=false//1.生成一个VueComponent构造函数
const Demo=Vue.extend({})
//2.new一个VC对象
const d=new Demo()
//3.在原型中放置这个x为刚创建的VC
Vue.prototype.x=dnew Vue({el:"#app",render:h=>h(App),
})- 实现Student.vue与School.vue组件之间通信
School.vue
<template><div class="school"><h1>学校名称:{{name}}</h1><h1>学校地址:{{address}}</h1><h2 v-if="studentName">学生的姓名是:{{studentName}}</h2></div>
</template><script>
export default {name: "School",data(){return{name:"幸福中学",address:"重庆市渝北区",studentName:""}},mounted(){this.x.$on("hello",(value)=>{this.studentName=value})}
}
</script><style scoped>
.school{background-color: skyblue;
}
</style>
Student.vue
<template><div class="student"><h1>学生姓名:{{name}}</h1><h1>学生性别:{{sex}}</h1><button @click="showMsg">点我输出学生姓名</button></div>
</template><script>export default {name: "Student",data(){return{name:'李四',sex:'女'}},methods:{showMsg(){this.x.$emit("hello",this.name)}}}
</script><style scoped>
.student{background-color: pink;
}
</style>
正规写法
Vue原型身上的$on,$off,$emit不仅VC能调用到,Vm也可以
但是以下写法会报错:
//创建vm
const vm=new Vue({el:"#app",render:h=>h(App)
})Vue.prototype.x=vm
因为new Vue代码执行完毕后,意味着整个App组件(包括子组件School)都放到页面上去了,这时候再给原型x放vm已经晚了,这时可以借助生命周期函数使这一步有效。
正规写法如下:
main.js
import Vue from 'vue';import App from './App'Vue.config.productionTip=falsenew Vue({el:"#app",render:h=>h(App),beforeCreate() {Vue.prototype.$bus=this}
})
App.vue
<template><div class="main"><h1>{{msg}}</h1><School /><Student /></div>
</template><script>
import School from "@/components/School";
import Student from "@/components/Student";
export default {name: "App",data() {return {msg: "你好啊!",}},components:{School,Student},
}
</script><style scoped>
.main{background-color: grey;padding: 5px;
}
</style>
Student.vue
<template><div class="student"><h1>学生姓名:{{name}}</h1><h1>学生性别:{{sex}}</h1><button @click="showMsg">点我输出学生姓名</button></div>
</template><script>export default {name: "Student",data(){return{name:'李四',sex:'女'}},methods:{showMsg(){// this.x.$emit("hello",this.name)this.$bus.$emit("hello",this.name)}}}
</script><style scoped>
.student{background-color: pink;
}
</style>
School.vue
<template><div class="school"><h1>学校名称:{{name}}</h1><h1>学校地址:{{address}}</h1><h2 v-if="studentName">学生的姓名是:{{studentName}}</h2></div>
</template><script>
export default {name: "School",data(){return{name:"幸福中学",address:"重庆市渝北区",studentName:""}},mounted(){// this.x.$on("hello",(value)=>{//   this.studentName=value// })this.$bus.$on("hello",(data)=>{this.studentName=data})},beforeDestroy(){this.$bus.off("hello")}
}
</script><style scoped>
.school{background-color: skyblue;
}
</style>
总结:全局事件总线(GlobalEventBus)
- 一种组件间通信的方式,适用于任意组件间通信
- 安装全局事件总线:
new Vue({
…
beforeCreate(){
Vue.prototype.$bus=this //安装全局事件总线,$bus就是当前应用的vm
},
…
})
- 使用事件总线:
(1)接收数据:A组件想要接收数据,则在A组件中给$bus绑定自定义事件,事件的回调留在A组件自身methods(){
demo(data){…}
}
…
mounted(){
this.$bus.$on(‘xxx’,this.demo)
}
(2)提供数据:
this.$bus.$emit(‘xxx’,数据)
- 最好在beforeDestroy钩子中,用$off去解绑
当前组件所用到的事件
TodoList案例:全局事件总线
对于Item到App之间的传值,建议使用全局事件总线来传递,这样就不用List作为桥梁传递了
App.vue:
mounted(){//使用公共组件实现父组件和孙子组件传值this.$bus.$on("deleteTodo",this.deleteTodo)this.$bus.$on("checkTodo",this.checkTodo)},beforeDestroy() {//销毁公共组件的不再使用的组件this.$bus.$off("deleteTodo")this.$bus.$off("checkTodo")}
MyItem.vue:
export default {name: "MyItem",props:['todo'],methods:{deleteItem(id){//触发公共组件的某个事件if(confirm('确认删除嘛?'))  this.$bus.$emit("deleteTodo",id)},checkDone(id){//触发公共组件的某个事件this.$bus.$emit("checkTodo",id)}}
}
完整代码:
App.vue
<template><div class="bg"><div class="todoList"><h2 class="title">待办事项</h2><MyHeader  @addTodo="addTodo"/><div class="listItem" v-show="todos.length"><MyList :todos="todos"/><MyFooter :todos="todos" @clearAllTodo="clearAllTodo" @checkAllTodo="checkAllTodo"/></div></div></div>
</template><script>
import MyHeader from "@/components/MyHeader";
import MyList from '@/components/MyList';
import MyFooter from '@/components/MyFooter'
export default {name: "App",components:{MyHeader, MyList, MyFooter},data(){return{todos:JSON.parse(localStorage.getItem('todos'))||[]}},methods:{//添加一个todoaddTodo(todoObj){this.todos.unshift(todoObj)},//删除一个tododeleteTodo(id){this.todos=this.todos.filter(todo=>todo.id!==id)},//勾选or取消勾选一个todocheckTodo(id){this.todos.forEach((todo)=>{if(todo.id===id){todo.done=!todo.done}})},//清除已完成任务clearAllTodo() {this.todos=this.todos.filter(todo=>!todo.done)},//全选or取消全选checkAllTodo(done){this.todos.forEach(todo=>todo.done=done)}},watch:{todos:{//开启深度监视deep:true,handler(value){localStorage.setItem('todos',JSON.stringify(value))}}},mounted(){//使用公共组件实现父组件和孙子组件传值this.$bus.$on("deleteTodo",this.deleteTodo)this.$bus.$on("checkTodo",this.checkTodo)},beforeDestroy() {//销毁公共组件的不再使用的组件this.$bus.$off("deleteTodo")this.$bus.$off("checkTodo")}
}
</script><style lang="less">
*{padding: 0;margin: 0;
}
.bg{background-color: #333;height: 937px;padding-top: 100px;box-sizing: border-box;.todoList{background-color: #fff;width: 50%;height: 90%;margin: 0 auto;//box-shadow: 5px 5px 10px 3px rgba(147, 221, 255, 0.5),-5px -5px 10px 3px rgba(147, 221, 255, 0.5);  蓝色阴影box-shadow: 5px 5px 10px 3px rgba(0, 0, 0, 0.5),-5px -5px 10px 3px rgba(0, 0, 0, 0.5);padding-top: 20px;box-sizing: border-box;.title{text-align: center;font-size: 30px;font-weight: 300;color: #00a4ff;}.listItem{width: 90%;//height: 200px;margin: auto;/*background-color: pink;*/list-style: none;border-radius: 0 0 5px 5px;box-shadow: 1px 1px 5px 1px rgba(0,0,0,0.1),-1px -1px 5px 1px rgba(0,0,0,0.1);padding: 20px 0;box-sizing: border-box;}}
}
</style>
MyItem.vue
<template><div><li><!-- <input type="checkbox" name="matter" id="" v-model="todo.done">--><input type="checkbox" name="matter" id="" @change="checkDone(todo.id)" :checked="todo.done"> {{todo.title}}<button class="delete" @click="deleteItem(todo.id)">删除</button></li></div>
</template><script>
export default {name: "MyItem",props:['todo'],methods:{deleteItem(id){//触发公共组件的某个事件if(confirm('确认删除嘛?')) this.$bus.$emit("deleteTodo",id)},checkDone(id){//触发公共组件的某个事件this.$bus.$emit("checkTodo",id)}}
}
</script><style scoped lang="less">
li{//height: 35%;//width: 96%;display: block;//background-color: pink;margin: auto;padding: 12px;border-top: 1px solid rgba(87, 87, 87, 0.3);//border-left: 1px solid rgba(87, 87, 87, 0.3);//border-right: 1px solid rgba(87, 87, 87, 0.3);//box-sizing: border-box;border-collapse: collapse;button{background-color: #d9534f;float: right;padding: 3px 10px;color: white;border: 1px solid #d43f3a;border-radius: 5px;cursor: pointer;&:hover{background-color: #c9302c;border: 1px solid #ac2925;}}&:hover{background-color: rgba(0,0,0,0.1);}
}
</style>MyList.vue
<template><div><ul><div class="con"><MyItem v-for="todo in todos" :todo="todo" :key="todo.id"/></div></ul></div>
</template><script>
import MyItem from "@/components/MyItem";
export default {name:'MyList',components:{MyItem},props:['todos']
}
</script><style scoped lang="less">
ul{.con{//width: 95%;//margin: auto;border-bottom: 1px solid rgba(87, 87, 87, 0.3);border-left: 1px solid rgba(87, 87, 87, 0.3);border-right: 1px solid rgba(87, 87, 87, 0.3);margin: 0px 8px;//background-color: pink;}
}
</style>