文章目录
- 前言
- 一、基础环境搭建
- 1、项目环境搭建
- 2、zipkin server启动
- 3、基于Feign进行服务调用
- 二、Sleuth + Feign调用源码分析
- 1、调用链分析
- 2、Sleuth针对Feign进行的改造
- 总结
前言
该篇文章,主要介绍Spring Cloud Sleuth + Zipkin基础环境搭建,以及基于源码侧分析,使用Feign进行调用服务时,Sleuth如何做到无感收集Span信息。
一、基础环境搭建
1、项目环境搭建
为避免在pom.xml中,直接添加sleuth、zipkin依赖,出现版本冲突等问题,而导致项目启动失败,这里,使用aliyun脚手架,初始化该环境。
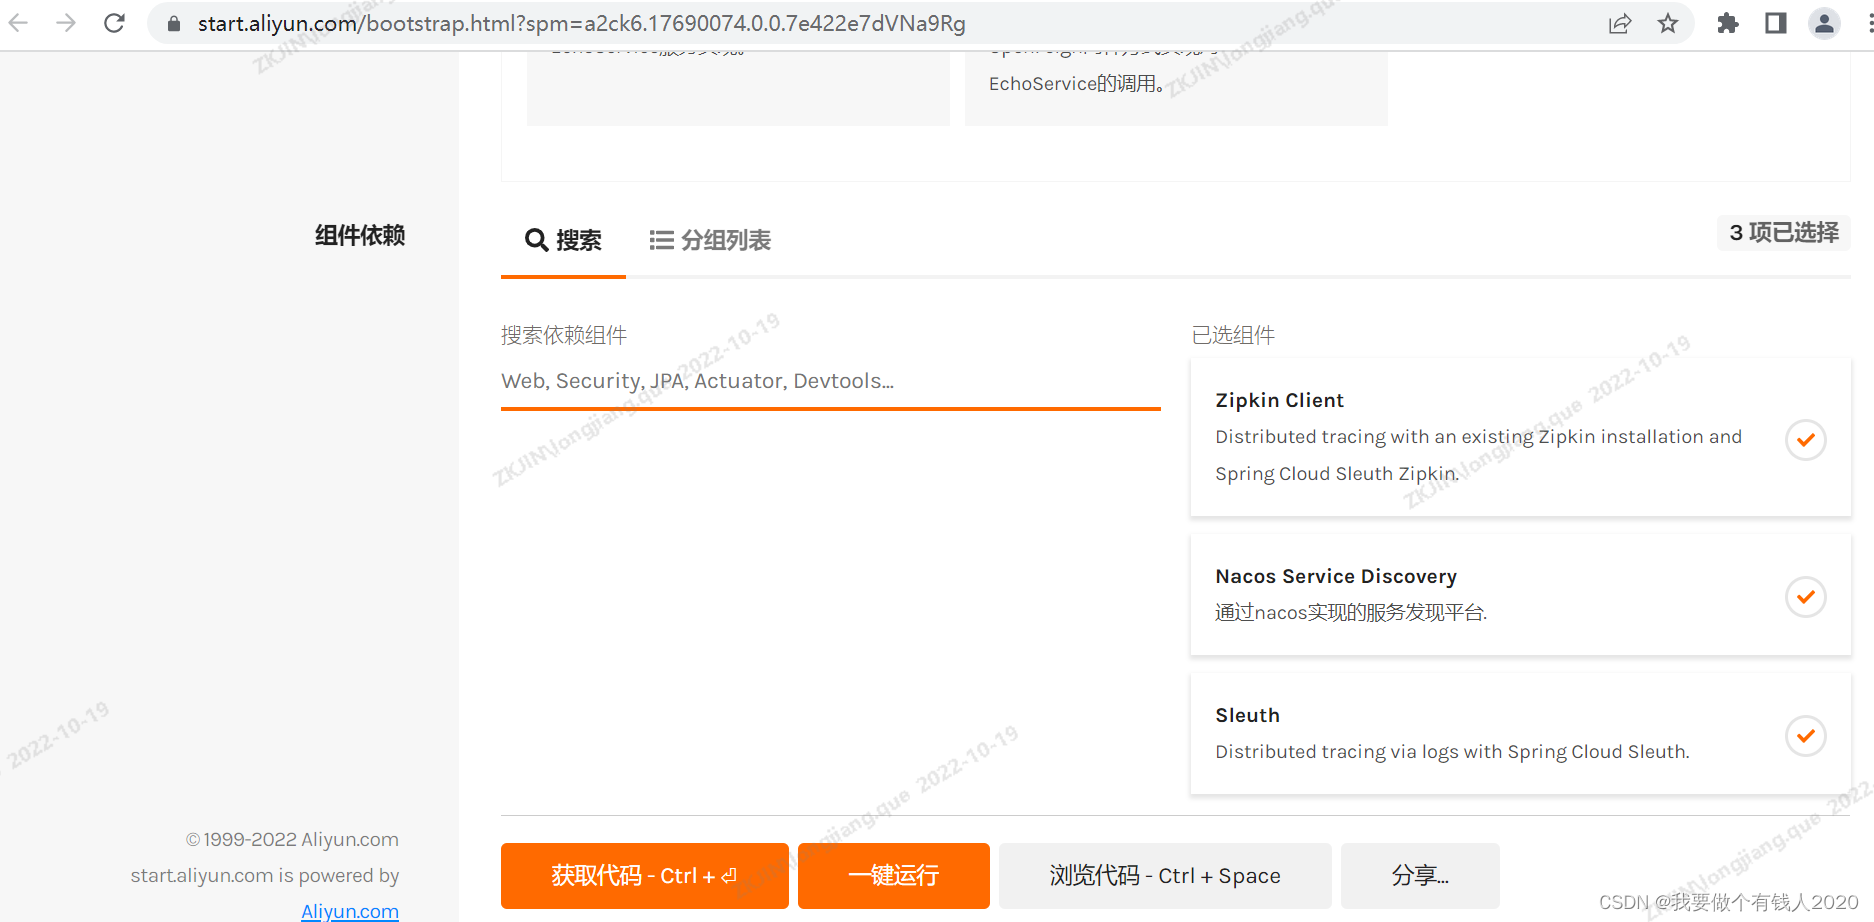
这里,使用分层架构中的web基础示例模式,搭建环境,项目结构如下所示:
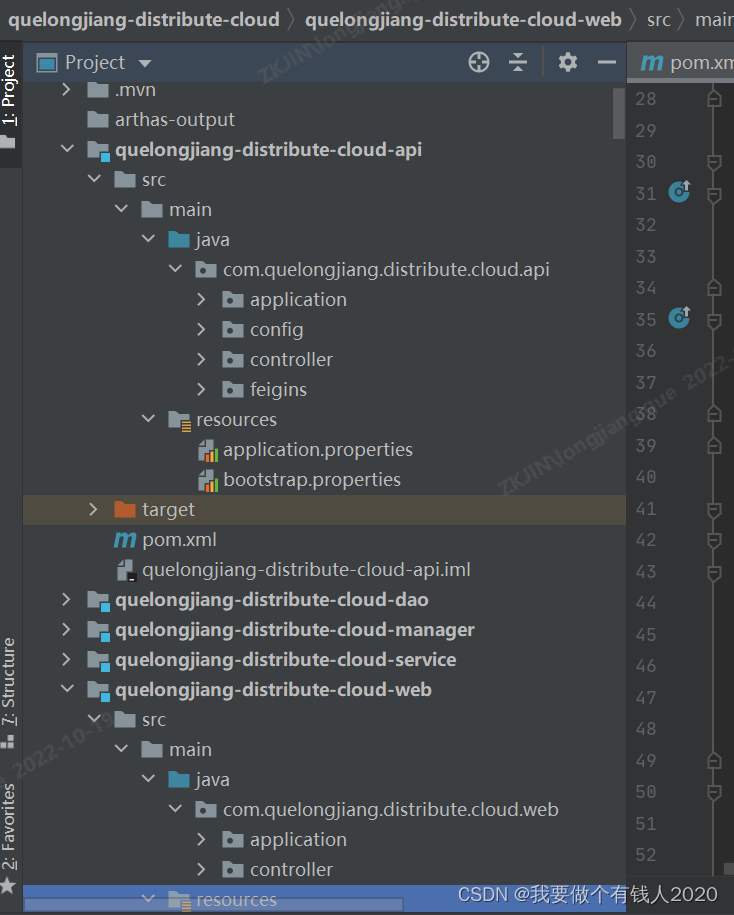
将api以及web两个模块,添加相关启动类等代码,使其作为两个启动服务。其中bootstrap.properties用于配置nacos相关信息,用于服务注册和发现。
spring.cloud.nacos.config.server-addr=localhost:8848
spring.cloud.nacos.config.username=nacos
spring.cloud.nacos.config.password=nacos
spring.cloud.nacos.config.namespace=d60c4d2a-7ea0-4a8b-9eea-689a30bc5aa5spring.cloud.nacos.discovery.server-addr=${spring.cloud.nacos.config.server-addr}
spring.cloud.nacos.discovery.user-name=${spring.cloud.nacos.config.username}
spring.cloud.nacos.discovery.password=${spring.cloud.nacos.config.password}
spring.cloud.nacos.discovery.namespace=${spring.cloud.nacos.config.namespace}
application.properties,配置zipkin服务信息(两个服务配置信息类似)。
spring.application.name=distribute-api
server.port=10001spring.zipkin.baseUrl=http://127.0.0.1:9411
debug=true
2、zipkin server启动
zipkin官网,提供多种方式,介绍zipkin server启动。现按照“Running from Source”,采用源码编码启动方式,启动zipkin server。
# get the latest source
git clone https://github.com/openzipkin/zipkin
cd zipkin
# Build the server and also make its dependencies
./mvnw -DskipTests --also-make -pl zipkin-server clean install
# Run the server
java -jar ./zipkin-server/target/zipkin-server-*exec.jar
3、基于Feign进行服务调用
api模块中,通过Feign请求web模块服务。
// 配置Feign
@Configuration
@EnableFeignClients(basePackages = "com.quelongjiang.**.feigins")
public class DistributeFeignConfig {
}// 用于调用web模块请求
@FeignClient(value = "distribute-web", path = "quelongjiang/webController")
public interface WebOperatorFeigin {@GetMapping("info")String info();
}// 在api模块,编写请求,并通过Feign调用web模块请求
@Slf4j
@RestController
@RequestMapping("quelongjiang/apiRequestController")
public class ApiRequestController {@Value("${spring.application.name}")private String applicationName;@Autowiredprivate WebOperatorFeigin webFeigin;@GetMapping("info")public String info() {this.webFeigin.info();log.info("Web Request Response is {}", this.webFeigin.info());return "This is " + applicationName + " request.";}@PostMapping("info")public Map<String, Object> infoPost() {Map<String, Object> response = new HashMap<>();response.put("MESSAGE", "This is " + applicationName + " request.");return response;}
}
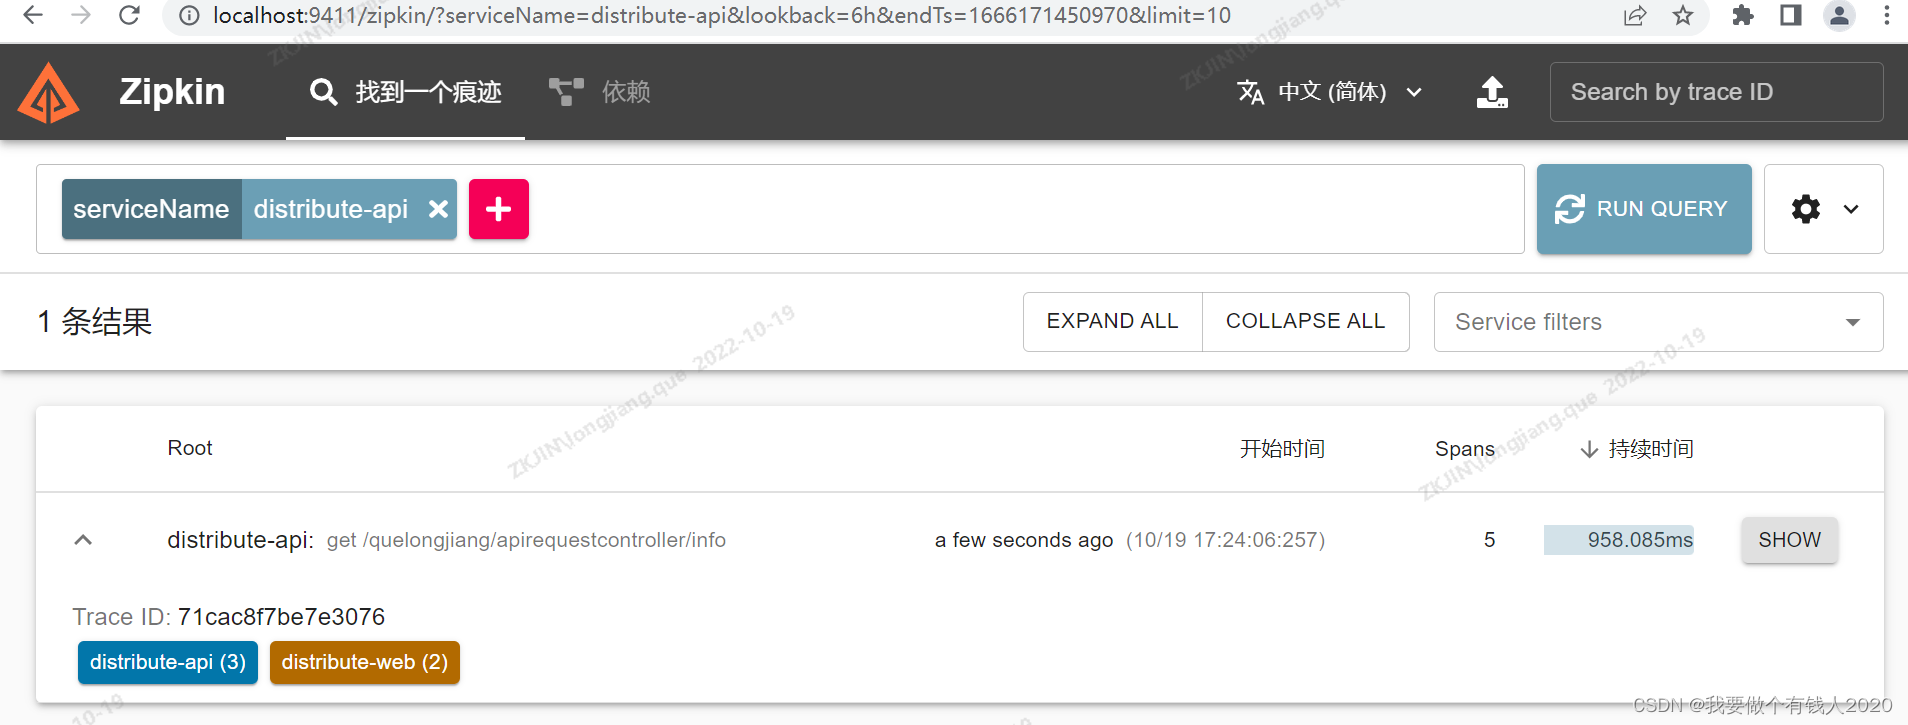
分别启动web和api两个服务,并请求api模块请求,在zipkin server 界面,可看到上述截图内容。
二、Sleuth + Feign调用源码分析
1、调用链分析
ApiRequestController.info中关于WebOperatorFeigin.info方法内部调用链,梳理总结如下
WebOperatorFeigin.info -> ReflectiveFeign.FeignInvocationHandler.invoke -> SynchronousMethodHandler.invoke -> client.execute (TraceLoadBalancerFeignClient) -> LoadBalancerFeignClient.execute -> AbstractLoadBalancerAwareClient.executeWithLoadBalancer -> LazyTracingFeignClient.execute -> TracingFeignClient.execute
针对上述内容,进行如下解释
1、基于动态代理方式,创建WebOperatorFeigin接口实现类,内部处理逻辑对应FeignInvocationHandler的invoke方法。
2、FeignInvocationHandler.invoke方法,通过method确定该方法对应的MethodHandler处理类,此处,对应于SynchronousMethodHandler类。
3、SynchronousMethodHandler.invoke内部,通过client.execute完成请求处理,client属性为Client接口实现类,此处,对应于TraceLoadBalancerFeignClient实现类。该实现类为LoadBalancerFeignClient子类。
4、LoadBalancerFeignClient.execute,通过一系列参数转换,最终通过delegate属性,完成execute,此处delegate对应于TracingFeignClient。
相关代码展示如下
// TraceLoadBalancerFeignClient类代码
@Override
public Response execute(Request request, Request.Options options) throws IOException {if (log.isDebugEnabled()) {log.debug("Before send");}Response response = null;// 创建SpanSpan fallbackSpan = tracer().nextSpan().start();try {if (delegateIsALoadBalancer()) {response = getDelegate().execute(request, options);}else {// TraceLoadBalancerFeignClient继承 LoadBalancerFeignClient,此处,使用父类execute方法,进行请求调用。response = super.execute(request, options);}if (log.isDebugEnabled()) {log.debug("After receive");}return response;}catch (Exception e) {// 省略部分代码}finally {fallbackSpan.abandon();}
}// LoadBalancerFeignClient
@Override
public Response execute(Request request, Request.Options options) throws IOException {try {URI asUri = URI.create(request.url());String clientName = asUri.getHost();URI uriWithoutHost = cleanUrl(request.url(), clientName);FeignLoadBalancer.RibbonRequest ribbonRequest = new FeignLoadBalancer.RibbonRequest(this.delegate, request, uriWithoutHost);IClientConfig requestConfig = getClientConfig(options, clientName);// lbClient,基于CachingSpringLoadBalancerFactory,借助于clientName,创建FeignLoadBalancer。// executeWithLoadBalancer在AbstractLoadBalancerAwareClient定义,具体的execute方法,在实现类(FeignLoadBalancer)定义return lbClient(clientName).executeWithLoadBalancer(ribbonRequest, requestConfig).toResponse();}catch (ClientException e) {// 省略部分代码}
}// FeignLoadBalancer
@Override
public RibbonResponse execute(RibbonRequest request, IClientConfig configOverride)throws IOException {Request.Options options;if (configOverride != null) {RibbonProperties override = RibbonProperties.from(configOverride);options = new Request.Options(override.connectTimeout(this.connectTimeout),override.readTimeout(this.readTimeout));}else {options = new Request.Options(this.connectTimeout, this.readTimeout);}// 该request.client对应于Client实现类。// request传参,于LoadBalancerFeignClient.execute方法中指定,其client方法,对应于该类的delegate属性。Response response = request.client().execute(request.toRequest(), options);return new RibbonResponse(request.getUri(), response);
}
2、Sleuth针对Feign进行的改造
通过上述分析,对于整体处理流程,有了一个大概的了解。接下来,通过解答3个问题,完成Sleuth对Feign调用改造分析。
1)SynchronousMethodHandler中client属性,如何被替换成TraceLoadBalancerFeignClient?
2)LoadBalancerFeignClient.execute,delegate属性,如何最终传递到LazyTracingFeignClient.execute?
3)如何将TracingFeignClient作为delegate属性,传递进LoadBalancerFeignClient?
在解答上述3个问题前,先介绍另外一个类,FeignContextBeanPostProcessor,正是这个类,完成Feign改头换面。
final class FeignContextBeanPostProcessor implements BeanPostProcessor {private final BeanFactory beanFactory;// 省略部分代码@Overridepublic Object postProcessAfterInitialization(Object bean, String beanName)throws BeansException {// 将FeignContext类型的Bean,转换成TraceFeignContext。// Sleuth对Feign内部关键Bean的替换,是通过TraceFeignObjectWrapper完成的。if (bean instanceof FeignContext && !(bean instanceof TraceFeignContext)) {return new TraceFeignContext(traceFeignObjectWrapper(), (FeignContext) bean);}return bean;}private TraceFeignObjectWrapper traceFeignObjectWrapper() {return new TraceFeignObjectWrapper(this.beanFactory);}
}
FeignContextBeanPostProcessor,将FeignContext类型的bean,替换成TraceFeignContext。两者为继承关系,代码差异体现在getInstance方法。既TraceFeignContext的getInstance方法,都会经过TraceFeignObjectWrapper.wrap修饰。
class TraceFeignContext extends FeignContext {private final TraceFeignObjectWrapper traceFeignObjectWrapper;private final FeignContext delegate;TraceFeignContext(TraceFeignObjectWrapper traceFeignObjectWrapper,FeignContext delegate) {this.traceFeignObjectWrapper = traceFeignObjectWrapper;this.delegate = delegate;}@Override@SuppressWarnings("unchecked")public <T> T getInstance(String name, Class<T> type) {T object = this.delegate.getInstance(name, type);if (object != null) {// 将FeignContext .getInstance方法获取的对象,使用TraceFeignObjectWrapper.wrap修饰一遍。// 也就是在这里,Sleuth将Feign原相关处理类,替换成Sleuth自己的亲信。return (T) this.traceFeignObjectWrapper.wrap(object);}return null;}// 省略部分代码
}
现在来分析TraceFeignObjectWrapper.wrap方法。
// TraceFeignObjectWrapper
Object wrap(Object bean) {// 针对Client类型的对象,进行大洗牌,替换成Sleuth自己的。if (bean instanceof Client && !(bean instanceof TracingFeignClient)) {// 将LoadBalancerFeignClient,替换成TraceLoadBalancerFeignClientif (ribbonPresent && bean instanceof LoadBalancerFeignClient&& !(bean instanceof TraceLoadBalancerFeignClient)) {return instrumentedFeignRibbonClient(bean);}if (ribbonPresent && bean instanceof TraceLoadBalancerFeignClient) {return bean;}// 将FeignBlockingLoadBalancerClient,替换成TraceFeignBlockingLoadBalancerClientif (loadBalancerPresent && bean instanceof FeignBlockingLoadBalancerClient&& !(bean instanceof TraceFeignBlockingLoadBalancerClient)) {return instrumentedFeignLoadBalancerClient(bean);}if (loadBalancerPresent&& bean instanceof RetryableFeignBlockingLoadBalancerClient&& !(bean instanceof TraceRetryableFeignBlockingLoadBalancerClient)) {return instrumentedRetryableFeignLoadBalancerClient(bean);}if (ribbonPresent && bean instanceof TraceFeignBlockingLoadBalancerClient) {return bean;}return new LazyTracingFeignClient(this.beanFactory, (Client) bean);}return bean;
}
现在开始解答上述三个问题。
1、SynchronousMethodHandler中client属性,如何被替换成TraceLoadBalancerFeignClient?
回答这个问题前,需先了解Feign代理类,是如何创建的,可参考FeignClient代理类创建过程分析 博文。此处,只列出相关代码。
FeignClientFactoryBean创建Feign代理类时,首先通过Spring上下文环境获取Client对象(此时为TraceLoadBalancerFeignClient),然后,通过getObject获取Feign代理对象。
getObject方法内部,最后通过getTarget方法,创建代理类。其中client属性,设置进Builder,后续在build方法中,用以创建Factory,通过调用create方法,创建SynchronousMethodHandler传入,client也就是这个时候,进驻到SynchronousMethodHandler。
// FeignClientFactoryBean
<T> T getTarget() {FeignContext context = applicationContext.getBean(FeignContext.class);Feign.Builder builder = feign(context);if (!StringUtils.hasText(url)) {if (!name.startsWith("http")) {url = "http://" + name;}else {url = name;}url += cleanPath();return (T) loadBalance(builder, context,new HardCodedTarget<>(type, name, url));}if (StringUtils.hasText(url) && !url.startsWith("http")) {url = "http://" + url;}String url = this.url + cleanPath();// 通过Spring上下文,获取Client,此处LoadBalancerFeignClient Bean,经由TraceFeignObjectWrapper,已替换成TraceLoadBalancerFeignClient Bean。Client client = getOptional(context, Client.class);if (client != null) {if (client instanceof LoadBalancerFeignClient) {// not load balancing because we have a url,// but ribbon is on the classpath, so unwrapclient = ((LoadBalancerFeignClient) client).getDelegate();}if (client instanceof FeignBlockingLoadBalancerClient) {// not load balancing because we have a url,// but Spring Cloud LoadBalancer is on the classpath, so unwrapclient = ((FeignBlockingLoadBalancerClient) client).getDelegate();}builder.client(client);}Targeter targeter = get(context, Targeter.class);// HystrixTargeter实现类,内部,通过builder.target方法,创建代理类。return (T) targeter.target(this, builder, context,new HardCodedTarget<>(type, name, url));
}// Feign.Builder类
public Feign build() {Client client = (Client)Capability.enrich(this.client, this.capabilities);Retryer retryer = (Retryer)Capability.enrich(this.retryer, this.capabilities);List<RequestInterceptor> requestInterceptors = (List)this.requestInterceptors.stream().map((ri) -> {return (RequestInterceptor)Capability.enrich(ri, this.capabilities);}).collect(Collectors.toList());Logger logger = (Logger)Capability.enrich(this.logger, this.capabilities);Contract contract = (Contract)Capability.enrich(this.contract, this.capabilities);Options options = (Options)Capability.enrich(this.options, this.capabilities);Encoder encoder = (Encoder)Capability.enrich(this.encoder, this.capabilities);Decoder decoder = (Decoder)Capability.enrich(this.decoder, this.capabilities);InvocationHandlerFactory invocationHandlerFactory = (InvocationHandlerFactory)Capability.enrich(this.invocationHandlerFactory, this.capabilities);QueryMapEncoder queryMapEncoder = (QueryMapEncoder)Capability.enrich(this.queryMapEncoder, this.capabilities);// 将Client对象,传递进Factory ,并用以构建ParseHandlersByName 对象。// 在ReflectiveFeign内部,通过ParseHandlersByName.apply方法处,通过factory.create方法,创建SynchronousMethodHandler对象。Factory synchronousMethodHandlerFactory = new Factory(client, retryer, requestInterceptors, logger, this.logLevel, this.decode404, this.closeAfterDecode, this.propagationPolicy, this.forceDecoding);ParseHandlersByName handlersByName = new ParseHandlersByName(contract, options, encoder, decoder, queryMapEncoder, this.errorDecoder, synchronousMethodHandlerFactory);return new ReflectiveFeign(handlersByName, invocationHandlerFactory, queryMapEncoder);
}
2、LoadBalancerFeignClient.execute,delegate属性,如何到达LazyTracingFeignClient.execute?
LoadBalancerFeignClient.execute方法,使用delegate属性,构造RibbonRequest对象,该对象用于请求参数,传递进FeignLoadBalancer的execute方法。此时,delegate,经过wrap修饰后,变成LazyTracingFeignClient。
// LoadBalancerFeignClient
@Override
public Response execute(Request request, Request.Options options) throws IOException {try {URI asUri = URI.create(request.url());String clientName = asUri.getHost();URI uriWithoutHost = cleanUrl(request.url(), clientName);FeignLoadBalancer.RibbonRequest ribbonRequest = new FeignLoadBalancer.RibbonRequest(this.delegate, request, uriWithoutHost);IClientConfig requestConfig = getClientConfig(options, clientName);// lbClient方法,创建FeignLoadBalancer对象,executeWithLoadBalancer方法在AbstractLoadBalancerAwareClient定义,为FeignLoadBalancer父类。// ribbonRequest对应于FeignLoadBalancer.RibbonRequest,其构造方法处,已保存FeignLoadBalancer.delegate属性。return lbClient(clientName).executeWithLoadBalancer(ribbonRequest, requestConfig).toResponse();}catch (ClientException e) {IOException io = findIOException(e);if (io != null) {throw io;}throw new RuntimeException(e);}
}// FeignLoadBalancer
@Override
public RibbonResponse execute(RibbonRequest request, IClientConfig configOverride)throws IOException {Request.Options options;if (configOverride != null) {RibbonProperties override = RibbonProperties.from(configOverride);options = new Request.Options(override.connectTimeout(this.connectTimeout),override.readTimeout(this.readTimeout));}else {options = new Request.Options(this.connectTimeout, this.readTimeout);}// 通过请求参数RibbonRequest,获取client对象,此对象来源于LoadBalancerFeignClient.execute方法中构造的RibbonRequest。Response response = request.client().execute(request.toRequest(), options);return new RibbonResponse(request.getUri(), response);
}
3、如何将TracingFeignClient作为delegate属性,传递进LoadBalancerFeignClient?
a、TraceLoadBalancerFeignClient继承LoadBalancerFeignClient,内部增加BeanFactory属性。
b、基于Bean Factory,获取Tracer、HttpTracing、TracingFeignClient属性。
c、通过TraceFeignObjectWrapper.instrumentedFeignRibbonClient,将Client替换成LazyTracingFeignClient对象。
d、将LazyTracingFeignClient,设置进TraceLoadBalancerFeignClient.delegate属性。
总结
Sleuth借助于TraceFeignObjectWrapper.wrap方法,将原Feign工作所使用的Client转换成Sleuth自己的Client,并在这些Client内部,完成Span对象的创建。