实验拓扑
拓扑下载
https://sharewh2.xuexi365.com/share/84b85b32-acb7-4f62-a389-6188680a19f3?t=3
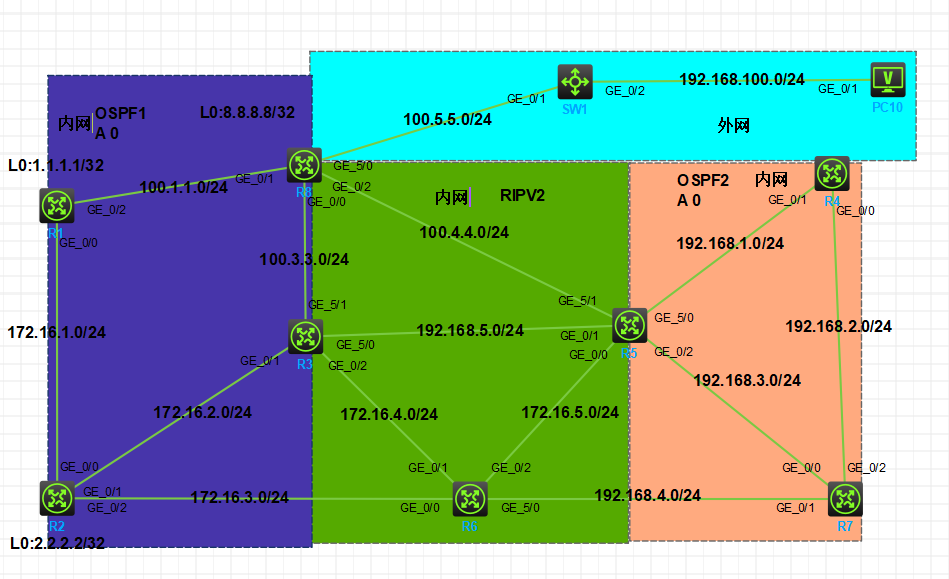
图 1-1
注:如无特别说明,描述中的 R1 或 SW1 对应拓扑中设备名称末尾数字为 1 的设备,R2 或 SW2 对应拓扑中设备名称末尾数字为 2 的设备,以此类推;另外,同一网段中,IP 地址的主机位为其设备编号,如 R3 的 g0/0 接口若在 192.168.1.0/24 网段,则其 IP 地址为 192.168.1.3/24,以此类推
实验需求
1. 按照图示配置IP地址;修改名称,配置ospf的路由器都需要配置环回口
2. 按照图示区域划分配置对应的动态路由协议,将所有环回口宣告进OSPF中,
3. 将所有环回口宣告进OSPF中,将rip路由引入ospf中,ospf路由引入rip中;
4. 要求实现内网全网互通;
5. 要求内网部分通过使用静态路由打通,内部网络要想访问外网,所以需要通过NAT技术实现;
7. 要求内部设备可以ping通外部网络;
8. 要求在R1上配置FTP服务,测试时可以使所有设备均可登录访问;
9. 要求在R4上配置Telnet服务,测试时可以使所有内网设备均可登录访问管理;
10.要求通过配置ACL策略使R5不能访问R1的ftp服务,其他内网设备不受影响;
11.要求你通过配置ACL策略使R2不能访问R4的Telnet服务,其他内网设备不受影响;
12.要求R6不能ping通R1的所有网段路由,其他内网网段不受影响;
13.要求R1不能ping通R6的所有业务IP地址包括环回口地址,其他内网地址不受影响;
14.要求R7不允许访问R1的FTP服务和telnet服务;
实验解法
15,按照图示配置IP地址;修改名称,配置ospf的路由器都需要配置环回口
R1
<H3C>sys
System View: return to User View with Ctrl+Z.
[H3C]sysn r1
[r1]int g0/0
[r1-GigabitEthernet0/0]ip add 172.16.1.1 24
[r1-GigabitEthernet0/0]int g0/2
[r1-GigabitEthernet0/2]ip add 100.1.1.1 24
[r1]int loo 0
[r1-LoopBack0]ip add 1.1.1.1 32
R2
<H3C>sys
System View: return to User View with Ctrl+Z.
[H3C]sysn r2
[r2-GigabitEthernet0/1]int g0/0
[r2-GigabitEthernet0/0]ip add 172.16.1.2 24
[r2-GigabitEthernet0/0]int g0/1
[r2-GigabitEthernet0/1]ip add 172.16.2.2 24
[r2-GigabitEthernet0/1]int g0/2
[r2-GigabitEthernet0/2]ip add 172.16.3.2 24
[r2]int loo 0
[r2-LoopBack0]ip add 2.2.2.2 32
R3
<H3C>sys
System View: return to User View with Ctrl+Z.
[H3C]sysn r3
[r3-GigabitEthernet0/0]int g0/1
[r3-GigabitEthernet0/1]ip add 172.16.2.3 24
[r3-GigabitEthernet0/1]int g0/2
[r3-GigabitEthernet0/2]ip add 172.16.4.3 24
[r3-GigabitEthernet0/2]int g5/0
[r3-GigabitEthernet5/0]ip add 192.168.5.3 24
[r3-GigabitEthernet5/0]int g5/1
[r3-GigabitEthernet5/1]ip add 100.3.3.3 24
[r3]int loo 0
[r3-LoopBack0]ip add 3.3.3.3 32
R4
<H3C>sys
System View: return to User View with Ctrl+Z.
[H3C]sysn r4
[r4]int g0/0
[r4-GigabitEthernet0/0]ip add 192.168.2.4 24
[r4-GigabitEthernet0/0]int g0/1
[r4-GigabitEthernet0/1]ip add 192.168.1.4 24
[r4]int loo 0
[r4-LoopBack0]ip add 4.4.4.4 32
R5
<H3C>sys
System View: return to User View with Ctrl+Z.
[H3C]sysn r5
[r5]int g0/0
[r5-GigabitEthernet0/0]ip add 172.16.5.5 24
[r5-GigabitEthernet0/0]int g0/1
[r5-GigabitEthernet0/1]ip add 192.168.5.5 24
[r5-GigabitEthernet0/1]int g0/2
[r5-GigabitEthernet0/2]ip add 192.168.3.5 24
[r5-GigabitEthernet0/2]int g5/0
[r5-GigabitEthernet5/0]ip add 192.168.1.5 24
[r5-GigabitEthernet5/0]int g5/1
[r5-GigabitEthernet5/1]ip add 100.4.4.5 24
[r5]int loo 0
[r5-LoopBack0]ip add 5.5.5.5 32
R6
<H3C>sys
System View: return to User View with Ctrl+Z.
[H3C]sysn r6
[r6]int g0/0
[r6-GigabitEthernet0/0]ip add 172.16.3.6 24
[r6-GigabitEthernet0/0]int g0/1
[r6-GigabitEthernet0/1]ip add 172.16.4.6 24
[r6-GigabitEthernet0/1]int g0/2
[r6-GigabitEthernet0/2]ip add 172.16.5.6 24
[r6-GigabitEthernet0/2]int g5/0
[r6-GigabitEthernet5/0]ip add 192.168.4.6 24
[r6]int loo 0
[r6-LoopBack0]ip add 6.6.6.6 32
R7
<H3C>sys
System View: return to User View with Ctrl+Z.
[H3C]sysn r7
[r7]int g0/0
[r7-GigabitEthernet0/0]ip add 192.168.3.4 24
[r7-GigabitEthernet0/0]int g0/1
[r7-GigabitEthernet0/1]ip add 192.168.4.7 24
[r7-GigabitEthernet0/1]int g0/2
[r7-GigabitEthernet0/2]ip add 192.168.2.7 24
[r7]int loo 0
[r7-LoopBack0]ip add 7.7.7.7 32
R8
<H3C>sys
System View: return to User View with Ctrl+Z.
[H3C]sysn r8
[r8]int g0/0
[r8-GigabitEthernet0/0]ip add 100.3.3.8 24
[r8-GigabitEthernet0/0]int g0/1
[r8-GigabitEthernet0/1]ip add 100.1.1.8 24
[r8-GigabitEthernet0/1]int g0/2
[r8-GigabitEthernet0/2]ip add 100.4.4.8 24
[r8-GigabitEthernet0/2]int g5/0
[r8-GigabitEthernet5/0]ip add 100.5.5.8 24
[r8]int loo 0
[r8-LoopBack0]ip add 8.8.8.8 32
SW1(100.5.5.0为vlan10-----192.168.100.0为vlan20)
<H3C>sys
System View: return to User View with Ctrl+Z.
[H3C]sys sw1
[sw1]vlan 10
[sw1-vlan10]port g1/0/1
[sw1-vlan10]vlan 20
[sw1-vlan20]port g1/0/2
[sw1-vlan20]int vlan 10
[sw1-Vlan-interface10]ip add 100.5.5.10 24
[sw1-Vlan-interface10]int vlan 20
[sw1-Vlan-interface20]ip add 192.168.100.254 24
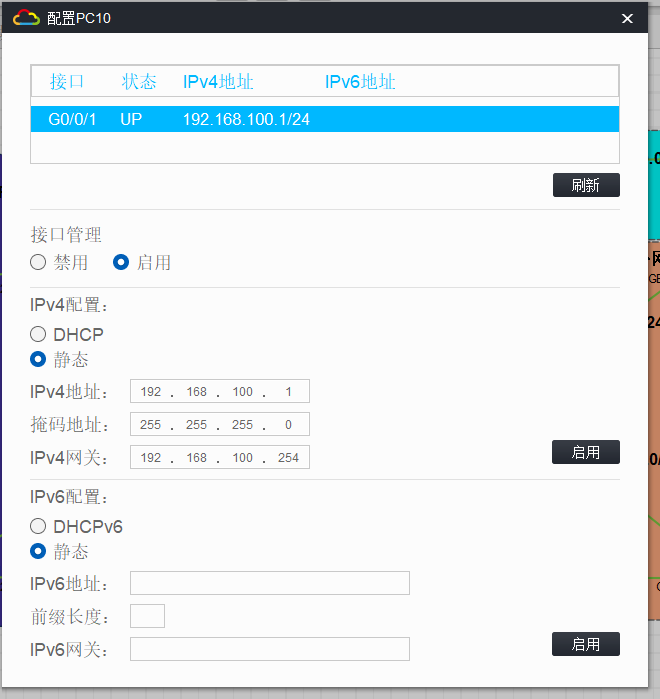
PC10
16,按照图示区域划分配置对应的动态路由协议,将所有环回口宣告进OSPF中,
R1
[r1]ospf rou 1.1.1.1
[r1-ospf-1]a 0
[r1-ospf-1-area-0.0.0.0]netw 172.16.1.0 0.0.0.255
[r1-ospf-1-area-0.0.0.0]netw 100.2.2.0 0.0.0.255
[r1-ospf-1-area-0.0.0.0]netw 1.1.1.1 0.0.0.0
R2
[r2]ospf rou 2.2.2.2
[r2-ospf-1]a 0
[r2-ospf-1-area-0.0.0.0]netw 172.16.1.0 0.0.0.255
[r2-ospf-1-area-0.0.0.0]netw 172.16.2.0 0.0.0.255
[r2-ospf-1-area-0.0.0.0]netw 172.16.3.0 0.0.0.255
[r2-ospf-1-area-0.0.0.0]netw 2.2.2.2 0.0.0.0
R3
[r3]ospf rou 3.3.3.3
[r3-ospf-1]a 0
[r3-ospf-1-area-0.0.0.0]netw 172.16.2.3 0.0.0.255
[r3-ospf-1-area-0.0.0.0]netw 100.3.3.0 0.0.0.255
[r3-ospf-1-area-0.0.0.0]netw 3.3.3.3 0.0.0.0
[r3-ospf-1-area-0.0.0.0]rip
[r3-rip-1]ver 2
[r3-rip-1]undo sum
[r3-rip-1]netw 172.16.4.0
[r3-rip-1]netw 192.168.5.0
R4
[r4]ospf rou 4.4.4.4
[r4-ospf-1]a 0
[r4-ospf-1-area-0.0.0.0]netw 192.168.2.0 0.0.0.255
[r4-ospf-1-area-0.0.0.0]netw 192.168.1.0 0.0.0.255
[r4-ospf-1-area-0.0.0.0]netw 4.4.4.4 0.0.0.0
R5
[r5]ospf rou 5.5.5.5
[r5-ospf-1]a 0
[r5-ospf-1-area-0.0.0.0]netw 192.168.3.0 0.0.0.255
[r5-ospf-1-area-0.0.0.0]netw 192.168.1.0 0.0.0.255
[r5-ospf-1-area-0.0.0.0]netw 5.5.5.5 0.0.0.0
[r5-ospf-1-area-0.0.0.0]rip
[r5-rip-1]undo sum
[r5-rip-1]ver 2
[r5-rip-1]netw 100.4.4.0
[r5-rip-1]netw 192.168.5.0
[r5-rip-1]netw 172.16.5.0
R6
[r6]rip
[r6-rip-1]ver 2
[r6-rip-1]undo sum
[r6-rip-1]netw 172.16.4.0
[r6-rip-1]netw 172.16.3.0
[r6-rip-1]netw 192.168.4.0
[r6-rip-1]netw 6.6.6.6
R7
[r7]ospf rou 7.7.7.7
[r7-ospf-1]a 0
[r7-ospf-1-area-0.0.0.0]netw 192.168.3.0 0.0.0.255
[r7-ospf-1-area-0.0.0.0]netw 192.168.4.0 0.0.0.255
[r7-ospf-1-area-0.0.0.0]netw 192.168.2.0 0.0.0.255
[r7-ospf-1-area-0.0.0.0]netw 7.7.7.7 0.0.0.0
R8
[r8]ospf rou 8.8.8.8
[r8-ospf-1]a 0
[r8-ospf-1-area-0.0.0.0]netw 100.1.1.0 0.0.0.255
[r8-ospf-1-area-0.0.0.0]netw 100.3.3.0 0.0.0.255
[r8-ospf-1-area-0.0.0.0]netw 8.8.8.8 0.0.0.0
[r8-ospf-1-area-0.0.0.0]rip
[r8-rip-1]ver 2
[r8-rip-1]undo sum
[r8-rip-1]netw 100.4.4.0
17,将rip路由引入ospf中,ospf路由引入rip中;
R3
[r3]ospf
[r3-ospf-1]import-route rip
[r3-ospf-1]rip
[r3-rip-1]import-rou ospf
R5
[r5]ospf
[r5-ospf-1]import-route rip
[r5-ospf-1]rip
[r5-rip-1]import-route ospf
R8
[r8]ospf
[r8-ospf-1]import-rou rip
[r8-ospf-1]rip
[r8-rip-1]import-rou ospf
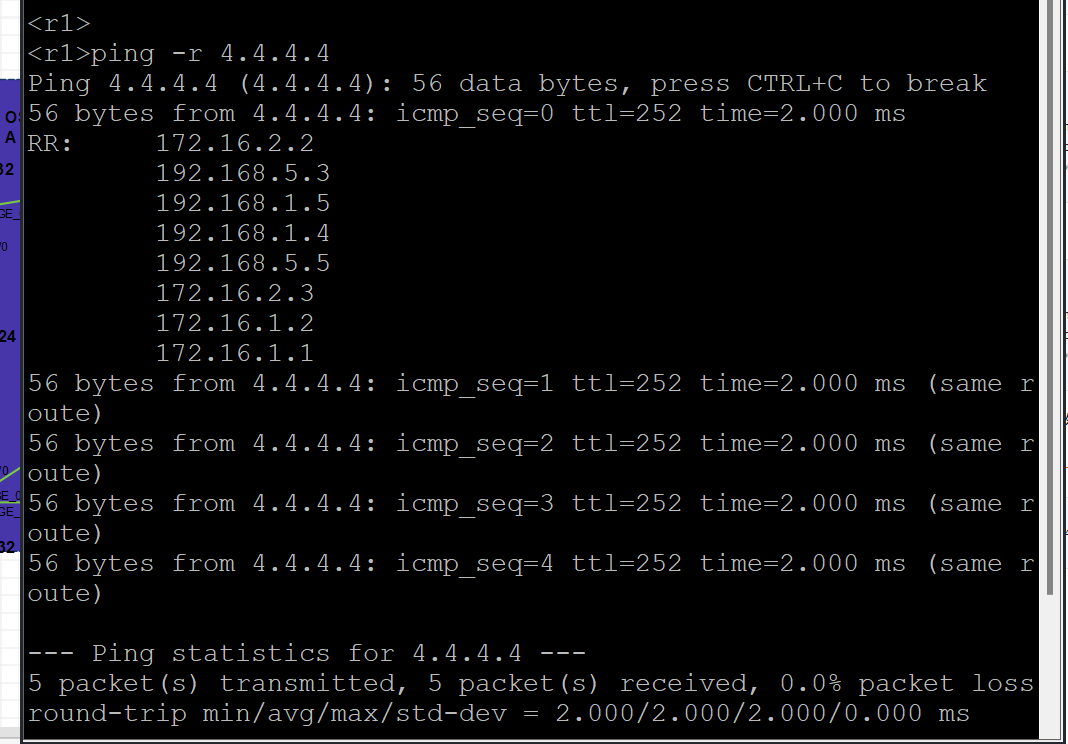
18,要求实现内网全网互通;
解析:使用ping -r路径跟踪查询每一跳是否转发有路径返回即可测试内部网段全通过使用R1pingR4环回口地址
<r1>ping -r 4.4.4.4
19,内网路由器使用静态路由打通外网电脑,内部网络要想访问外网网段,用ospf下发出口缺省地址,R5跨区域需要引入直连与ospf中引入缺省地址进行转发,所以需要通过NAT技术实现;
R8
[r8]ip route-sta 0.0.0.0 0 100.5.5.10
[r8]acl ba 2000
[r8-acl-ipv4-basic-2000]rule per so an
[r8-acl-ipv4-basic-2000]int g5/0
[r8-GigabitEthernet5/0]nat out 2000
[r8]ospf
[r8-ospf-1]default-route-advertise
R5
[r5-ospf-1]rip
[r5-rip-1]im
[r5-rip-1]import-route direct
[r5]ospf
[r5-ospf-1]default-route-advertise
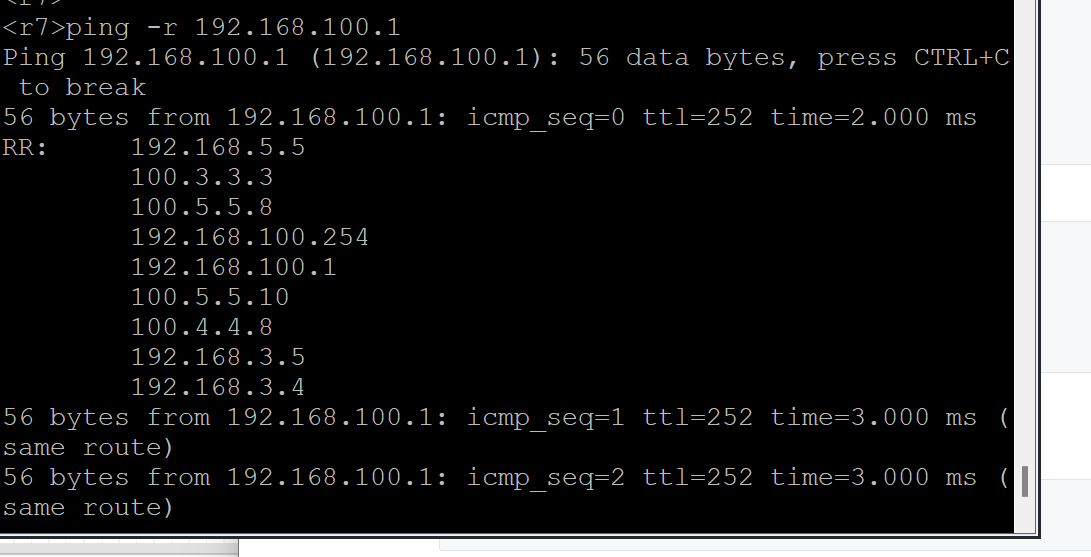
20,要求内部设备可以ping通外部网络;
R7
<r7>ping -r 192.168.100.1
21,要求在R1上配置FTP服务,测试时可以使所有设备均可登录访问,真实设备需要至少10位数的密码。
R1
[r1]ftp server enable
[r1]local-user yong
New local user added.
[r1-luser-manage-yong] password simple zxcvbnm123
Invalid password composition. The new password must contain at least 2 types and at least 1 characters for each type.
[r1-luser-manage-yong] service-type ftp
[r1-luser-manage-yong] authorization-attribute work-directory flash:/
[r1-luser-manage-yong] authorization-attribute user-role network-admin                   可操作系统所有资源与权限
22,要求在R4上配置Telnet服务,测试时可以使所有内网设备均可登录访问管理,明文在网络中传输密码,真实设备严谨使用。
R4
[r4]telnet server enable
[r4]local-user yong
[r4-luser-manage-yong] password simple zxcvbnm123
[r4-luser-manage-yong] service-type telnet
[r4-luser-manage-yong] authorization-attribute user-role network-admin                           可操作系统所有资源与权限
23,要求通过配置ACL策略使R5不能访问R1的ftp服务,其他内网设备不受影响;
R5(直接复制可能报错)
acl ad 3000
rule deny tcp source 100.4.4.5 0 destination 100.2.2.1 0 destination-port range ftp-data ftp
rule deny tcp source 192.168.5.5 0 destination 100.2.2.1 0  destination-port range ftp-data ftp
rule deny tcp source 172.16.5.5 0  destination 100.2.2.1 0  destination-port range ftp-data ftp
rule deny tcp source 192.168.1.5 0 destination 100.2.2.1 0  destination-port range ftp-data ftp
rule deny tcp source 192.168.3.5 0  destination 100.2.2.1 0   destination-port range ftp-data ftp
rule deny tcp source 5.5.5.5 0  destination 100.2.2.1 0   destination-port range ftp-data ftp
rule deny tcp source 100.4.4.5 0 destination 177.16.1.1 0 destination-port range ftp-data ftp
rule deny tcp source 192.168.5.5 0 destination 177.16.1.1 0  destination-port range ftp-data ftp
rule deny tcp source 172.16.5.5 0  destination 177.16.1.1 0  destination-port range ftp-data ftp
rule deny tcp source 192.168.1.5 0 destination 177.16.1.1 0  destination-port range ftp-data ftp
rule deny tcp source 192.168.3.5 0  destination 177.16.1.1 0   destination-port range ftp-data ftp
rule deny tcp source 5.5.5.5 0  destination 177.16.1.1 0  destination-port range ftp-data ftp
rule deny tcp source 100.4.4.5 0 destination 1.1.1.1 0 destination-port range ftp-data ftp
rule deny tcp source 192.168.5.5 0 destination 1.1.1.1 0  destination-port range ftp-data ftp
rule deny tcp source 172.16.5.5 0  destination 1.1.1.1 0  destination-port range ftp-data ftp
rule deny tcp source 192.168.1.5 0 destination 1.1.1.1 0  destination-port range ftp-data ftp
rule deny tcp source 192.168.3.5 0  destination 1.1.1.1 0   destination-port range ftp-data ftp
rule deny tcp source 5.5.5.5 0  destination 1.1.1.1 0  destination-port range ftp-data ftp
int range g0/0 to g0/1
packet-filter 3000 outbound
int g5/1
packet-filter 3000 outbound
24,要求你通过配置ACL策略使R2不能访问R4的Telnet服务,其他内网设备不受影响;
R2
acl ad 3000
rule deny tcp source 172.16.0.0 0.0.255.255 destination 192.168.0.0 0.0.255.255 destination-port eq telnet
int ran g0/0 to g0/2
packet-filter 3000 outbound
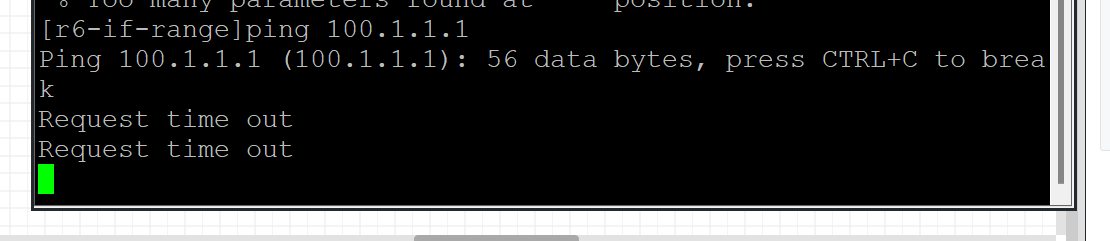
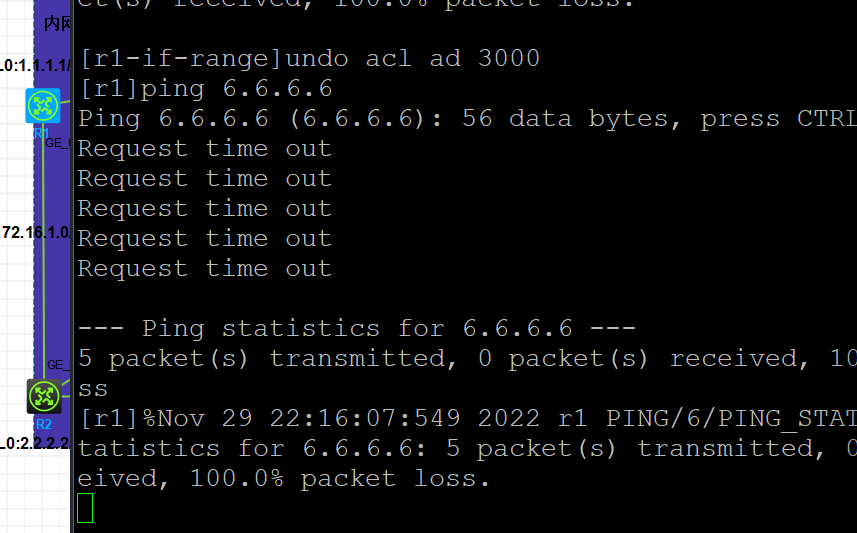
25,要求R6不能ping通R1的所有网段路由,其他内网网段不受影响;
R6
acl advanced 3000
rule 0 deny icmp source 192.168.2.6 0 destination 100.1.1.1 0
rule 5 deny icmp source 192.168.2.6 0 destination 100.2.2.1 0
rule 10 deny icmp source 192.168.2.6 0 destination 172.16.1.1 0
rule 15 deny icmp source 192.168.3.6 0 destination 100.2.2.1 0
rule 20 deny icmp source 192.168.3.6 0 destination 100.1.1.1 0
rule 25 deny icmp source 192.168.3.6 0 destination 172.16.1.1 0
rule 30 deny icmp source 192.168.4.6 0 destination 172.16.1.1 0
rule 35 deny icmp source 192.168.4.6 0 destination 100.1.1.1 0
rule 40 deny icmp source 192.168.4.6 0 destination 100.2.2.1 0
int ran g0/0 to g0/2
packet-filter 3000 outbound
26,要求R1不能ping通R6的所有业务IP地址包括环回口地址,其他内网地址不受影响;
R6
acl advanced 3000
rule deny icmp source 100.1.1.1 0 destination 6.6.6.6 0
rule  deny icmp source 100.2.2.1 0 destination 6.6.6.6 0
rule  deny icmp source 172.16.1.1 0 destination 6.6.6.6 0
int ran g0/0 to g0/2
packet-filter 3000 inb
27,要求R7不允许访问R1的FTP服务和telnet服务;
R7
acl ad 3000
rule  deny tcp source 192.168.3.4 0 destination 172.16.1.1 0 destination-port range telnet ftp
rule  deny tcp source 192.168.4.7 0 destination 172.16.1.1 0 destination-port range telnet ftp
rule  deny tcp source 192.168.2.7 0 destination 172.16.1.1 0 destination-port range telnet ftp
rule  deny tcp source 7.7.7.7 0 destination 172.16.1.1 0 destination-port range telnet ftp
rule  deny tcp source 192.168.3.4 0 destination 100.1.1.1 0 destination-port range telnet ftp
rule  deny tcp source 192.168.4.7 0 destination 100.1.1.1 0 destination-port range telnet ftp
rule  deny tcp source 192.168.2.7 0 destination 100.1.1.1 0 destination-port range telnet ftp
rule  deny tcp source 7.7.7.7 0 destination 100.1.1.1 0 destination-port range telnet ftp
rule  deny tcp source 192.168.3.4 0 destination 1.1.1.1 0 destination-port range telnet ftp
rule  deny tcp source 192.168.4.7 0 destination 1.1.1.1 0 destination-port range telnet ftp
rule  deny tcp source 192.168.2.7 0 destination 1.1.1.1 0 destination-port range telnet ftp
rule  deny tcp source 7.7.7.7 0 destination 1.1.1.1 0 destination-port range telnet ftp
int ran g0/0 to g0/1
packet-filter 3000 out