相信大家对ConstraintLayout(约束布局)不陌生,这是google推出的一个强大控件,之所以强大其实主要归纳有两点:减少布局层次,能够轻松实现复杂布局。当然在我们实际使用过程中,是否真的减少了布局层次?其实这个问题从我开始用这个布局产生了疑问,看了下自己写的布局还是一层包一层。如果你也有这个问题,那么接下来文章中的内容能够帮助你解决.
1.约束布局基本使用:
相信大家对于基本使用应该都没什么问题,这里就不做过多阐述,跟四大控件里面的相对布局思路类似。
2.约束布局辅助控件:
辅助控件就是今天的重点内容:今天重点说下GuideLine,Layer,Flow,group这四个辅助控件。我先贴下我demo布局
<?xml version="1.0" encoding="utf-8"?>
<androidx.constraintlayout.widget.ConstraintLayout xmlns:android="http://schemas.android.com/apk/res/android"xmlns:app="http://schemas.android.com/apk/res-auto"xmlns:tools="http://schemas.android.com/tools"android:id="@+id/cons"android:layout_width="match_parent"android:layout_height="match_parent"><androidx.constraintlayout.helper.widget.Layerandroid:id="@+id/layer"android:layout_width="0dp"android:layout_height="0dp"android:background="#D16D6D"app:constraint_referenced_ids="textview1,textview2,src"app:layout_constraintBottom_toBottomOf="parent"app:layout_constraintLeft_toLeftOf="parent"app:layout_constraintRight_toRightOf="parent"app:layout_constraintTop_toTopOf="parent" /><TextViewandroid:id="@+id/textview1"android:layout_width="0dp"android:layout_height="wrap_content"android:padding="10dp"android:text="这是一个constrainlayout自带的流式布局Flow"android:textColor="@color/white"app:layout_constraintLeft_toLeftOf="parent"app:layout_constraintRight_toLeftOf="@id/guideline"app:layout_constraintTop_toTopOf="parent" /><TextViewandroid:id="@+id/textview2"android:layout_width="0dp"android:layout_height="wrap_content"android:padding="10dp"android:text="这是一个constraintlayout自带的Layer层布局"android:textColor="@color/white"app:layout_constraintLeft_toLeftOf="parent"app:layout_constraintRight_toLeftOf="@id/guideline"app:layout_constraintTop_toBottomOf="@id/textview1" /><androidx.constraintlayout.widget.Guidelineandroid:id="@+id/guideline"android:layout_width="wrap_content"android:layout_height="wrap_content"android:orientation="vertical"app:layout_constraintGuide_percent="0.8" /><ImageViewandroid:id="@+id/src"android:layout_width="0dp"android:layout_height="wrap_content"android:padding="10dp"android:src="@mipmap/ic_launcher"app:layout_constraintBottom_toBottomOf="@id/textview2"app:layout_constraintLeft_toRightOf="@id/guideline"app:layout_constraintRight_toRightOf="parent"app:layout_constraintTop_toTopOf="@id/textview1" /><androidx.constraintlayout.helper.widget.Flowandroid:id="@+id/demo_flow"android:layout_width="0dp"android:layout_height="wrap_content"app:flow_firstHorizontalBias="0"app:flow_firstHorizontalStyle="packed"app:flow_horizontalBias="0"app:flow_horizontalGap="10dp"app:flow_horizontalStyle="spread_inside"app:flow_lastHorizontalBias="0"app:flow_lastHorizontalStyle="packed"app:flow_verticalGap="8dp"app:flow_wrapMode="chain"app:layout_constraintLeft_toLeftOf="parent"app:layout_constraintRight_toRightOf="parent"app:layout_constraintTop_toBottomOf="@id/textview2" /></androidx.constraintlayout.widget.ConstraintLayout>
2.1 GuideLine辅助线
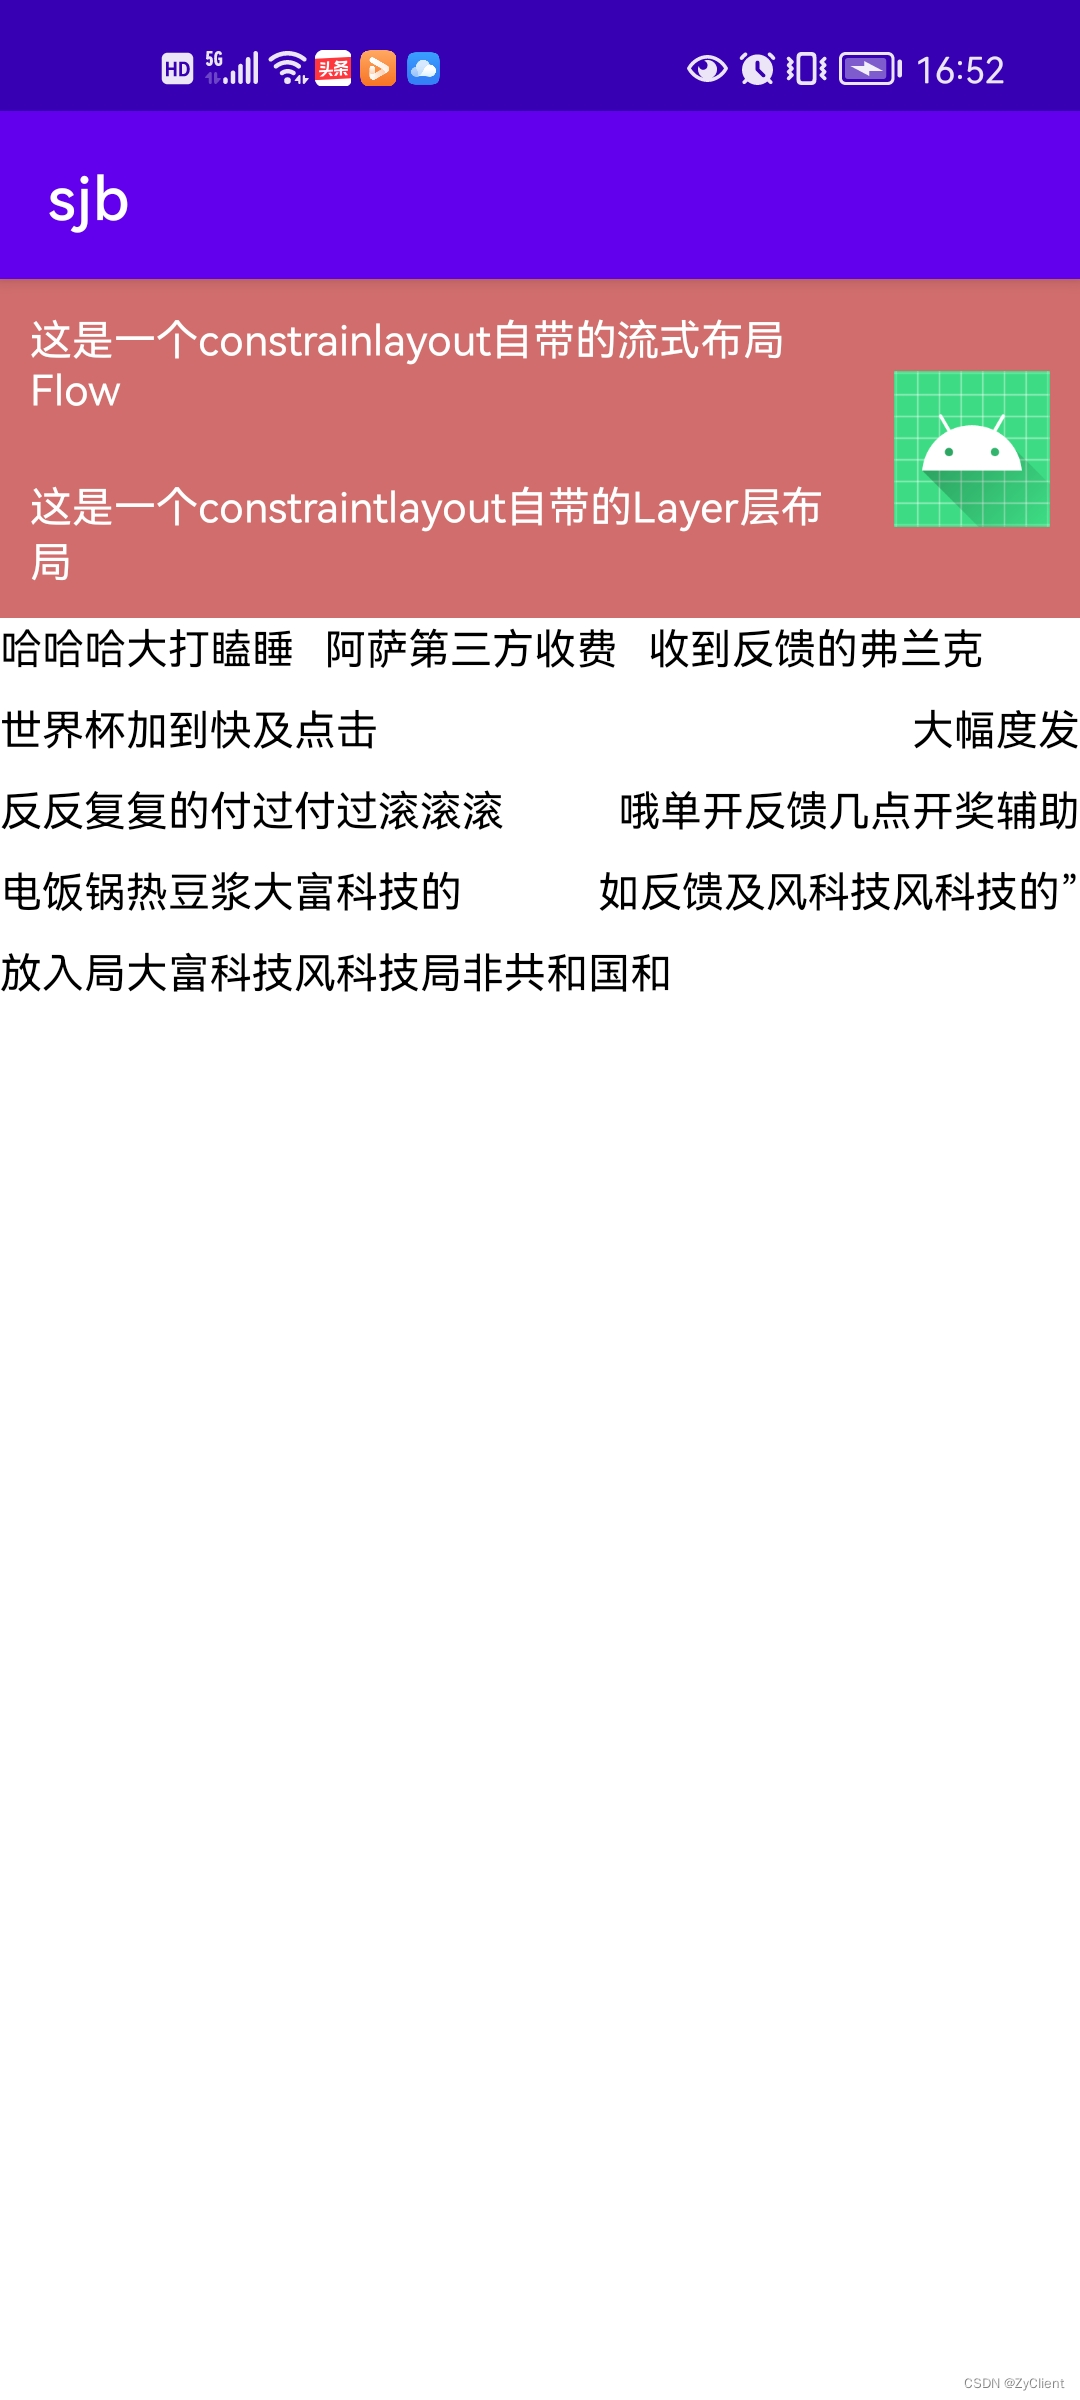
首先看布局中的guideLine控件:这个控件是不显示在界面上的,也不占用任何空间,主要用于辅助线,它分水平和垂直辅助线,上面布局就是垂直辅助线,我们看看预览效果
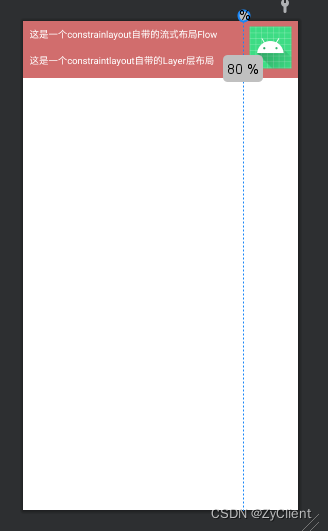
可以看到预览效果中在屏幕0.8宽度上有一条垂直辅助线,他可以作为左右两边控件的约束条件.因此guideline可以简单理解为:不显示,不占空间的一条辅助约束其他控件的线。
2.2 Layer控件
说到这个控件我就不得不提一下:在不知道这个辅助控件之前,我的xml布局还是一层套一层,为什么呐?因为我要给某几个控件设置一个背景色。相当于要管理几个子view,果断只有选择在外面包裹一层cons。我也多次在网上找了下资料是在无从下手,group也不行。就在最近在研究flow时突然看到这个控件,omg突然发现新大陆。layer就是层布局,他的作用感觉可以理解为帧布局。
看下xml中这段布局
<androidx.constraintlayout.helper.widget.Layerandroid:id="@+id/layer"android:layout_width="0dp"android:layout_height="0dp"android:background="#D16D6D"app:constraint_referenced_ids="textview1,textview2,src"app:layout_constraintBottom_toBottomOf="parent"app:layout_constraintLeft_toLeftOf="parent"app:layout_constraintRight_toRightOf="parent"app:layout_constraintTop_toTopOf="parent" /><TextViewandroid:id="@+id/textview1"android:layout_width="0dp"android:layout_height="wrap_content"android:padding="10dp"android:text="这是一个constrainlayout自带的流式布局Flow"android:textColor="@color/white"app:layout_constraintLeft_toLeftOf="parent"app:layout_constraintRight_toLeftOf="@id/guideline"app:layout_constraintTop_toTopOf="parent" /><TextViewandroid:id="@+id/textview2"android:layout_width="0dp"android:layout_height="wrap_content"android:padding="10dp"android:text="这是一个constraintlayout自带的Layer层布局"android:textColor="@color/white"app:layout_constraintLeft_toLeftOf="parent"app:layout_constraintRight_toLeftOf="@id/guideline"app:layout_constraintTop_toBottomOf="@id/textview1" /><androidx.constraintlayout.widget.Guidelineandroid:id="@+id/guideline"android:layout_width="wrap_content"android:layout_height="wrap_content"android:orientation="vertical"app:layout_constraintGuide_percent="0.8" /><ImageViewandroid:id="@+id/src"android:layout_width="0dp"android:layout_height="wrap_content"android:padding="10dp"android:src="@mipmap/ic_launcher"app:layout_constraintBottom_toBottomOf="@id/textview2"app:layout_constraintLeft_toRightOf="@id/guideline"app:layout_constraintRight_toRightOf="parent"app:layout_constraintTop_toTopOf="@id/textview1" />
需要给管理的子控件id设置上使用app:constraint_referenced_ids,使用相当简单,另外建议把layer写在管理的子布局前面不然设置的背景可能无效,至于为什么你可以理解为帧布局,layer写在后面就会把子view覆盖无法正常显示.这样就解决了给多个子控件设置背景又套一层。不过这个控件我还没用到项目上,只是有写demo实例。
2.3 flow控件
这个控件就是我们说的流式布局,在以往我们现实这种效果需要自定义管理器,view或者第三方框架。目前google在cons中已经开源了flow控件。使用也相对简单:
<?xml version="1.0" encoding="utf-8"?>
<androidx.constraintlayout.widget.ConstraintLayout xmlns:android="http://schemas.android.com/apk/res/android"xmlns:app="http://schemas.android.com/apk/res-auto"xmlns:tools="http://schemas.android.com/tools"android:layout_width="match_parent"android:layout_height="wrap_content"><androidx.constraintlayout.helper.widget.Layerandroid:layout_width="match_parent"android:layout_height="match_parent"app:constraint_referenced_ids="tv_device_name,tv_online_state,tv_switch_state2"app:layout_constraintBottom_toBottomOf="parent"app:layout_constraintLeft_toLeftOf="parent"app:layout_constraintRight_toRightOf="parent"app:layout_constraintTop_toTopOf="parent" /><TextViewandroid:id="@+id/tv_device_name"android:layout_width="wrap_content"android:layout_height="wrap_content"android:ellipsize="end"android:maxLines="1"android:padding="5dp"android:text="测试测试"android:textColor="@color/purple_200"android:textStyle="bold"app:layout_constraintStart_toStartOf="parent"app:layout_constraintTop_toTopOf="parent" /><TextViewandroid:id="@+id/tv_org_name"android:layout_width="0dp"android:layout_height="wrap_content"android:layout_marginTop="16dp"android:text="研发部dadfad打发士大夫打发范德萨"android:textColor="@color/purple_700"app:layout_constraintLeft_toLeftOf="parent"app:layout_constraintRight_toLeftOf="@id/guideline"app:layout_constraintTop_toBottomOf="@id/tv_device_name" /><androidx.constraintlayout.widget.Guidelineandroid:id="@+id/guideline"android:layout_width="wrap_content"android:layout_height="wrap_content"android:orientation="vertical"app:layout_constraintGuide_percent="0.3" /><!--        //chain或者aligned,chain:链形式,依次挨着排,aligned会两端对齐--><!--        flow_firstHorizontalStyle首行的对齐方式,packed:靠最左侧挨着排,水平间隔:horizontalGap生--><!--        app:flow_horizontalBias="0" 全局水平bias,为0时,每行都贴左边,可解决中间行单独占一行时,不贴最左侧的问题--><!--        flow_horizontalGap  控件水平方向上的间隔--><androidx.constraintlayout.helper.widget.Flowandroid:id="@+id/flow"android:layout_width="0dp"android:layout_height="wrap_content"android:layout_marginStart="5dp"android:layout_marginEnd="5dp"app:constraint_referenced_ids="tv_type,tv_online_state,tv_switch_state,tv_switch_state2,tv_switch_state3,tv_switch_state4,tv_switch_state5"app:flow_firstHorizontalBias="0"app:flow_firstHorizontalStyle="packed"app:flow_horizontalGap="10dp"app:flow_horizontalStyle="spread_inside"app:flow_lastHorizontalBias="0"app:flow_lastHorizontalStyle="packed"app:flow_verticalGap="8dp"app:flow_wrapMode="chain"app:layout_constraintLeft_toRightOf="@id/guideline"app:layout_constraintRight_toRightOf="parent"app:layout_constraintTop_toTopOf="@id/tv_org_name" /><TextViewandroid:id="@+id/tv_type"android:layout_width="0dp"android:layout_height="wrap_content"android:text="自动采集看接口接gfgg"android:textColor="@color/black"app:layout_constraintWidth_default="wrap"/><TextViewandroid:id="@+id/tv_online_state"android:layout_width="0dp"android:layout_height="wrap_content"android:text="在线"android:textColor="@color/black"app:layout_constraintWidth_default="wrap"/><TextViewandroid:id="@+id/tv_switch_state"android:layout_width="0dp"android:layout_height="wrap_content"android:text="合位"android:textColor="@color/black"app:layout_constraintWidth_default="wrap" /><TextViewandroid:id="@+id/tv_switch_state2"android:layout_width="0dp"android:layout_height="wrap_content"android:text="的反馈进度"android:textColor="@color/black"app:layout_constraintWidth_default="wrap" /><TextViewandroid:id="@+id/tv_switch_state3"android:layout_width="0dp"android:layout_height="wrap_content"android:text="的反馈进"android:textColor="@color/black"app:layout_constraintWidth_default="wrap" /><TextViewandroid:id="@+id/tv_switch_state4"android:layout_width="0dp"android:layout_height="wrap_content"android:text="的反馈进度接口"android:textColor="@color/black"app:layout_constraintWidth_default="wrap" /><TextViewandroid:id="@+id/tv_switch_state5"android:layout_width="0dp"android:layout_height="wrap_content"android:text="的反馈进度接口"android:textColor="@color/black"app:layout_constraintWidth_default="wrap" />
</androidx.constraintlayout.widget.ConstraintLayout>
效果图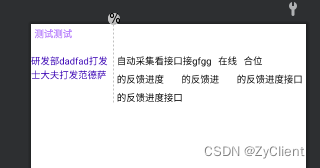
这个控件属性较多,理解起来不难,主要是应用场景:1.列表 2.历史搜索
列表里面比较简单直接在item里面对需要自动换行的控件设置id,类似上面的布局。
第二种历史搜索我们模拟一个list<String>的集合,控件进行动态生成(flow部分):
<androidx.constraintlayout.helper.widget.Flowandroid:id="@+id/demo_flow"android:layout_width="0dp"android:layout_height="wrap_content"app:flow_firstHorizontalBias="0"app:flow_firstHorizontalStyle="packed"app:flow_horizontalBias="0"app:flow_horizontalGap="10dp"app:flow_horizontalStyle="spread_inside"app:flow_lastHorizontalBias="0"app:flow_lastHorizontalStyle="packed"app:flow_verticalGap="8dp"app:flow_wrapMode="chain"app:layout_constraintLeft_toLeftOf="parent"app:layout_constraintRight_toRightOf="parent"app:layout_constraintTop_toBottomOf="@id/textview2" />
可以看到在flow布局中并没有设置ids,因此在我们页面中需要动态添加才能生效,下面给出java代码:
stringList.add("哈哈哈大打瞌睡");
stringList.add("阿萨第三方收费");
stringList.add("收到反馈的弗兰克");
stringList.add("世界杯加到快及点击");
stringList.add("大幅度发");
stringList.add("反反复复的付过付过滚滚滚");
stringList.add("哦单开反馈几点开奖辅助");
stringList.add("电饭锅热豆浆大富科技的");
stringList.add("如反馈及风科技风科技的”");
stringList.add("放入局大富科技风科技局非共和国和");
        int ids[] = new int[stringList.size()];int localis[] = new int[]{R.id.tvUserCode, R.id.tvUserName, R.id.tvTestDate, R.id.tvHumidity, R.id.tvPercent, R.id.tvCircle, R.id.tvTestSkin, R.id.tvHirstory, R.id.tva, R.id.tvb, R.id.tvc, R.id.tvd, R.id.tve, R.id.tvf};for (int index = 0; index < stringList.size(); index++) {TextView textView = new TextView(this);ConstraintLayout.LayoutParams layoutParams = new ConstraintLayout.LayoutParams(ConstraintLayout.LayoutParams.WRAP_CONTENT, ConstraintLayout.LayoutParams.WRAP_CONTENT);layoutParams.matchConstraintDefaultWidth=ConstraintLayout.LayoutParams.WRAP_CONTENT;textView.setLayoutParams(layoutParams);textView.setId(localis[index]);
//            textView.setGravity(Gravity.START);
//            textView.setTextSize(16.0f);textView.setTextColor(getResources().getColor(R.color.black));textView.setText(stringList.get(index));cons.addView(textView);ids[index] = localis[index];textView.setOnClickListener(v -> {Log.e("您点击了", textView.getText().toString());Toast.makeText(MainActivity.this, "您点击了" + textView.getText(), Toast.LENGTH_SHORT).show();});}
flow.setReferencedIds(ids);
这里面重点就是setReferencedIds设置控件的id,需要传一个int[].这样我们就可以动态实现自动换行了,跟记录历史搜索功能类似,搜索内容进行自动换行。看下效果图
重点是中间部分,他实现了自动换行功能。因此在项目中我们需要自动换行时可以选择此控件实现,不需要接住第三方或者自定义。
2.4 group控件
这个辅助控件目前个人觉得功能比较单一就是分组管理,同样需要设置控件id对其进行统一管理,他与flow不同的是不能设置背景,一般是用于对其控件gone visiable的。这里就不单独贴出布局了。
总结:约束布局的其他辅助控件就不列出了,总之功能比较强大的,我们平时在项目中可能使用得不多,导致我们忽略了这个控件的优势,因此这些辅助控件还是值得大家学习,特别是layer能够统一设置控件背景。可以减少避免不必要的布局层次。

![[附源码]Python计算机毕业设计SSM隆庆祥企业服装销售管理系统(程序+LW)](https://img-blog.csdnimg.cn/e5fa0145c45047fca2c855eddcd4860e.png)


![[Spring]第二篇:IOC控制反转](https://img-blog.csdnimg.cn/661ffdcff6cf4f03911c2e5044fdd0c5.png)