前面的总结中使用砸壳重签后的App进行调试,本篇在越狱环境下不重签App进行调试,但是还是需要砸壳获取Headers.
一、Cycript
1.1 在越狱环境中使用Cycript
- 在越狱环境上,安装Cycript插件.需要先安装adv-cmds插件,因为被Cycript插件所依赖、在Cydia中,安装Cycript
- 在设备中找到WeChat,并找到它的进程
$ ssh root@192.168.124.12
Holothurian6P:~ root# ps -A | grep WeChat
34532 ??         0:00.00 /var/containers/Bundle/Application/0AE7CC54-E2BF-4CD0-A1F6-95EBB12285D0/WeChat.app/WeChat
34589 ttys002 0:00.00 grep WeChat-
- 针对WeChat进程,进入cy环境
Holothurian6P:~ root# cycript -p 34532
cy# -
- 此时我们并没有污染WeChat,但可以使用Cycript命令进行调试了
# UIApp
#"<UIApplication: 0x139d07820>"
cy#
1.2 导入cy文件
- 在越狱环境中,使用自定义cy文件
-
- 找到之前使用的“获取当前控制器”的cy脚本,在越狱环境中,将脚本拷贝到设备上的Cycript指定目录下,即可使用
- 从Mac端: 将current_vc.cy脚本,拷贝到 /usr/lib/cycript0.9目录下(FileZilla查看)
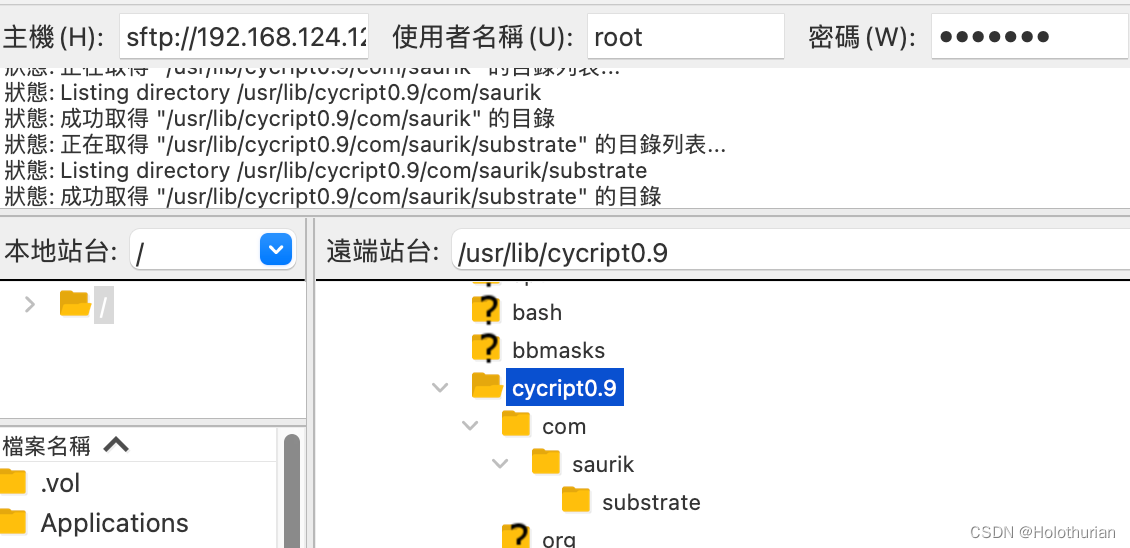
scp currentVC.cy root@192.168.124.12:/usr/lib/cycript0.9
current_vc.cy 100% 918 59.0KB/s 00:00- SSH登录手机查看文件存在位置
$ ssh root@192.168.124.12
Holothurian6P:~ root# cd /usr/lib/cycript0.9
Holothurian6P:/usr/lib/cycript0.9 root# ls
com/  current_vc.cy  org/
Holothurian6P:/usr/lib/cycript0.9 root#- 针对WeChat进程,进入cy环境,可以使用进程id或名称
cycript -p WeChat- 导入 currentVC脚本
@import current_vc
{}- 获取当前包路径
cy# APPPATH
@"/var/containers/Bundle/Application/0AE7CC54-E2BF-4CD0-A1F6-95EBB12285D0/WeChat.app"- 使用cy文件,必须拷贝到Cycript指定目录下,这样很可能造成文件冲突.所以Cycript引入了命名空间,可以将cy文件拷贝到不同子目录中,然后按照指定规则导入.
- 在/usr/lib/cycript0.9目录下,已经默认存在一些子目录
- 在com目录下,存在以作者名字命名的saurik目录,里面存储了官方的MS.cy脚本
- 仿照官方的目录结构,在com目录下,创建自定义目录Holothurian
Holothurian6P:~ root# cd /usr/lib/cycript0.9
Holothurian6P:/usr/lib/cycript0.9 root# ls
com/  current_vc.cy  org/
Holothurian6P:/usr/lib/cycript0.9/ root# cd com
Holothurian6P:/usr/lib/cycript0.9/com root# mkdir Holothurian
Holothurian6P:/usr/lib/cycript0.9/com root# cd Holothurian
Holothurian6P:/usr/lib/cycript0.9/Holothurian root# mv .../current_vc.cy ../Holothurian-
- 进入WeChat进程的cy环境,导入current_vc脚本
$ ssh root@192.168.124.12
Holothurian6P:~ root# cycript -p WeChat
cy# @import com.Holothurian.current_vc
{}
cy#-
- 使用这种方式,保证了脚本的唯一性,有效避免文件冲突.并且按不同目录划分,更利于脚本的管理
二、Theos
- theos是一个越狱开发工具包,使用它可以创建Tweak项目,动态Hook第三方程序,使用MonkeyDev框架,它提供的Logos语法,其实也依赖于theos
2.1 theos安装
sudo git clone --recursive https://github.com/theos/theos.git /opt/theos-
- theos有很多依赖库,子组件,使用 recursive参数,可以循环下载,将依赖库一并安装
- opt目录,用来安装附加程序包.有时会出现系统权限问题,建议将theos安装自定义目录.或者安装到opt目录,然后在自定义目录中拷贝一份.
2.2 ldid
-
- 安装ldid的过程中,可能会一同安装ldid
- ldid是针对越狱插件的签名工具.如果未安装,需要手动安装
brew install ldid2.3 theos插件
目的: 使用theos插件,“窃取”AlipayWallet(10.3.66)的登录密码
2.3.1 静态分析
需要取出AlipayWallet的头文件
- 1、frida-iOS-dump尝试:失败
- 2、通过手机上的Clutch 尝试
Clutch -i  查看当前安装的所有包
Clutch -d //数字/包名/-
- 如果砸壳成功并且压缩成功、那么将会出现在如下目录下
/private/var/mobile/Documents/Dumped/-
- 如果砸壳中途退出、那么将会出现在缓存中
/private/var/tmp/clutch/-
- 将砸壳后的内容移动到Mac电脑上
scp -r root@192.168.124.12:/private/var/tmp/clutch/649B21FD-53F7-49BE-86F8-8DA5898A7343/ /Users/Chenxi/Desktop/-
- 查看可执行文件破解与否 cryptid表示加密状态、1加密、0解密
otool -l AlipayWallet | grep cry-
- 加密: 砸壳失败
-
3、dumpdecrypted.dylib砸壳尝试:
$ ssh root@192.168.124.12
Holothurian6P:~ root# ps -e
...
37102 ??         0:00.00 /var/containers/Bundle/Application/9D61BA0D-4C7D-4BEA-99A0-0928B3BE40FA/AlipayWallet.app/Alip
...
Holothurian6P:~ root# cycript -p AlipayWallet
cy# @import com.Holothurian.current_vc
cy# APPPATH
@"/var/containers/Bundle/Application/9D61BA0D-4C7D-4BEA-99A0-0928B3BE40FA/AlipayWallet.app"
cy# [[NSFileManager defaultManager] URLsForDirectory:NSDocumentDirectory inDomains:NSUserDomainMask][0]
#"file:///var/mobile/Containers/Data/Application/7F4E0FEA-217C-4DD0-8BEB-820BA9C5FCFC/Documents/"
cy# exit(0)
Holothurian6P: cd /var/mobile/Containers/Data/Application/7F4E0FEA-217C-4DD0-8BEB-820BA9C5FCFC/Documents/
Holothurian6P:/var/mobile/Containers/Data/Application/7F4E0FEA-217C-4DD0-8BEB-820BA9C5FCFC/Documents root# cp /private/var/root/dumpdecrypted.dylib /var/mobile/Containers/Data/Application/7F4E0FEA-217C-4DD0-8BEB-820BA9C5FCFC/Documents/
Holothurian6P:/var/mobile/Containers/Data/Application/7F4E0FEA-217C-4DD0-8BEB-820BA9C5FCFC/Documents root# DYLD_INSERT_LIBRARIES=dumpdecrypted.dylib /var/containers/Bundle/Application/9D61BA0D-4C7D-4BEA-99A0-0928B3BE40FA/AlipayWallet.app/AlipayWallet
......
Holothurian6P:/var/mobile/Containers/Data/Application/7F4E0FEA-217C-4DD0-8BEB-820BA9C5FCFC/Documents root# ls | grep Ali
AlipayWallet.fid*
GenieForAlipay.fid*
Holothurian6P:/var/mobile/Containers/Data/Application/7F4E0FEA-217C-4DD0-8BEB-820BA9C5FCFC/Documents root# exit
logout
Connection to 192.168.124.12 closed.
scp -r root@192.168.124.12:/var/mobile/Containers/Data/Application/7F4E0FEA-217C-4DD0-8BEB-820BA9C5FCFC/Documents/AlipayWallet.fid ~/Desktop-
- 最终得到AlipayWallet.fid文件、删掉后缀即为可执行文件.
- 将AlipayWallet的头文件按照名称排列class-dump到指定目录
class-dump -S -s -H AlipayWallet -o ./Headers2.3.2 动态分析
- 在设备中打开ZFB,来到登录界面,并找到它的进程
ssh root@192.168.124.12
Holothurian6P:~ root# ps -A | grep AlipayWallet
37231 ??         0:00.00 /var/containers/Bundle/Application/9D61BA0D-4C7D-4BEA-99A0-0928B3BE40FA/AlipayWallet.app/AlipayWallet
37269 ttys000 0:00.00 grep AlipayWallet-
- 进入AlipayWallet进程的cy环境
Holothurian6P:~ root# cycript -p 37231-
- 导入current_vc脚本 && 获取当前控制器
cy# @import com.Holothurian.current_vc
{}- 进入AlipayWallet的密码登录界面
- 查看当前控制器
cy# HSCurrentVC()
#"<ALULoginVerifyController: 0x10ec9da00>"- 打印控制器下所有视图
cy# #0x10ec9da00.view.recursiveDescription().toString()
`<UIView: 0x11df16190; frame = (0 0; 414 736); autoresize = W+H; layer = <CALayer: 0x281dd1a00>>| <ALULoginContainerView: 0x11df1fad0; frame = (0 0; 414 736); layer = <CALayer: 0x281d298e0>>|    | <ALULoginVerifyPasswordView: 0x11cb31330; frame = (0 422; 414 314); layer = <CALayer: 0x281e836a0>>|    |    | <ALULoginPWDInputTextField: 0x11e57c310; frame = (20 87; 374 55); clipsToBounds = YES; layer = <CALayer: 0x281e83b60>>|    |    |    | <UIButton: 0x11cb277d0; frame = (296 16; 66 23); opaque = NO; layer = <CALayer: 0x281e944a0>>|    |    |    |    | <UIButtonLabel: 0x11cb27af0; frame = (0.333333 2; 65.3333 19.3333); text = '\u5fd8\u8bb0\u5bc6\u7801'; opaque = NO; userInteractionEnabled = NO; layer = <_UILabelLayer: 0x283bd4f00>>|    |    |    |    |    | <_UILabelContentLayer: 0x281ee8b40> (layer)|    |    |    | <UIView: 0x11cb4e250; frame = (283.5 19.5; 0.5 16); layer = <CALayer: 0x281e94640>>|    |    |    | <UIButton: 0x11cb280c0; frame = (249.5 16.5; 22 22); opaque = NO; layer = <CALayer: 0x281e94700>>|    |    |    |    | <UIImageView: 0x10d5c8710; frame = (0.333333 4.33333; 21 13); clipsToBounds = YES; opaque = NO; userInteractionEnabled = NO; layer = <CALayer: 0x281ee8920>>|    |    |    | <UIControl: 0x11e57e650; frame = (243.5 6; 34 43); layer = <CALayer: 0x281e8c820>>|    |    |    | <ALUPWDTextField: 0x10e852a00; baseClass = UITextField; frame = (12 9.5; 231.5 36); text = ''; opaque = NO; gestureRecognizers = <NSArray: 0x281422a60>; layer = <CALayer: 0x281e8cb00>>|    |    |    |    | <UITextFieldLabel: 0x11e57e860; frame = (0 8; 232 19.3333); text = '\u8bf7\u8f93\u5165\u767b\u5f55\u5bc6\u7801'; opaque = NO; userInteractionEnabled = NO; layer = <_UILabelLayer: 0x283bdf700>>|    |    |    |    |    | <_UILabelContentLayer: 0x281ee8ca0> (layer)|    |    |    |    | <_UITextFieldContentView: 0x11cbd5a10; frame = (0 0; 232 36); opaque = NO; userInteractionEnabled = NO; layer = <__UITextTiledLayer: 0x283ea32a0>>|    |    |    |    |    | <UITextSelectionView: 0x11e580a30; frame = (0 0; 0 0); alpha = 0; userInteractionEnabled = NO; layer = <CALayer: 0x281e94280>>|    |    |    |    |    | <__UITileLayer: 0x280940f30> (layer)|    |    | <ALULoginAccountInfoView: 0x11e57c520; frame = (20 24; 374 55); layer = <CALayer: 0x281e8f680>>|    |    |    | <UIImageView: 0x11e5781d0; frame = (80 12; 31 31); clipsToBounds = YES; opaque = NO; userInteractionEnabled = NO; layer = <CALayer: 0x281e8d240>>|    |    |    | <UILabel: 0x11e57eb50; frame = (123 9.5; 171 36); text = '180 **** **73'; userInteractionEnabled = NO; layer = <_UILabelLayer: 0x283bdf6b0>>|    |    | <UIView: 0x11e57c130; frame = (20 158; 374 49); layer = <CALayer: 0x281e83aa0>>|    |    | <AUButton: 0x11cbd5400; baseClass = UIButton; frame = (20 158; 374 49); clipsToBounds = YES; alpha = 0.4; opaque = NO; layer = <CALayer: 0x281e8ac60>>|    |    |    | <UIImageView: 0x10d531070; frame = (0 0; 374 49); clipsToBounds = YES; opaque = NO; userInteractionEnabled = NO; layer = <CALayer: 0x281ee8340>>|    |    |    | <UIButtonLabel: 0x11e57b9d0; frame = (166.667 12.6667; 41 24); text = '\u767b\u5f55'; opaque = NO; userInteractionEnabled = NO; layer = <_UILabelLayer: 0x283bded00>>|    |    |    |    | <_UILabelContentLayer: 0x281ee8aa0> (layer)| <ALULoginButtonListView: 0x11df1a3b0; frame = (0 680; 414 44); layer = <CALayer: 0x281b176e0>>|    | <UIView: 0x11df1a7b0; frame = (174 0; 66 44); layer = <CALayer: 0x281b175a0>>|    |    | <UIButton: 0x11e61a810; frame = (0 0; 66 44); opaque = NO; tag = 100; layer = <CALayer: 0x281dd3fa0>>|    |    |    | <UIButtonLabel: 0x11df00520; frame = (0.333333 12.3333; 65.3333 19.3333); text = '\u66f4\u591a\u9009\u9879'; opaque = NO; userInteractionEnabled = NO; layer = <_UILabelLayer: 0x283b12170>>|    |    |    |    | <_UILabelContentLayer: 0x281b30f40> (layer)`
cy#- 首先找到登录按钮
- 在输出的视图中,搜索“登录”文案,找不到是因为在cy环境中,中文使用了Unicode编码,将“登录”文案,通过Unicode编码为 \u767b\u5f55
- 在输出的视图中,搜索得到“登录”按钮
| | | <AUButton: 0x11cbd5400; baseClass = UIButton; frame = (20 158; 374 49); clipsToBounds = YES; alpha = 0.4; opaque = NO; layer = <CALayer: 0x281e8ac60>>| | | | <UIImageView: 0x10d531070; frame = (0 0; 374 49); clipsToBounds = YES; opaque = NO; userInteractionEnabled = NO; layer = <CALayer: 0x281ee8340>>| | | | <UIButtonLabel: 0x11e57b9d0; frame = (166.667 12.6667; 41 24); text = '\u767b\u5f55'; opaque = NO; userInteractionEnabled = NO; layer = <_UILabelLayer: 0x283bded00>>| | | | | <_UILabelContentLayer: 0x281ee8aa0> (layer)- 找到AUButton的事件响应者和事件名称
- 找到AUButton的事件响应者
cy# #0x11cbd5400.allTargets
[NSSet setWithArray:@[#"<ALULoginVerifyPasswordViewModel: 0x281e83640>",#"<AUButton: 0x11cbd5400; baseClass = UIButton; frame = (20 158; 374 49); clipsToBounds = YES; alpha = 0.4; opaque = NO; layer = <CALayer: 0x281e8ac60>>"]]]-
- 此处存在两个响应者,一个是AUButton自身,另一个是 ALULoginVerifyPasswordViewModel
- 确认AUButton的触摸事件 allControlEvents
cy# #0x11cbd5400.allControlEvents
64-
- 根据UIControlEvents枚举值,64为 2的6次方
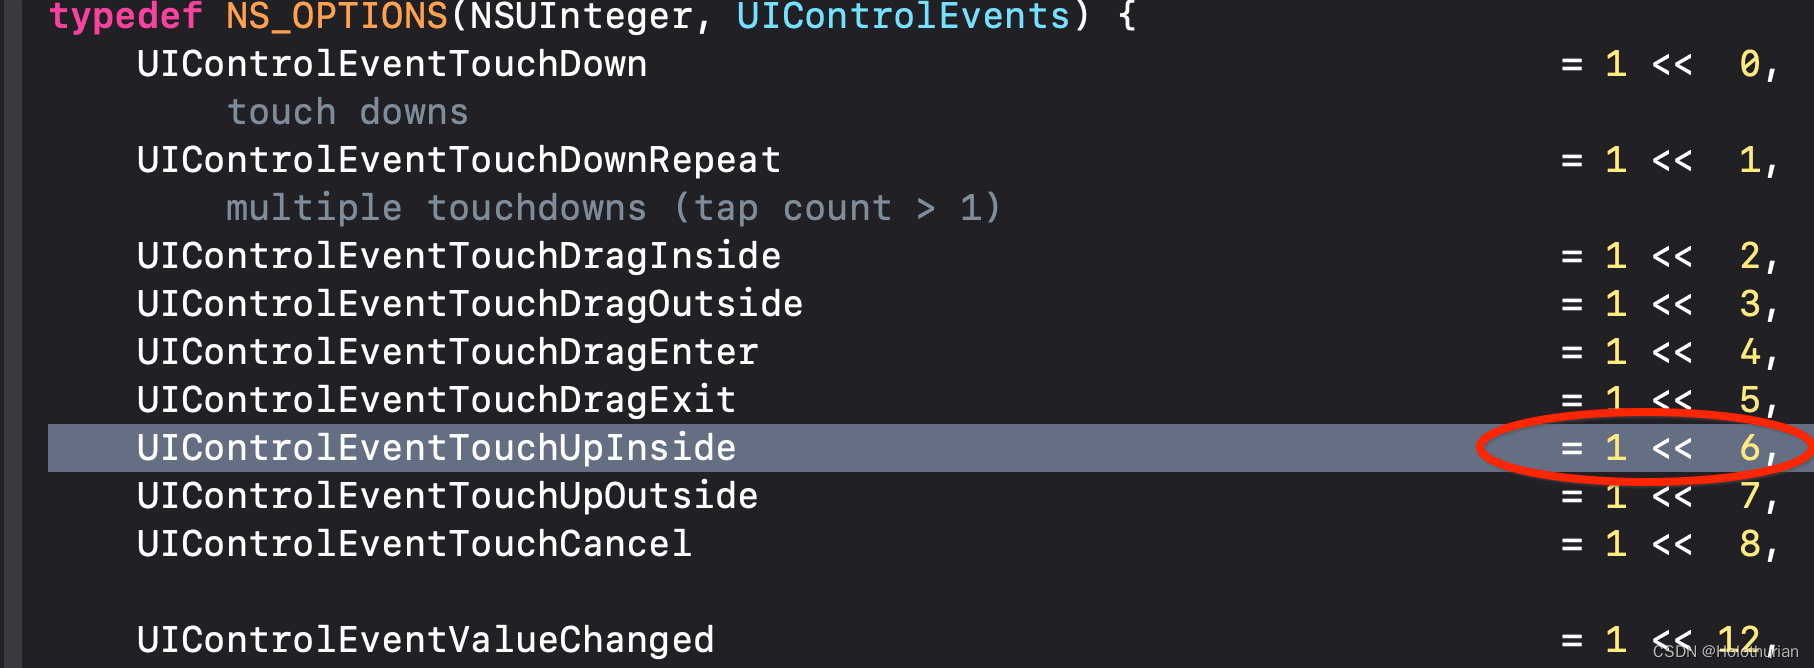
-
- 也就是AUButton触发UIControlEventTouchUpInside,事件响应者为 ALULoginVerifyPasswordViewModel
- 找到响应者的事件名称
- 通过响应者和触摸事件,找到事件名称
cy# [#0x11cbd5400 actionsForTarget: #0x281e83640 forControlEvent: 64]
@["onLoginMainButtonClicked:"]-
-
- 参数1为响应者对象,参数2为触摸事件的枚举值,返回事件名称 onLoginMainButtonClicked
- 登录的AUButton可触发 ALULoginVerifyPasswordViewModel 对象的 onLoginMainButtonClicked 方法
-
- 找到密码文本框
- 在密码框中输入 haishen
- 在输出的视图中,搜索 haishen

-
- 从视图结构的层级分析来看
- ALUPWDTextField --> ALULoginPWDInputTextField --> ALULoginVerifyPasswordView --> ALULoginContainerView
- 和密码框相关的父视图,可以追溯到 ALULoginContainerView, 作为一个Container,应该只是一个容器, 然而其中包含的 ALULoginVerifyPasswordView 视图,与响应者 ALULoginVerifyPasswordViewModel 应该有所关联.
- 在Header文件夹中搜索 ALULoginContainerView ,得到
@interface ALULoginContainerView : UIView
- (id)hitTest:(struct CGPoint)arg1 withEvent:(id)arg2;
@end-
- 它是做点击手势处理的View、并且仅用于 ALULoginBaseController 中.其中存在着ALULoginContainerView的一个实例对象_loginView
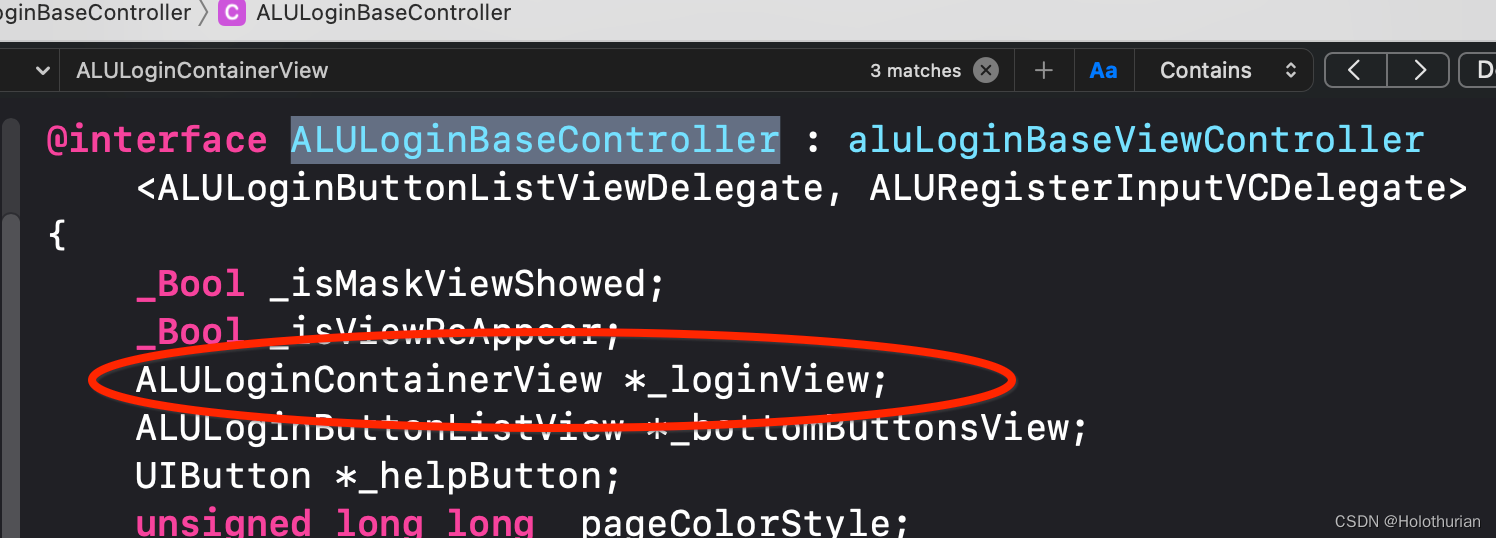
-
- 然而当前的控制器为 ALULoginVerifyController, 继承于 ALULoginBaseController .因此关系逐渐清晰起来了
- 查看 ALULoginVerifyController ,其中存在着 ALULoginVerifyPasswordView的实例对象_verifyPasswordView,
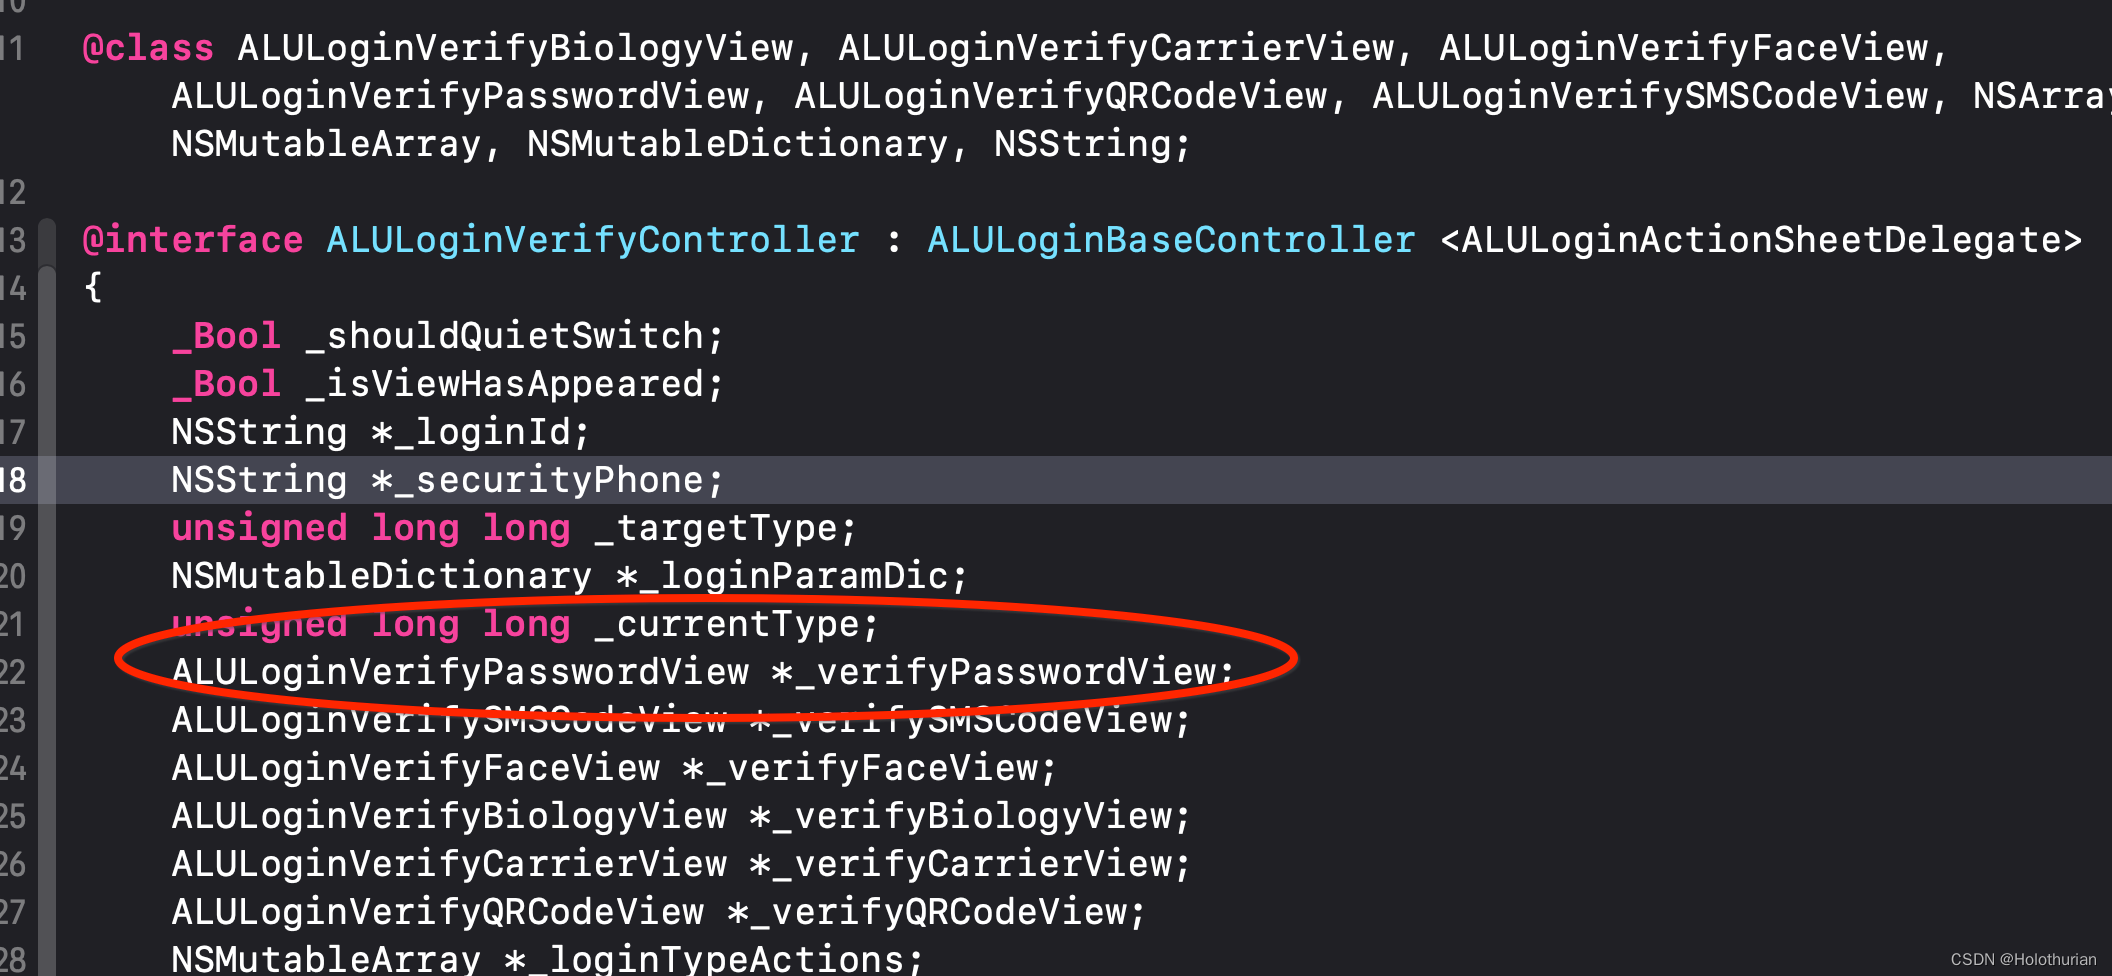
- 继续寻找响应者链条、搜索 ALULoginVerifyPasswordView视图, 可以看到其中存在的实例为 _pwdTextField 的 ALULoginPWDInputTextField对象
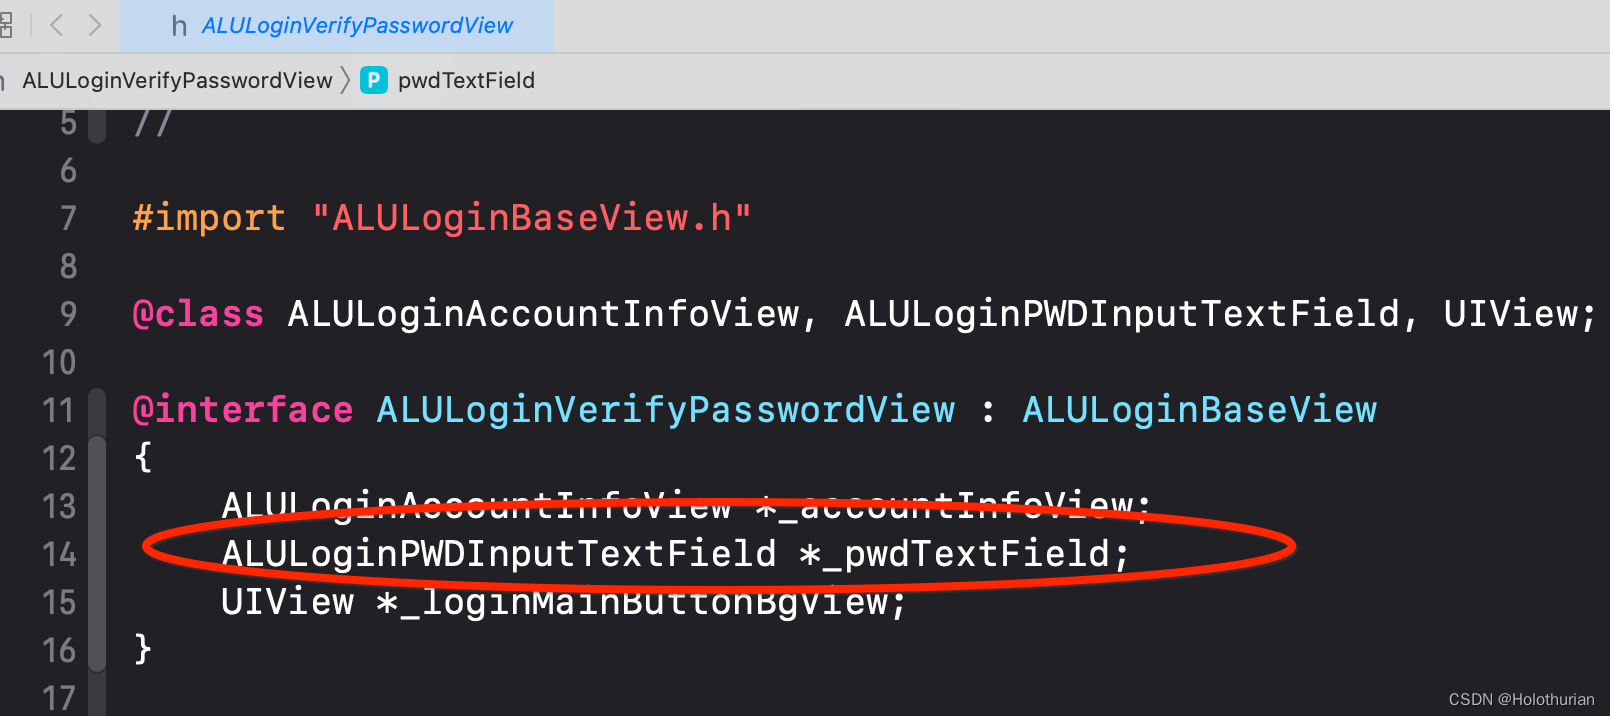
- 搜索 ALULoginPWDInputTextField 文件,得到 _pwdTextField 实例对象,并且有个ALULoginPWDInputTextFieldDelegate的代理对象 _delegate值得注意.
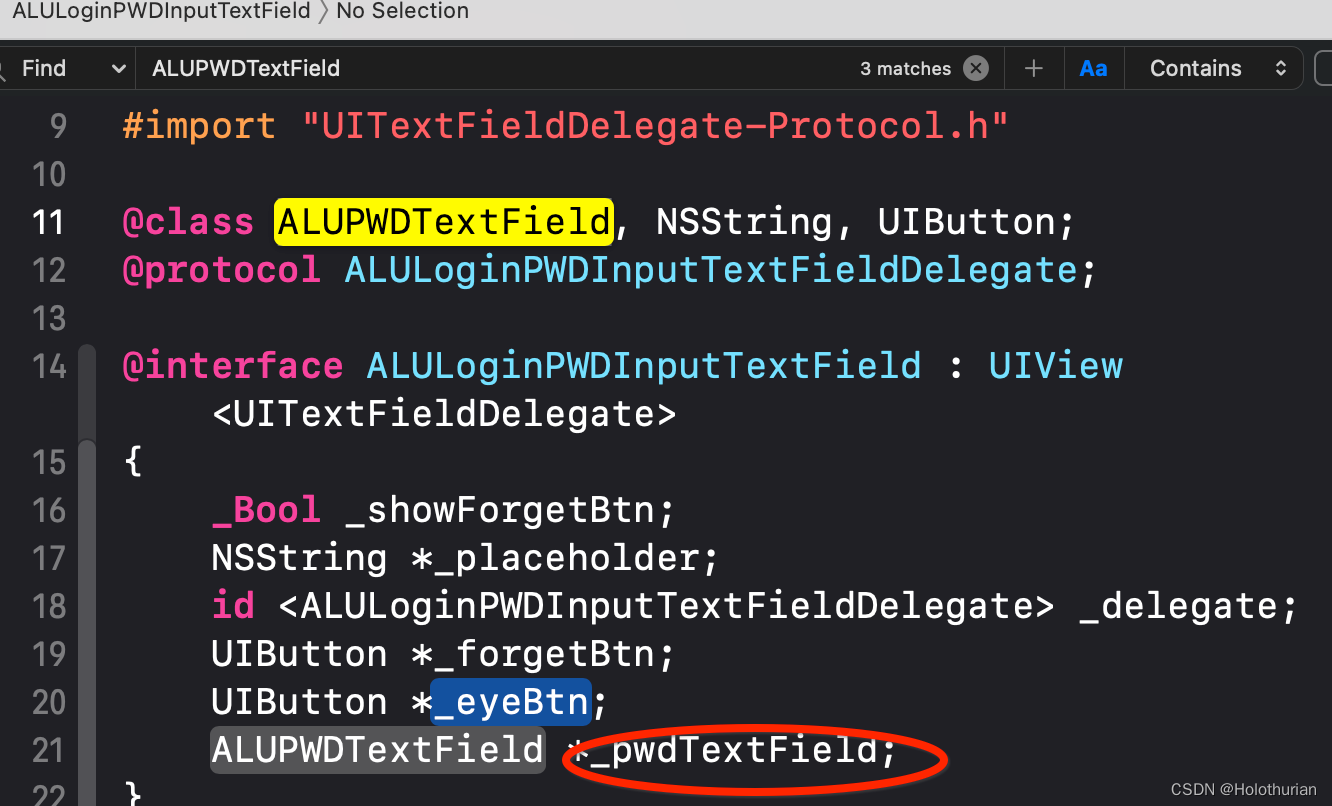
- 继续查看ALUPWDTextField 对象的实现, 继承于 UITextField
@interface ALUPWDTextField : UITextField {_Bool _isSecurityField;
}
- (_Bool)canPerformAction:(SEL)arg1 withSender:(id)arg2;
@property(nonatomic) _Bool isSecurityField; // @synthesize isSecurityField=_isSecurityField;
@end- 对Headers文件夹搜索ALULoginVerifyPasswordViewModel : 其中内容如下, 可以看到我们的响应事件 onLoginMainButtonClicked就在其中
#import "ALULoginBaseViewModel.h"#import "ALULoginPWDInputTextFieldDelegate-Protocol.h"
@class NSString;
@interface ALULoginVerifyPasswordViewModel : ALULoginBaseViewModel <ALULoginPWDInputTextFieldDelegate>
...
- (void)checkStartPWDLogin;
- (id)currentLoginId;
- (id)currentPassword;
- (void)eyeBtnClicked:(id)arg1;
- (void)forgetBtnClicked:(id)arg1;
- (void)onLoginMainButtonClicked:(id)arg1;
- (void)pwdInputTextFieldDidBeginEdit:(id)arg1;
- (void)pwdInputTextFieldDidChanged:(id)arg1;
- (void)pwdInputTextFieldDidEndEdit:(id)arg1;
- (void)pwdInputTextFieldReturnClicked:(id)arg1;
....
@end
综上: 密码文本框的整体存在关系为
- ALULoginVerifyController 的 父类存在着个 _loginView(ALULoginContainerView)对象;
- ALULoginContainerView上添加了_verifyPasswordView (ALULoginVerifyPasswordView) 视图对象
- ALULoginVerifyPasswordView 视图 存在 _pwdTextField(ALULoginPWDInputTextField)对象
- ALULoginPWDInputTextField内存在_pwdTextField(ALUPWDTextField)对象
- ALUPWDTextField继承于UITextField,那么密码内容也就是text(属性)了
那么我们从哪里开刀获取密码呢?
- 就我看来,当点击了”登录“按钮之后,我们有多种方式获取密码
- 1、直接从ALULoginVerifyPasswordView视图出发,通过 _pwdTextField 的代理方法依次获取,然而ALULoginPWDInputTextFieldDelegate的代理方法都在ALULoginVerifyPasswordViewModel中实现了
- _pwdTextField --> _pwdTextField --> _textField --> text
- 2、直接从ALULoginVerifyPasswordViewModel中的 currentPassword 方法,是不是就是密码?
- - (id)currentPassword;
- 1、直接从ALULoginVerifyPasswordView视图出发,通过 _pwdTextField 的代理方法依次获取,然而ALULoginPWDInputTextFieldDelegate的代理方法都在ALULoginVerifyPasswordViewModel中实现了
2.3.3 搭建theos插件
- 使用nic.pl,创建组件
$ nic.pl
NIC 2.0 - New Instance Creator
------------------------------[1.] iphone/activator_event[2.] iphone/activator_listener[3.] iphone/application[4.] iphone/application_swift[5.] iphone/control_center_module-11up[6.] iphone/cydget[7.] iphone/flipswitch_switch[8.] iphone/framework[9.] iphone/library[10.] iphone/notification_center_widget[11.] iphone/notification_center_widget-7up[12.] iphone/preference_bundle[13.] iphone/preference_bundle_swift[14.] iphone/theme[15.] iphone/tool[16.] iphone/tool_swift[17.] iphone/tweak[18.] iphone/tweak_with_simple_preferences[19.] iphone/xpc_service[20.] iphone/xpc_service_modern
Choose a Template (required):-
- 输入17,选择 iphone/tweak插件
- 输入工程名称
Project Name (required): AlipayPwdDemo-
- 输入包名称,类似BundleID,但是此处要求全部小写
Package Name [com.yourcompany.alipaypwddemo]: com.holothurian.alipaypwddemo-
- 输入作者名称,默认计算机名称.如果不修改,直接回车
Author/Maintainer Name [Holothurian]: Holothurian-
- 输入插件将要附件的进程,填写该进程的BundleID.可以在cy环境,通过APPID获取
[iphone/tweak] MobileSubstrate Bundle filter [com.apple.springboard]: com.alipay.iphoneclient-
- 输入附加后杀掉的进程,默认为SpringBoard(桌面进程),杀掉后所有进程都会重启.如果不修改,直接回车
[iphone/tweak] List of applications to terminate upon installation (space-separated, '-' for none) [SpringBoard]: Instantiating iphone/tweak in alipaypwddemo/... Done.-
- 插件创建完成,生成tweak工程
-
- Tweak.x: 代码,使用Logos语法
- control: 配置信息,版本号,作者名称等
- Makefile: 编译时用到的文件,需要配置
- AlipayPwdDemo.plist: 附加应用的包名称
- 修改Tweak.x文件的后缀名
- .x文件支持OC语法,我们需要支持OC,C/C++语法的 .xm文件,故此将Tweak.x修改为Tweak.xm
- 修改Makefile
- 手机安装插件,也是通过SSH连接的,所以在Makefile中,增加USB连接的IP和端口的配置
export THEOS_DEVICE_IP=192.168.124.12
export THEOS_DEVICE_PORT=22-
- 由于Tweak.x文件的后缀名修改,在Makefile中,同步修改AlipayPwdDemo_FILES
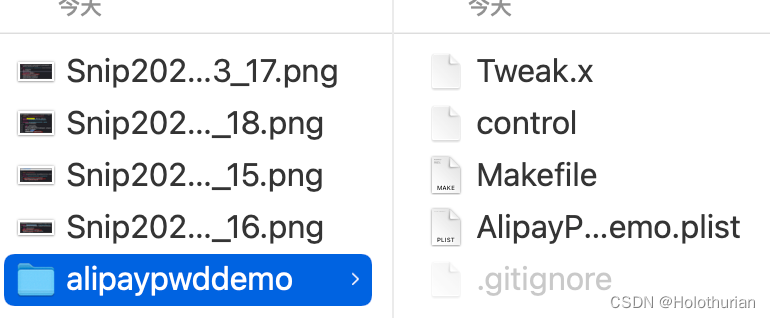
AlipayPwdDemo_FILES = Tweak.xm- 将alipaypwddemo文件夹,使用VCCode打开
- 打开Tweak.m文件,写入以下代码(选择最简便的方式:方法2) .有坑提示~~~
#import <UIKit/UIKit.h>
// 通过ViewModel的响应获取密码
%hook ALULoginVerifyPasswordViewModel- (id)currentLoginId {NSString *loginId = (NSString *)%orig;// 输出当前登录的loginId、因为本身带返回值,所以直接取值NSLog(@"HOOK当前登录的LoginId: %@", loginId);return %orig;
}
- (id)currentPassword{//NSString *pwd = (NSString *)%orig;//输出当前登录用户的密码//NSLog(@"HOOK当前密码----: %@",pwd);return %orig;
}- (void)onLoginMainButtonClicked:(id)arg1 {// 查看当前的登录Id[self currentLoginId];// 直接获取当前密码NSLog(@"HOOK点击后的响应登录密码: %@", (NSString *)[self currentPassword]);
}
%end
2.3.4 安装theos插件
- 工程中,不允许包含中文,否则编译报错
- 从终端进入aliwaypwddemo目录下
$ cd ~/Desktop/alipaypwddemo192 ~/Desktop/alipaypwddemo master $ ls
AlipayPwdDemo.plist Makefile Tweak.xm control-
- 清理工程
make clean
==> Cleaning…-
- 编译工程
make
==> Notice: Build may be slow as Theos isn’t using all available CPU cores on this computer. Consider upgrading GNU Make: https://theos.dev/docs/parallel-building
==> Warning: Building for iOS 11.0, but the current toolchain can’t produce arm64e binaries for iOS earlier than 14.0. More information: https://theos.dev/docs/arm64e-deployment
> Making all for tweak AlipayPwdDemo…
==> Preprocessing Tweak.xm…
==> Compiling Tweak.xm (arm64)…
Tweak.xm:22:3: error: receiver type 'ALULoginVerifyPasswordViewModel' for instance message is a forward declaration[self currentLoginId];^~~~
Tweak.xm:25:8: note: forward declaration of class here
@class ALULoginVerifyPasswordViewModel;^
Tweak.xm:24:64: error: receiver type 'ALULoginVerifyPasswordViewModel' for instance message is a forward declarationNSLog(@"HOOK点击后的响应登录密码: %@", (NSString *)[self currentPassword]);^~~~
Tweak.xm:25:8: note: forward declaration of class here
@class ALULoginVerifyPasswordViewModel;^
2 errors generated.
make[3]: *** [/Users/chenxi/Desktop/alipaypwddemo/.theos/obj/debug/arm64/Tweak.xm.b0ccc732.o] Error 1
rm /Users/chenxi/Desktop/alipaypwddemo/.theos/obj/debug/arm64/Tweak.xm.mm
make[2]: *** [/Users/chenxi/Desktop/alipaypwddemo/.theos/obj/debug/arm64/AlipayPwdDemo.dylib] Error 2
make[1]: *** [internal-library-all_] Error 2
make: *** [AlipayPwdDemo.all.tweak.variables] Error 2-
- 发现一个警告问题, 支持的iOS系统版本7.0、去Makefile修改一下最低支持11.0
TARGET := iphone:clang:latest:11.0-
- 报错问题是因为使用了self、需要前置声明,ALULoginVerifyPasswordViewModel继承于ALULoginBaseViewModel翻看ALULoginBaseViewModel的头文件,发现它的内容
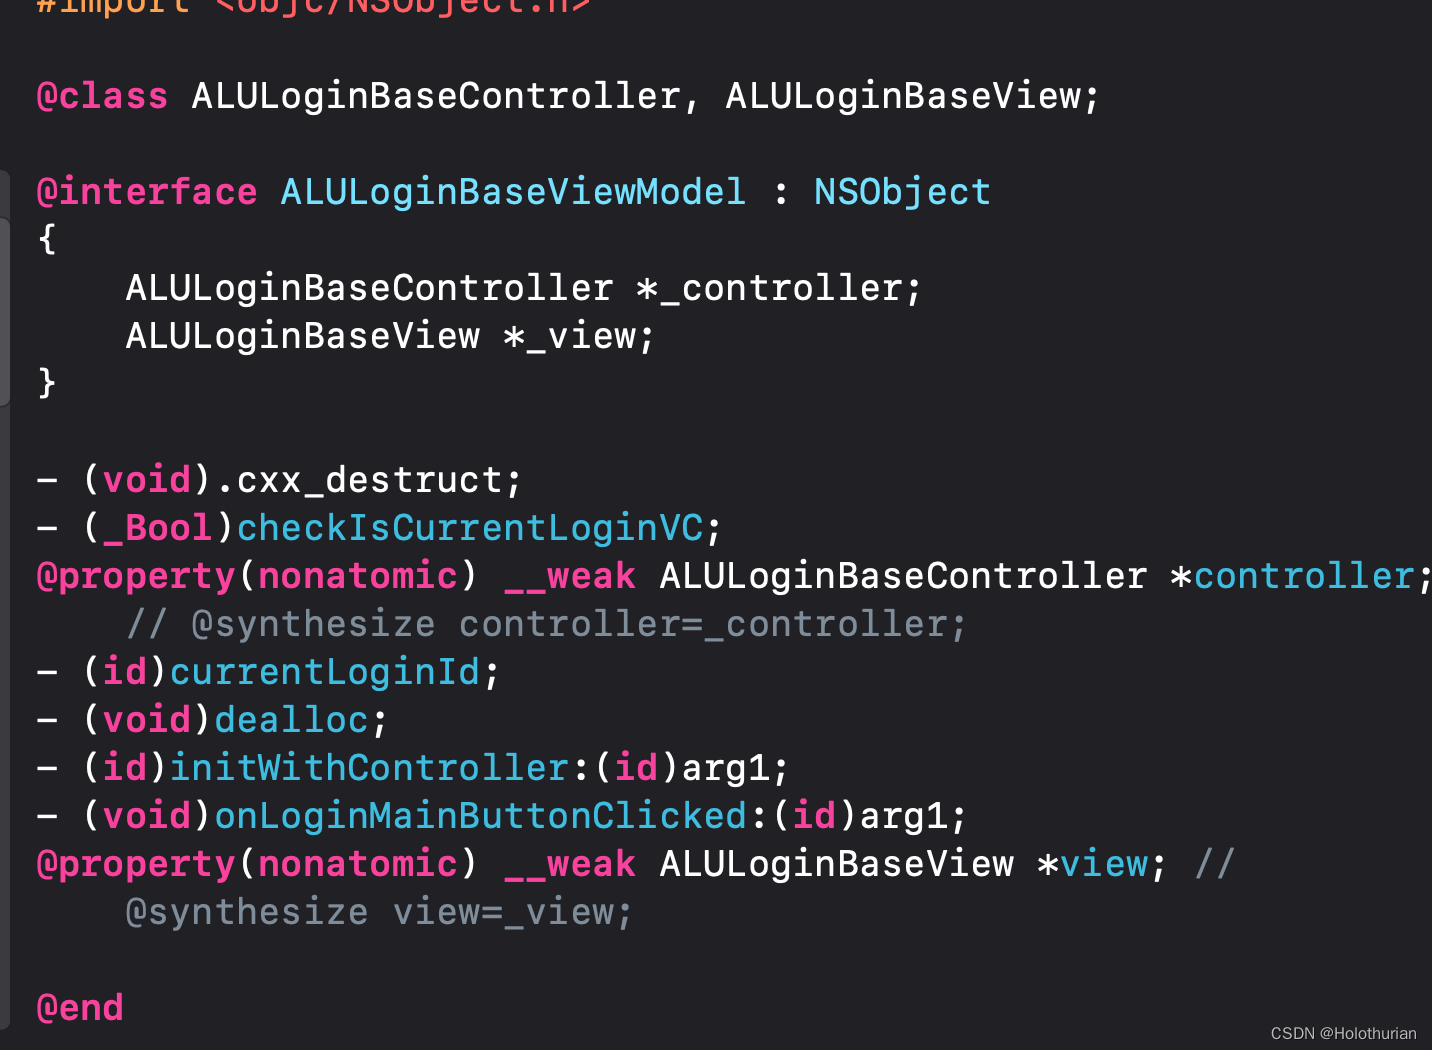
-
- 那么ViewModel与Controller的关系在此体现; 在Tweak文件中 补上类的声明及方法
@interface ALULoginBaseViewModel :NSObject
- (NSString *)currentLoginId;
@end@interface ALULoginVerifyPasswordViewModel :ALULoginBaseViewModel
- (NSString *)currentPassword;
@end-
- 再次执行编译命令
make clean
==> Cleaning…
make
==> Notice: Build may be slow as Theos isn’t using all available CPU cores on this computer. Consider upgrading GNU Make: https://theos.dev/docs/parallel-building
==> Warning: Building for iOS 11.0, but the current toolchain can’t produce arm64e binaries for iOS earlier than 14.0. More information: https://theos.dev/docs/arm64e-deployment
> Making all for tweak AlipayPwdDemo…
==> Preprocessing Tweak.xm…
==> Compiling Tweak.xm (arm64)…
==> Linking tweak AlipayPwdDemo (arm64)…
ld: warning: directory not found for option '-F/opt/theos/vendor/lib/iphone/rootful'
==> Generating debug symbols for AlipayPwdDemo…
==> Preprocessing Tweak.xm…
==> Compiling Tweak.xm (arm64e)…
==> Linking tweak AlipayPwdDemo (arm64e)…
ld: warning: directory not found for option '-F/opt/theos/vendor/lib/iphone/rootful'
==> Generating debug symbols for AlipayPwdDemo…
==> Merging tweak AlipayPwdDemo…
==> Signing AlipayPwdDemo…-
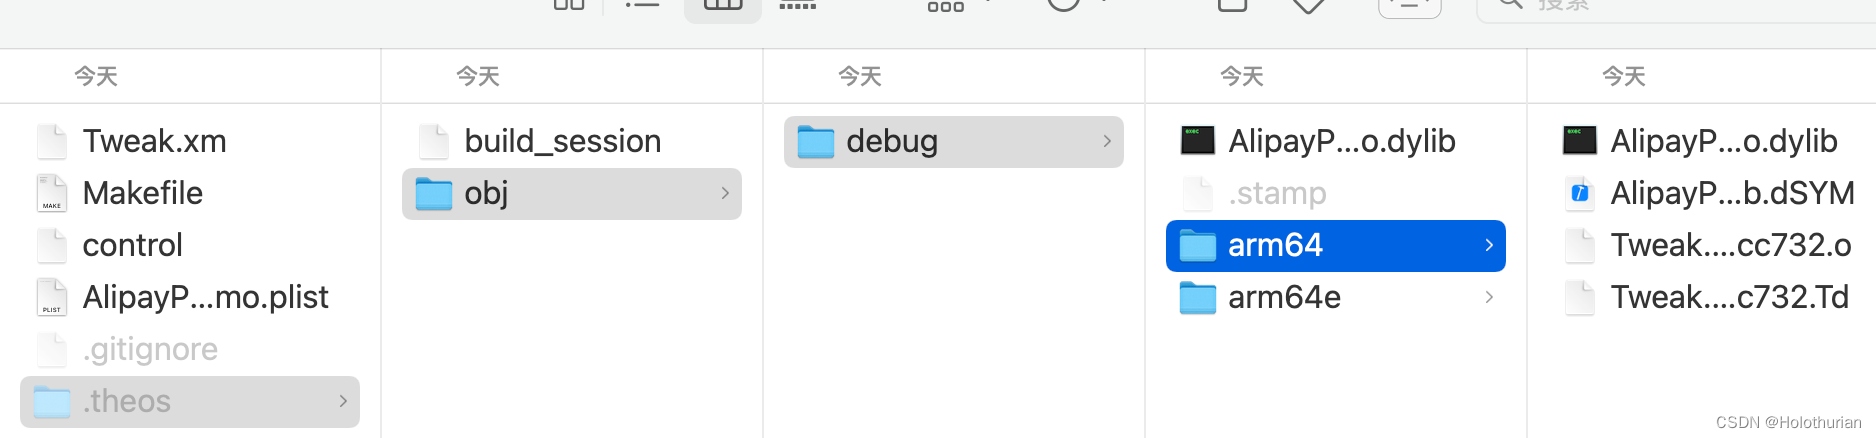
- 编译完成后可以看到动态库的生成
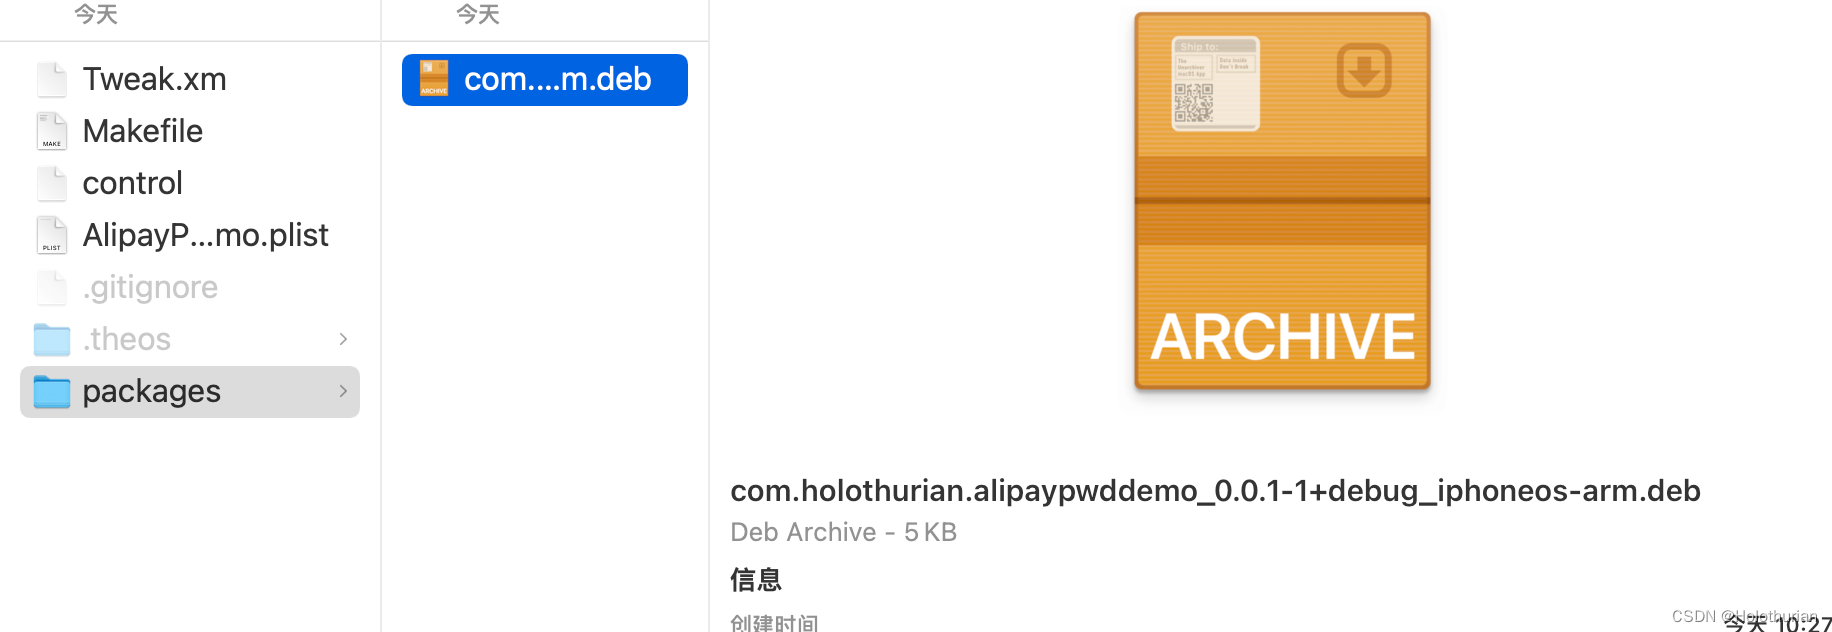
- 打包插件
 make package
==> Notice: Build may be slow as Theos isn’t using all available CPU cores on this computer. Consider upgrading GNU Make: https://theos.dev/docs/parallel-building
==> Warning: Building for iOS 11.0, but the current toolchain can’t produce arm64e binaries for iOS earlier than 14.0. More information: https://theos.dev/docs/arm64e-deployment
> Making all for tweak AlipayPwdDemo…
make[2]: Nothing to be done for `internal-library-compile'.
> Making stage for tweak AlipayPwdDemo…
dm.pl: building package `com.holothurian.alipaypwddemo:iphoneos-arm' in `./packages/com.holothurian.alipaypwddemo_0.0.1-1+debug_iphoneos-arm.deb'-
- 打包完成后的产物
- 安装
 make install
==> Error: /Applications/Xcode.app/Contents/Developer/usr/bin/make install requires that you set THEOS_DEVICE_IP in your environment.
==> Notice: It is also recommended that you have public-key authentication set up for root over SSH, or you will be entering your password a lot.
make: *** [internal-install] Error 1-
- 在~/.bash_profile或~/.zshrc文件中添加 THEOS_DEVICE_IP和THEOS_DEVICE_PORT
export THEOS_DEVICE_IP=192.168.124.12
export THEOS_DEVICE_PORT=22-
- 再次执行安装
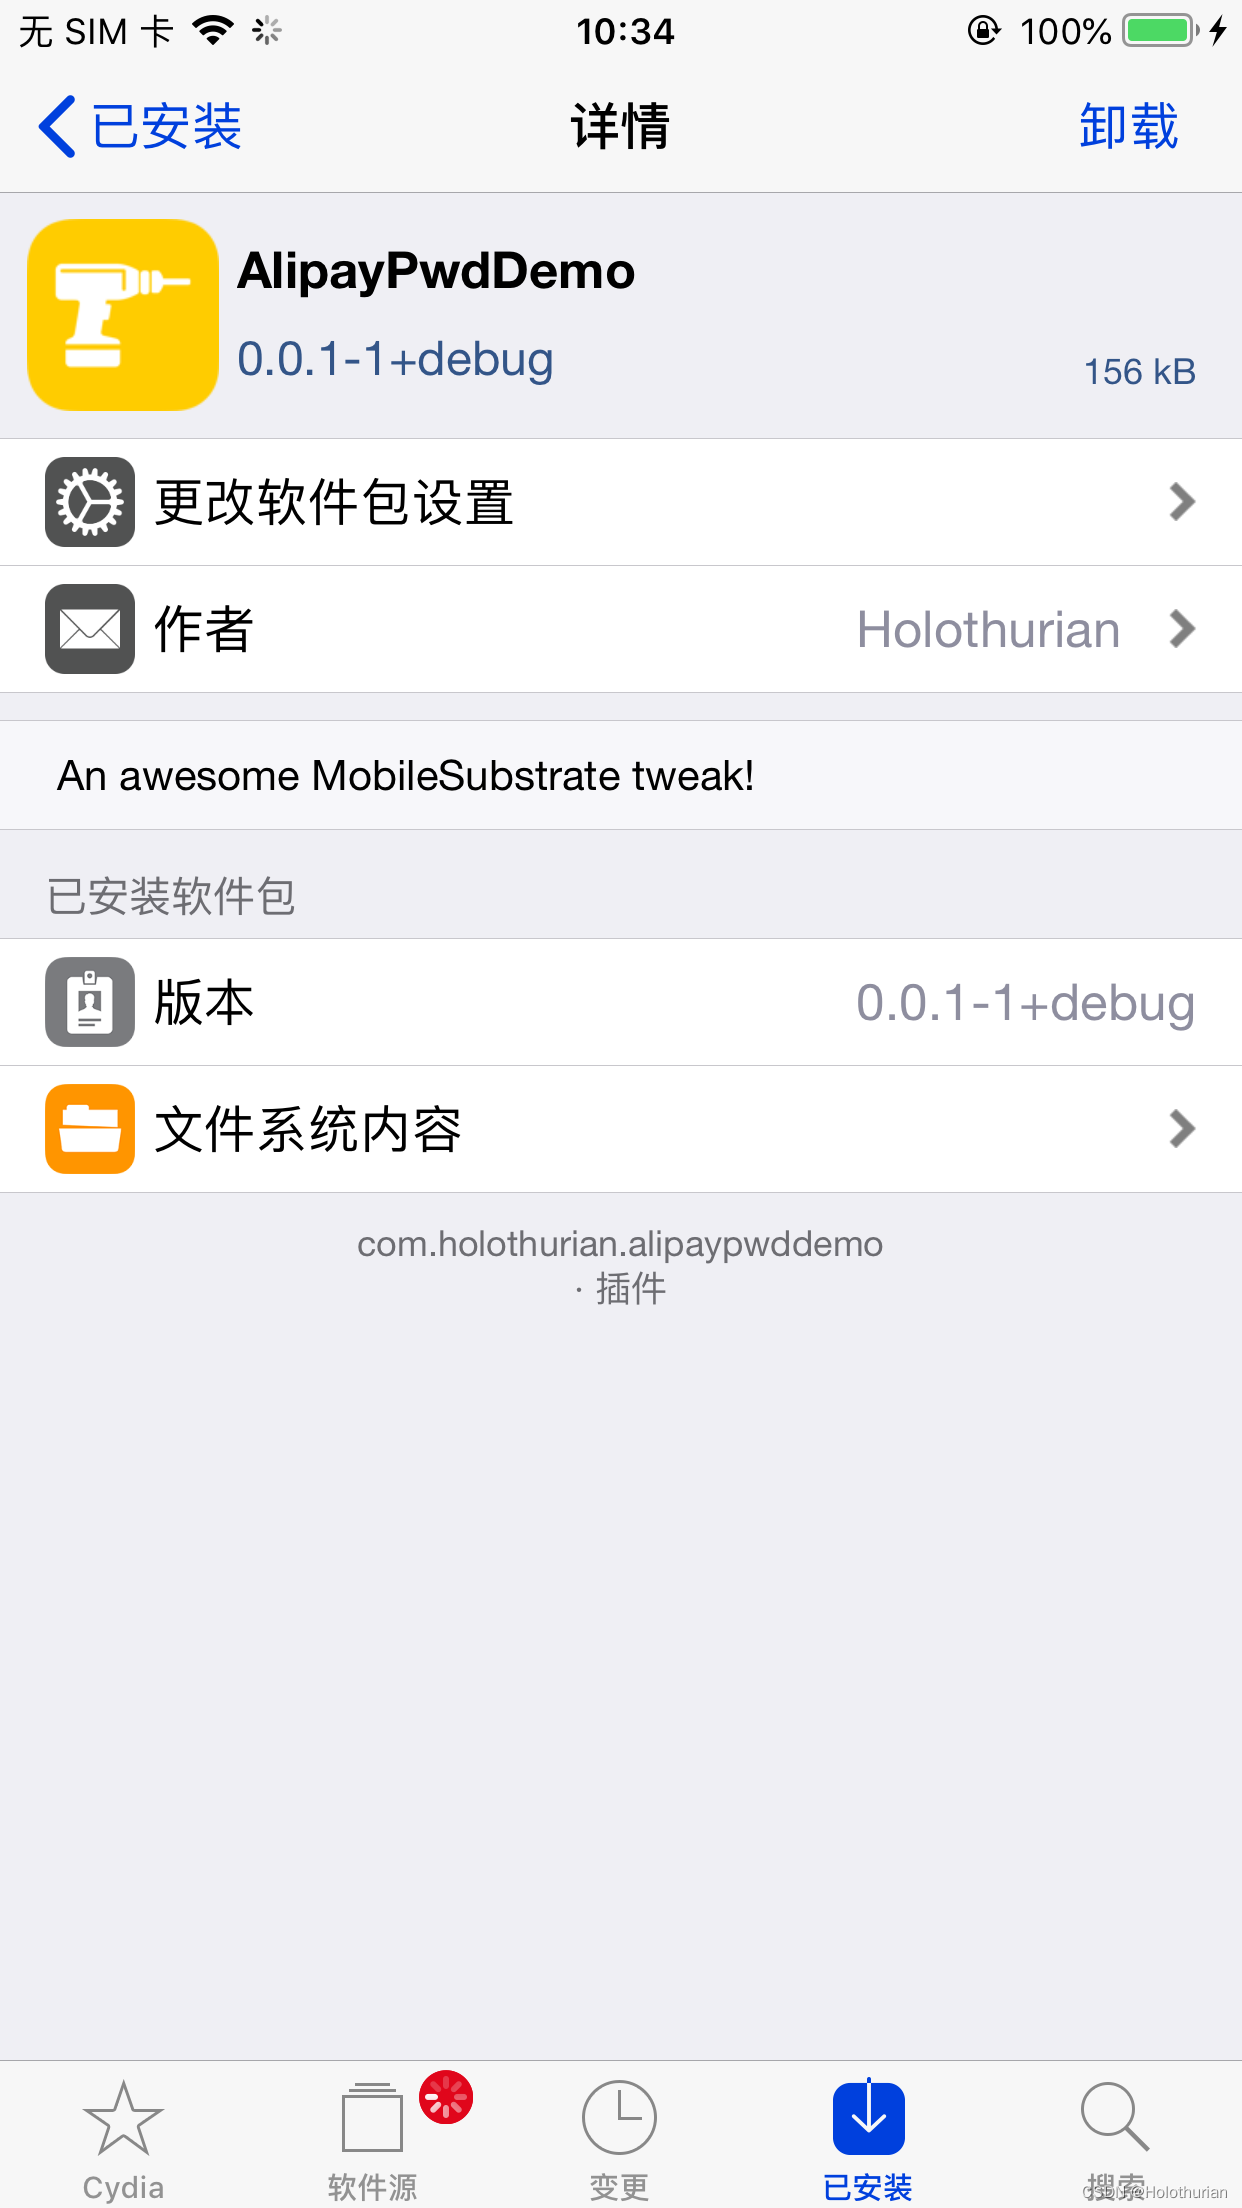
make install
==> Installing…
Selecting previously unselected package com.holothurian.alipaypwddemo.
(Reading database ... 2229 files and directories currently installed.)
Preparing to unpack /tmp/_theos_install.deb ...
Unpacking com.holothurian.alipaypwddemo (0.0.1-1+debug) ...
Setting up com.holothurian.alipaypwddemo (0.0.1-1+debug) ...
==> Unloading SpringBoard…-
- 安装成功后,设备的SpringBoard(桌面进程)重启
- 在Cydia中,可以看到我们的自定义插件
- Mac电脑上,打开Devices and Simulators,选择 Open Console,打开控制台
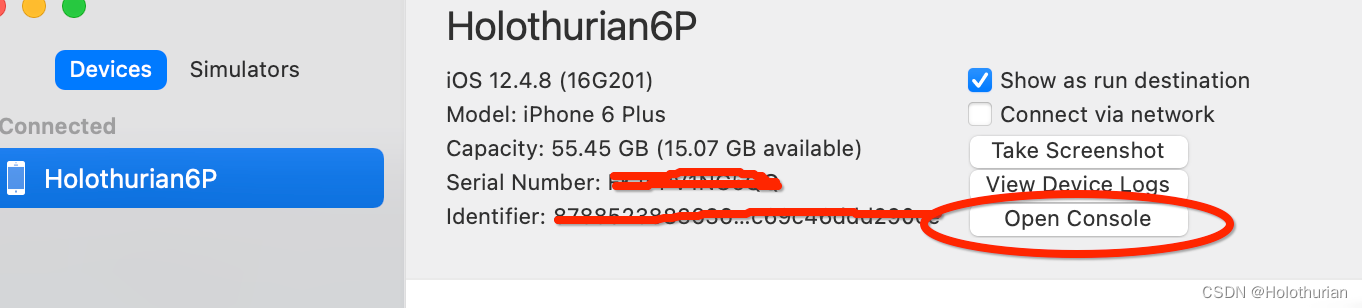
- 手机上,打开AlipayWallet, 进入密码登录页,输入密码后点击登录按钮
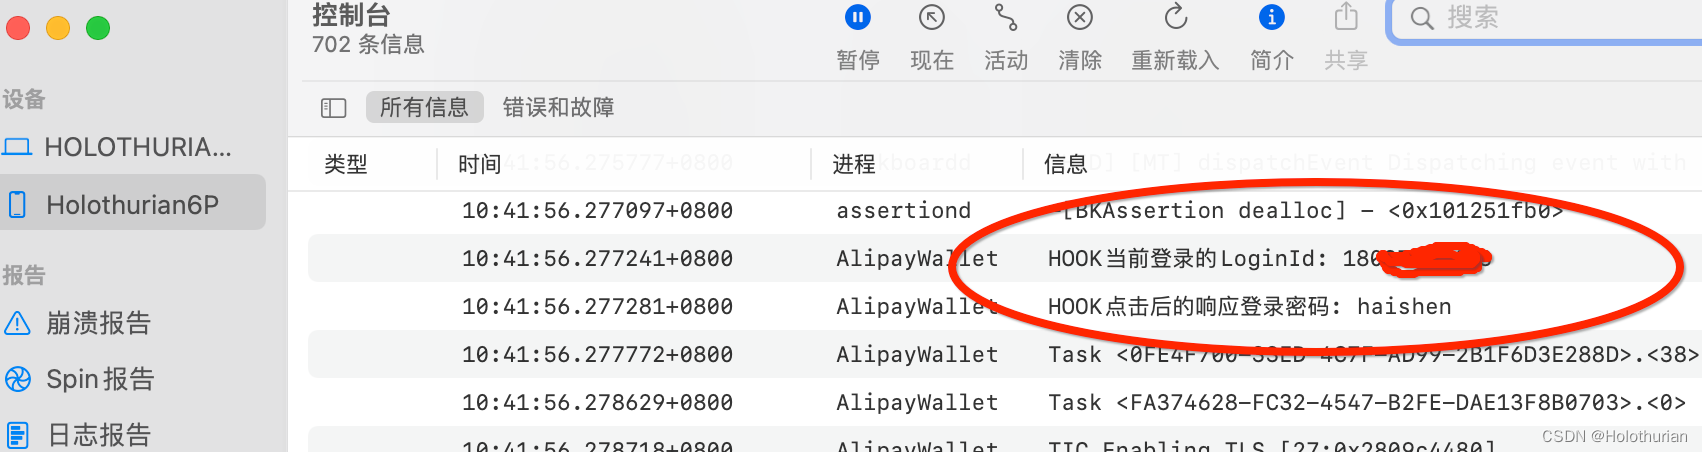
-
- HOOK成功,可以看到原来的账号和密码
- 使用theos插件,在不污染应用的情况下,窃取到AlipayWallet的登录账号和密码
2.4 theos与Xcode
- 如果电脑中有多个Xcode版本,需要指定Xcode路径
- 获取Xcode路径
xcode-select -p /Applications/Xcode.app/Contents/Developer- 指定Xcode路径
xcode-select --switch /Applications/Xcode.app/Contents/Developer三、总结
- Cycript
- 越狱手机安装Cycript插件,依赖于adv-cmds插件
- 依附进程,使用cycript -p 进程id/名称
- 导入cy文件
- 将自定义cy文件,放入 /usr/lib/cycript0.9目录中
- 为了不重名,让入com目录中,创建自己组织的文件夹
- 加载时,使用 @import com.组织名称.文件名称
- theos
- 是一个越狱开发工具包
- 可以创建Tweak项目,动态Hook第三方程序
- 搭建theos插件
- 使用 nic.pl --> 创建iphone/tweak插件, 17
- 输入的包名称,类似BundleID, 要求全部小写
- 需要支持OC、C/C++语法,修改Tweak.x文件后缀,改为.xm
- 文件后缀名的修改,同步修改Makefile文件中的配置
- Makefile文件中,增加USB连接的IP和端口,Mac环境变量中也需要
- 安装theos插件
- 工程目录中,不允许包含中文,否则编译报错
- 清理工程: make clean
- 编译工程: make
- 打包: make package
- 安装: make install
- theos和Xcode
- 多个版本的Xcode,需要指定Xcode路径
- 获取Xcode路径,使用 xcode-select-p
- 指定Xcode路径,使用 xcode-select --switch /Applications/Xcode.app/Contents/Developer